The Colorado Human Resource Staff Interchange is required to be reported to the Colorado Department of Education. The purpose of this is to report to the state of Colorado information on the staff at each school district. For more information on the report from the Colorado Department of Education visit their website at www.cde.state.co.us. The site with the latest layout and definitions can be found on this page: Data Pipeline Interchanges - Staff | CDE (state.co.us)
•Staff Assignment File Layout 2023-2024staffassignmentfilelayout (state.co.us)
•Staff Profile File Layout 2023-2024staffprofilefilelayout (state.co.us)
•Staff Evaluation File 2022-2023staffevaluationfilelayoutanddefinitions (state.co.us) (updated 03/31/2023)
Select video link below for step by step explanation of this report:
https://recordings.join.me/Si9Js91paU-Ez5MSi4c_PQ
In the WFO system, there are a few options to use when entering in the data for this report.
Option 1: Add, Change Employee Information
1. Select either Human Resources or Payroll Processing
2. Select Add, Change Employee Information
3. Select the following options to view on this screen. By selecting these options, you will see all the fields for this report. The necessary fields have been highlighted for you.
a. General Information
b. Payroll Control
c. Other
d. Position
e. Degree

Option 2: Employee Horizontal Data Changes
1. Select Human Resources or Payroll Processing.
2. Select Employee Horizontal Data Changes or Employee, Contracts, Deduction/Benefits.
3. Select one of the four views listed below to enter in the needed information.
a. SR Colorado HR Employee Degree
b. SR Colorado HR Employee Master
c. SR Colorado HR Employee Position
d. SR Colorado HR Employee SR 1
The staff profile file layout from CDE is as follows:
1. The first column is the name that CDE has assigned the field.
2. The second column is the field length in the file.
3. The third column is the table and field name where the data comes from within WFO.
4. The fourth column tells you which box, at the top, to check, if you work in the “Add, Change Employee Information” menu selection that is location under either “Human Resources” or “Payroll Processing.”
CDE Link: 2023-2024staffprofilefilelayout (state.co.us)
|
CDE Field Name (* means required) |
length |
SDS Table: Field |
Data Elements |
Area in Add Change area |
|
Admin Unit/SOP Code |
5 |
Screen match |
Admin/Boces Code |
|
|
LEA Code/BOCES Code* |
4 |
Screen match |
District/Boces Number |
|
|
Social Security Number* |
9 |
Emp Master: Soc_Sec_Numb |
SSN - Must Match EDIS |
|
|
EDID* |
8 |
Emp Master: Pension Number |
Must match in EDIS |
Payroll Control |
|
Staff's First Name* |
30 |
Emp Master: Employee Name |
First Name must match in EDIS-Must Match |
General Information |
|
Staff's Last Name* |
30 |
Emp Master: Employee Name |
Last Name must match in EDIS- Must Match |
General Information |
|
Staff's Gender* |
2 |
Emp Master: Sex |
01-Female, 02-Male, 03-NonBinary |
General Information |
|
Staff's Date of Birth |
8 |
Emp Master: Birth date |
MMDDYYYY Format DOB must match in EDIS- Must Match in EDIS |
General Information |
|
Staff's Ethnicity: Hispanic or Latino* |
1 |
Emp Master: Ethnic Code |
|
General Information |
|
Staff's Race: Amer Indian or AK Native* |
1 |
Emp Master: Ethnic Code |
|
General Information |
|
Staff's Race: Asian* |
1 |
Emp Master: Ethnic Code |
|
General Information |
|
Staff's Race: Black/African Amer* |
1 |
Emp Master: Ethnic Code |
|
General Information |
|
Staff's Race: White* |
1 |
Emp Master: Ethnic Code |
|
General Information |
|
Staff's Race: Native HI or Other PI* |
1 |
Emp Master: Ethnic Code |
|
General Information |
|
Staff's District of Residence* |
4 |
Emp Master: Misc Code 1 |
Can be zero-filled for contracted staff |
Other |
|
Beginning Date at School LEA* |
8 |
Emp Master: Hire Date |
MMDDYYYY Format |
Payroll Control |
|
Years Prior Pre/K-12 Teach Exper |
2 |
Emp Master: Years in State |
Req. for Job class Codes between 201-206 |
Other |
|
Years Prior Pre/K-12 Ed. Experience |
2 |
Emp Master: Years Education in State |
Required for Job class Codes between 100-299 |
Other |
|
Years Principal at Any School* |
2 |
Emp Master: Misc Code 2 |
Required for Principals and Supt Serving as Principal |
Other |
|
Highest Level of Ed. Completed* |
2 |
Emp Master: Highest Degree Level C015 |
Can be zero-filled for contracted staff |
Other |
|
Institution Code of Degree* |
4 |
Employee Degre: College Code |
Can be zero-filled for contracted staff |
Degree |
|
State Code of Degree* |
2 |
Employee Degree: College State |
Can be zero-filled for contracted staff |
Degree |
|
Subject Area of Degree 1* |
4 |
Employee Degree: Degree Subject Area 1 |
Can be zero-filled for contracted staff |
Degree |
|
Subject Area of Degree 2* |
4 |
Employee Degree: Degree Subject Area 2 |
Can be zero-filled for contracted staff |
Degree |
|
Subject Area of Degree 3* |
4 |
Employee Degree: Degree Subject Area 3 |
Can be zero-filled for contracted staff |
Degree |
The staff Assignment file layout from CDE is as follows:
1. The first column is the name that CDE has assigned the field.
2. The second column is the field length in the file.
3. The third column is the table and field name where the data comes from within WFO.
4. The fourth column indicates which box to check at the top of the “Add, Change Employee Information” menu selection that is location under either “Human Resources” or “Payroll Processing.”
CDE Link: 2023-2024staffassignmentfilelayout (state.co.us)
|
CDE Field Name |
length |
SDS Table: Field |
Data Elements |
Area in Add Change area |
|
Administrative Unit/SOP Code* |
5 |
Screen Match |
Admin/BOCES Code |
|
|
SchoolDistict(LEA)/BOCES Code* |
4 |
Screen Match |
District/Boces Number |
|
|
Special Education Assignment Flag* |
1 |
Emp Position: User_YN25 |
Y or N |
Position |
|
EDID |
8 |
Emp Master:Pension Number |
|
General |
|
Staff's First Name* |
30 |
Emp Master: Employee Name |
|
General |
|
Staff's Last Name* |
30 |
Emp Master: Employee Name |
|
General |
|
Staff's Gender* |
2 |
Emp Master: Sex |
01-Female, 02-Male, 03-NonBinary |
General |
|
Staff’s Date of Birth |
8 |
Emp Master: Birthdate |
|
General |
|
School Code* |
4 |
Emp Master: School Location |
|
General |
|
SPED Staff Program Code* |
4 |
Emp Position: Misc_3 |
|
Position |
|
Job Classification Code* |
3 |
Emp Position: Job Classification |
|
Position |
|
Start Date of Assignment* |
8 |
Emp Position: Start Date |
|
Position |
|
End Date of Assignment |
8 |
Emp Position: End Date |
|
Position |
|
Employment Status Code* |
2 |
Emp Position: Employment Status |
|
Position |
|
Number of Contract Days* |
3 |
Emp Position: Number of Contract Days |
|
Position |
|
Hours Worked per Day* |
4 |
Emp Position: Hours Per Day |
|
Position |
|
Hourly Rate of Pay* |
5 |
Emp Position: Hourly Rate |
|
Position |
|
Base Salary or Wage* |
6 |
Emp Position: Base Wages |
|
Position |
|
Teaching Subject Area* |
4 |
Emp Position: Job Code |
|
Position |
|
Administrator/Instructional Area* |
4 |
Emp Position: Service ID |
|
Position |
|
Grant/Project Funding Source* |
4 |
Emp Position: Grant Reporting Code |
|
Position |
|
Years Principal at this school* |
2 |
Emp Position: Misc_2 |
|
Position |
|
Grade Level - Infant* |
1 |
Emp Position: User YN_16 |
Y or N |
Position |
|
Grade Level - PreK* |
1 |
Emp Position: User YN_13 |
Y or N |
Position |
|
Grade Level - K* |
1 |
Emp Position: User YN_14 |
Y or N |
Position |
|
Grade Level – 1st* |
1 |
Emp Position: User YN_1 |
Y or N |
Position |
|
Grade Level – 2nd* |
1 |
Emp Position: User YN_2 |
Y or N |
Position |
|
Grade Level – 3rd* |
1 |
Emp Position: User YN_3 |
Y or N |
Position |
|
Grade Level – 4th* |
1 |
Emp Position: User YN_4 |
Y or N |
Position |
|
Grade Level – 5th* |
1 |
Emp Position: User YN_5 |
Y or N |
Position |
|
Grade Level – 6th* |
1 |
Emp Position: User YN_6 |
Y or N |
Position |
|
Grade Level – 7th* |
1 |
Emp Position: User YN_7 |
Y or N |
Position |
|
Grade Level – 8th* |
1 |
Emp Position: User YN_8 |
Y or N |
Position |
|
Grade Level – 9th* |
1 |
Emp Position: User YN_9 |
Y or N |
Position |
|
Grade Level – 10th* |
1 |
Emp Position: User YN_10 |
Y or N |
Position |
|
Grade Level – 11th* |
1 |
Emp Position: User YN_11 |
Y or N |
Position |
|
Grade Level – 12th* |
1 |
Emp Position: User YN_12 |
Y or N |
Position |
|
Number of Classes Taught in Subject * |
2 |
Emp Position: Assignment Code |
|
Position |
|
Demonstrates In-Field Status * |
2 |
Emp Position: Demonstrates n-Field Status |
|
Position |
How to get started:
STEP 1 – Select Payroll Processing or Human Resources
1. Select Payroll Processing or Human Resources
2. Then select the view you would like to use as you enter data. Please review Option 1 and Option 2 above.
3. The field that is used to activate the employee to show on the report for all District employees is the field “CDE District Employee”. It is in the “Other” selection if you are using “Option 1”. If you are using “Option 2” this field is found in the “SR Colorado HR Employee Master”. The field name is “User YN 1”.
4. The field that is used to activate the employees to only show on the Special Education report is the field “CDE Special ED Employees”. The field is in the “Other” selection if you are using “Option 1”. If you are using “Option 2” this field is found in the “SR Colorado HR Employee Master”. The field name is “User YN 7”.
STEP 2 – Enter Information Needed
Enter any information that is needed for this report.
STEP 3 - Changing the Name on the Column Heading (Only needed if you are using Option 2)
Since the names of the fields are different between CDE and the SDS WFO program you do have the ability to change the names in WFO to match what they are labeled by CDE. To change the column heading follow the information below for an example of how to change the name of the field.
1. Select Administrative Utilities.
2. Select Master Code Field Definition.
3. Select a table: Select the drop down and pick the Employee Master table.
4. Field to be coded: Select the field Misc_Code 1. In the Heading Text: Enter in the name you would like to change the field to.
Example: CDE calls this field School District Code of Residence. Then click the save button.
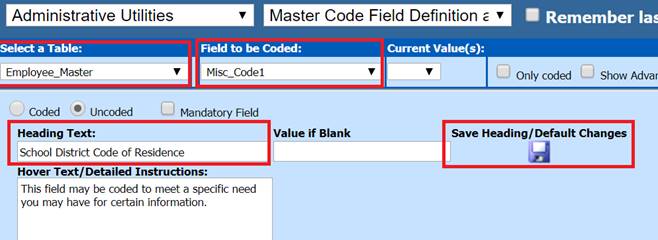
Continue this process with the remaining fields that you would like to change the field headings on in the Employee Master table. Once you have the field names changed in the Employee Master table do the same thing to the fields in the Employee Position table and the Employee Degree table. You will not need to change the field headings in the Employee SR 1 table as these have already been changed to match the field name given by CDE.
To see that the field names have changed go to the views that were created for the Staff Profile and the Staff Assignment. You will see that the column headings have changed.

STEP 4: Setting up Drop Downs for Easier Processing
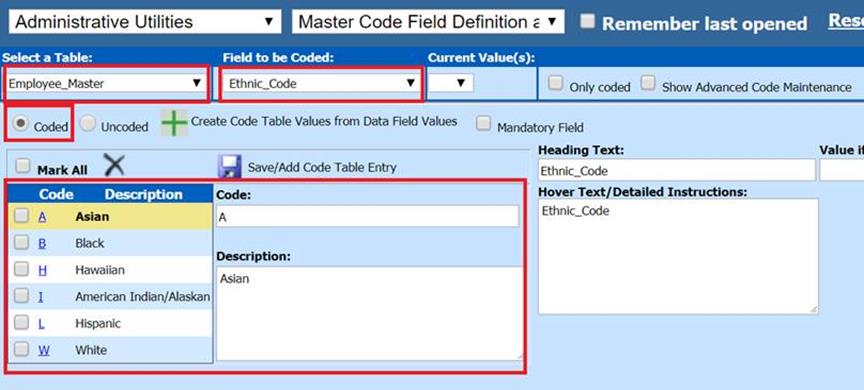
1. Select Administrative Utilities.
2. Select Master Code Field Definition.
3. Select a table: Select the drop down and pick the Employee Master Table.
4. Field to be coded: Select the field Ethnic Code. Select the “Coded” bullet. Per the instructions from the data pipeline this field needs to be an A, B, H, I, L or W. Please review the documentation from the data pipeline for the definitions of these letters.
5. In the Code area enter an “A”. Then in the description enter “Asian” for the description used for this item from the data pipeline definitions. Select the Save/Add Code Table Entry button. Then continue entering the rest of the items needed for the drop down on this field.
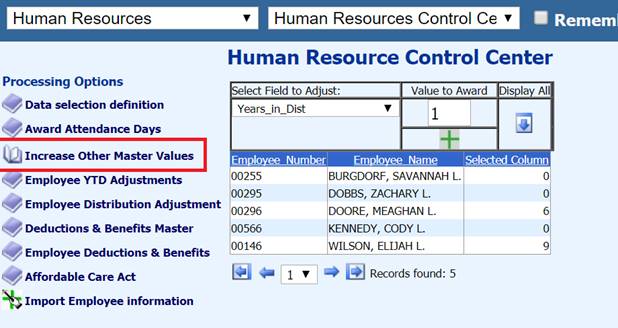
How to Increase Other Master Values for Every Employee
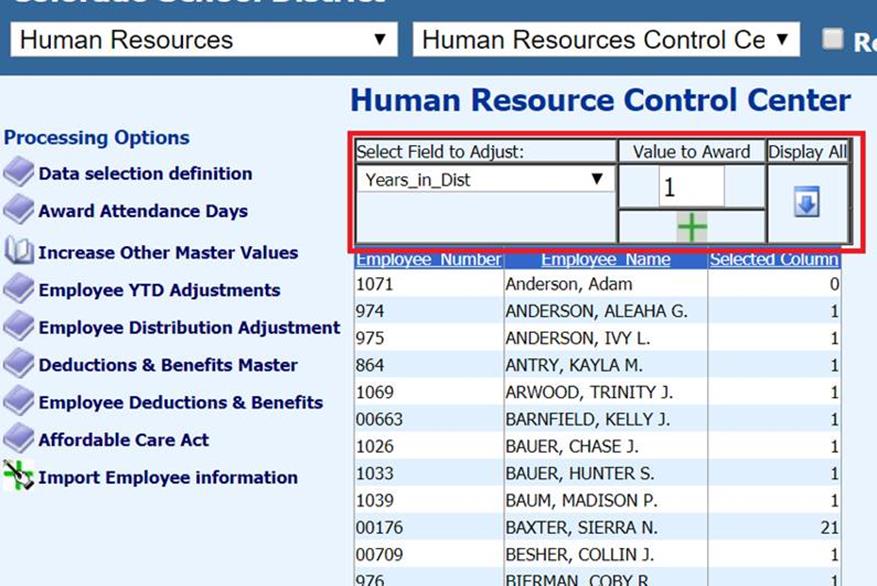
1. Select Human Resources
2. Select Human Resources Control Center.
3. Select “Increase Other Master Values “
4. In the view “Select Field to Adjust” select the field that needs to be changed for each employee such as “Years in District.”
5. To see all the employees in the database select the “Display All” option.
6. In the field “Value to Award” enter in the amount that each employee needs to be increased or decreased by. Then select the green plus button. This will add or subtract the number that was entered in the “Value to Award” area.
How to Increase Other Master Values for a Select Group of Employees
1. Select Human Resources.
2. Select Human Resource Control Center.
3. Select Data Selection definition.
4. The Employee Master table will display and the fields in that table will show below. Select a field that you can use to select a group of employees. Example: Select the field “Job Code.” In this example, the numbers 101, 103, and 105 represents all teachers. Select these numbers and then click on the arrow button to move them to the selection formulas. Next Save the Formula.
5. This area can be closed by selecting the “Data selection definition.” After closing this part of the screen select “Increase Other Master Values.” The formula that was just created in the “Data Selection definitions” area is the formula that will be used in the “Increase Other Master Values” area.

6. The employees that are listed in the Increase Other Master Values are the only employees with a “101, 103, or 105” in the Job code field in the Employee Master table.
7. Then in the “Select Field to Adjust” select the field that needs to be changed. Put in the value needed in the “Value to Award” area and select the green plus button. The values will change for every employee in the group.
Steps for Processing the Colorado Human Resource Staff Interchange
1. Select Payroll Processing.
2. Select State/Federal Reporting.
3. Select Colorado.
4. Select the Human Resource Pipeline Staff File or Human Resource Pipeline Staff Assignment File
Colorado Human Resource Data Exchange Report
1. There are two sections to the report.
•Staff Profile records
•Staff Assignment records
2. Select the Human Resource Pipeline Staff File
3. Select Report Date
Dates and Periods:
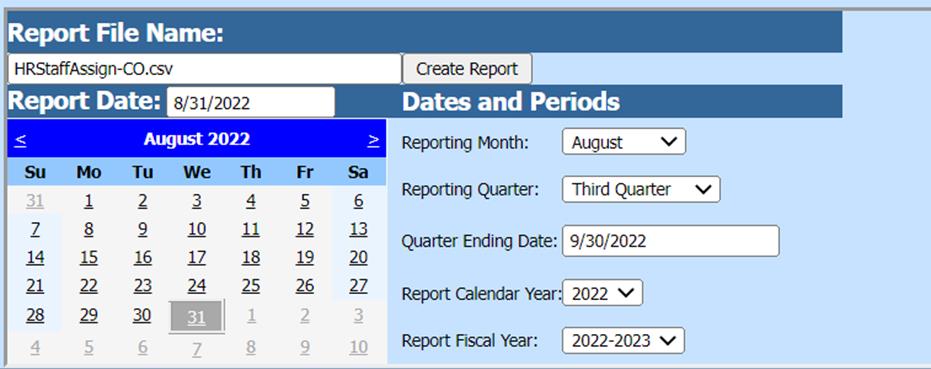
•Reporting Month
•Reporting Quarter
•Quarter Ending Date
•Report Calendar Year
•Report Fiscal Year
District Address, Contact, Account #’s and other coding information:
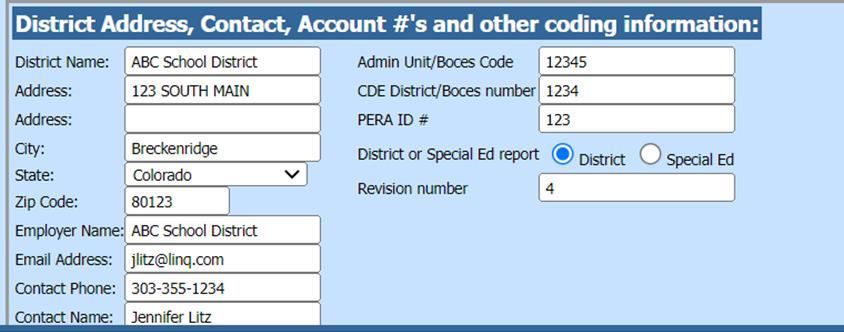
•Admin Unit/Boces Code enter Admin Unit/SOP Code
•CDE District/BOCES number enter School District/Boces Number
•PERA ID # enter PERA ID number
•District or Special Ed report
i. If the file to be processed for all employees excluding the Special Education employees select the bullet “District” under the “District or Special Ed report” area.
ii. If the file to be processed is for Special Education employees then select the bullet “Special Ed” under the “District or Special Ed report” area. If the “Special Ed” option is selected it will process only the employees that have a “Y” in the Employee Master Field “User YN 7”.
•Revision number enter revision number
•Select Save Setup

4. Select Create Report

5. There will be one folder with the name of the file on it. This file is an xlsx file. You need to save this file to your desktop or to another folder on your computer. Right click on the folder and select save target as. This file is the one you will submit through the data pipeline process.
•You can name the file for example to ABCschoolstaff01.xlsx. The extension of this file must be an .xlsx file.
•Save the file to your computer. You now have the Staff Profile file that can be uploaded to the CDE Human Resource Data Pipeline.

6. Next select the Human Resource Pipeline Staff Assignment File.
7. Select Report Date
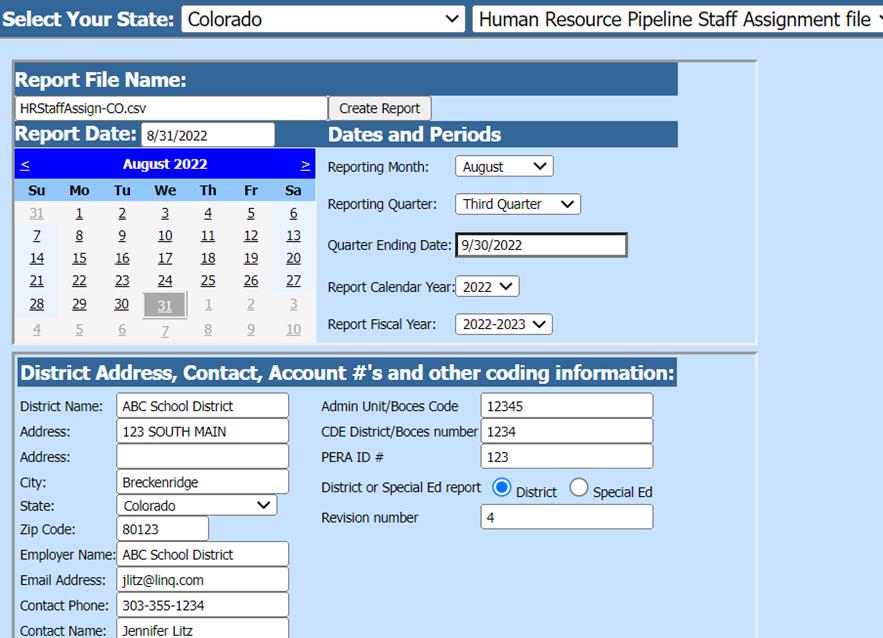
Dates and Periods:
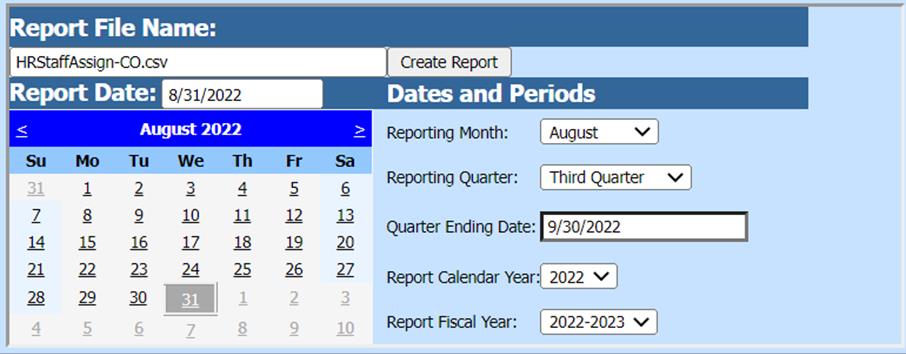
•Reporting Month
•Reporting Quarter
•Quarter Ending Date
•Report Calendar Year
•Report Fiscal Year
District Address, Contact, Account #’s and other coding information:
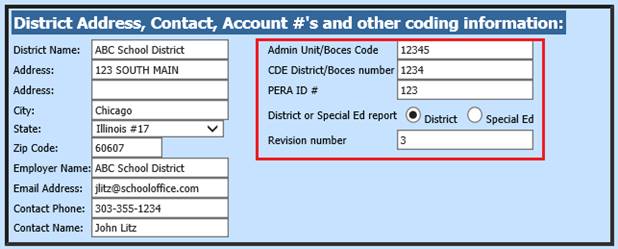
•Admin Unit/Boces Code enter Admin Unit/SOP Code
•CDE District/BOCES number enter School District/Boces Number
•PERA ID # enter PERA ID number
•District or Special Ed report
i. If the file to be processed for all employees excluding the Special Education employees select the bullet “District” under the “District or Special Ed report” area.
ii. If the file to be processed is for Special Education employees then select the bullet “Special Ed” under the “District or Special Ed report” area. If the “Special Ed” option is selected it will process only the employees that have a “Y” in the Employee Master Field “User YN 7”.
•Revision number enter revision number
8. Select Save Setup

9. Select Create Report

10. You now have one folder with the name of the file on it. This file is an xlsx file. You need to save this file to your desktop or to another folder on your computer. Right click on the folder and select save target as. This file is the one you will submit through the data pipeline process.

•You can name the file for example to ABCschoolstaffassignment01.xlsx. The extension of this file must be an .xlsx file.
•Save the file to your computer. You now have the Staff Assignment file that can be uploaded to the CDE Human Resource Data Pipeline.
11. Check the Staff Profile and the Staff Assignment file for accuracy. After creating the files for the Staff Profile and the Staff Assignment you can view them in the xlsx format for this purpose.
12. Correct any information in the views for the Staff Profile and Staff Assignment files and then create the file again. Upload the new files to the CDE Human Resource Data Pipeline.
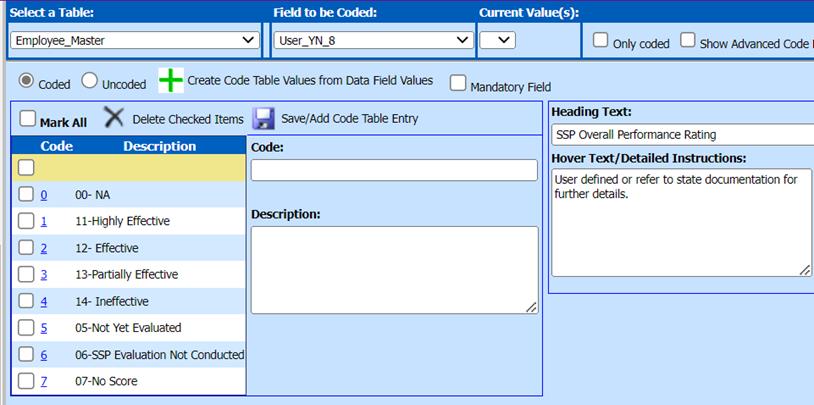
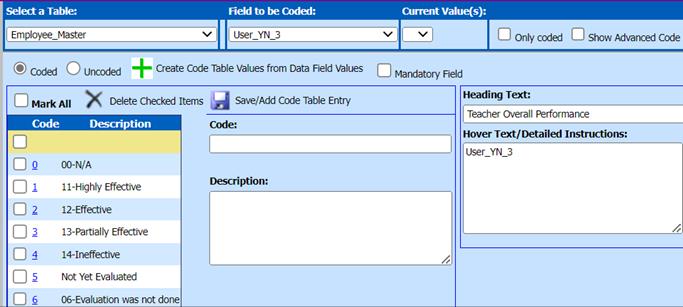
Setting up the Teacher Overall Performance Evaluation Rating Coded field:
1. Administration Utilities to Master Code Field Definition
2. Choose the Employee master table.
3. Next, choose User_YN_3.
4. Enter “Teacher Overall Performance in “Heading Text”.
5. With the dot in “Coded” add in the code and description.
6. Save.
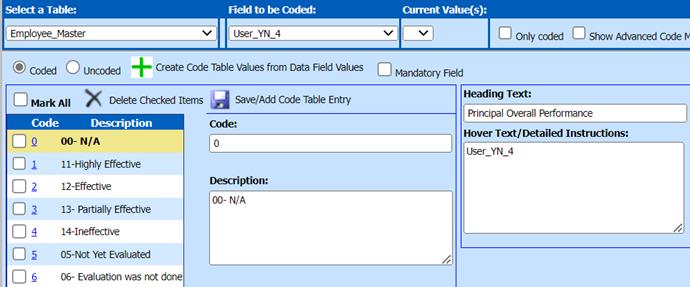
Setting up the Principal Overall Performance Evaluation Rating Coded field:
1. Administration Utilities to Master Code Field Definition
2. Choose the Employee master table.
3. Enter “Principal Overall Performance in “Heading Text”.
4. Next, choose User_YN_4.
5. With the dot in “Coded” add in the code and description.
6. Save.
Setting up the SSP Overall Performance Evaluation Rating Coded field:
1. Administration Utilities to Master Code Field Definition
2. Choose the Employee master table.
3. Enter “Principal Overall Performance in “Heading Text”.
4. Next, choose User_YN_4.
5. With the dot in “Coded” add in the code and description.
6. Save
