Revised: 4/2021
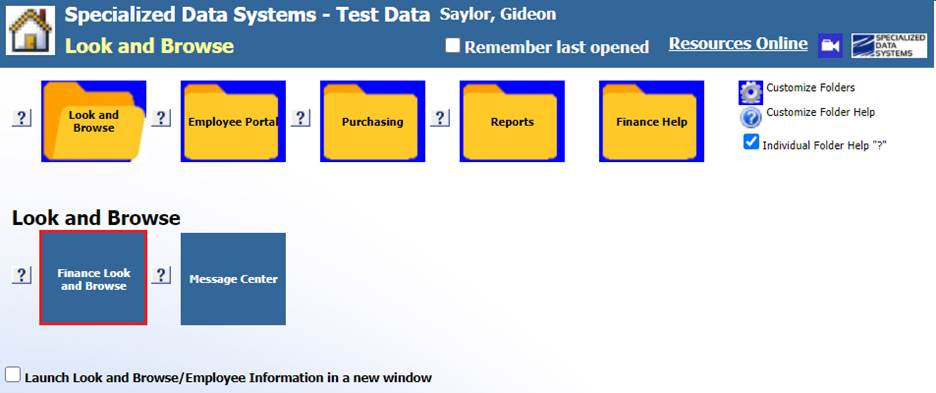
The Employee Portal allows you (the employee) to access your personal records, change your basic information, request leave time, approve e-time sheets, request a reimbursement, project pay, view direct deposit vouchers, view W2’s, respond to questions from the business office and human resource department, such as contract amounts and much more.
Login and Navigate the SDS System
Your administrator may have provided you with a letter or instructions on where to access the system and your personal User ID and Password.
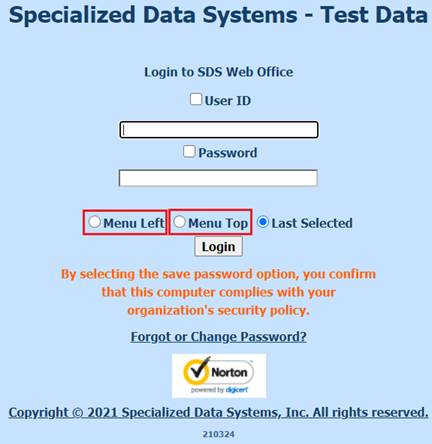
Login
To log into the Employee Portal follow the instructions below.
1. Locate the Employee Portal URL (link) that your administrator/tech has provided you
2. Open your browser (i.e. Internet Explorer) and type in the URL into your browser’s address bar (i.e.http://sslxx.schooloffice.com/districtname/sdsweboffice/login.aspx)
3. Enter your User ID and Password
4. Select Menu view selection
o Menu Left
o Menu Top
5. Select Login
Navigate the System
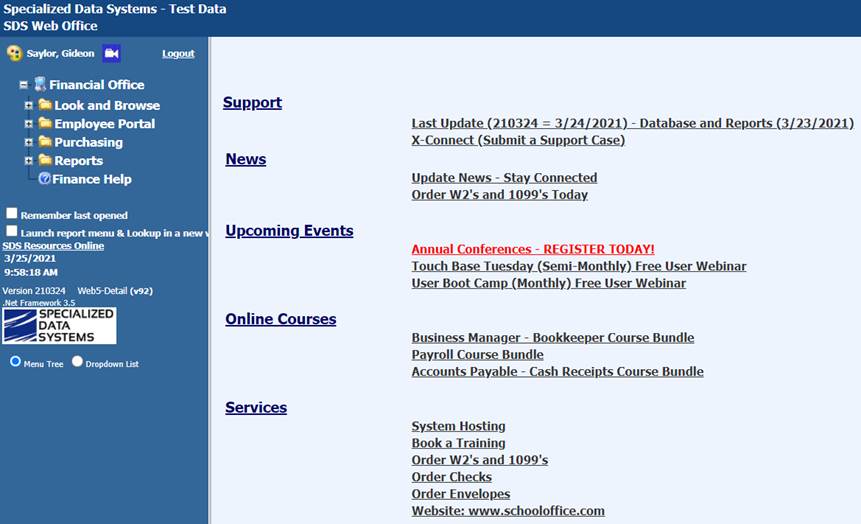
Depending on the selection you choose when you log into the system you will be able to view the menu tree on the left side of your login screen or the top of the screen. (Review the screen shot above).
Menu Options
1. By selecting the Menu Left the menu tree will show on the left side of the screen.
2. By selecting the Menu Top the menu will show at the top of the screen. The Far Left Dropdown box will display the Menu Heading being selected.
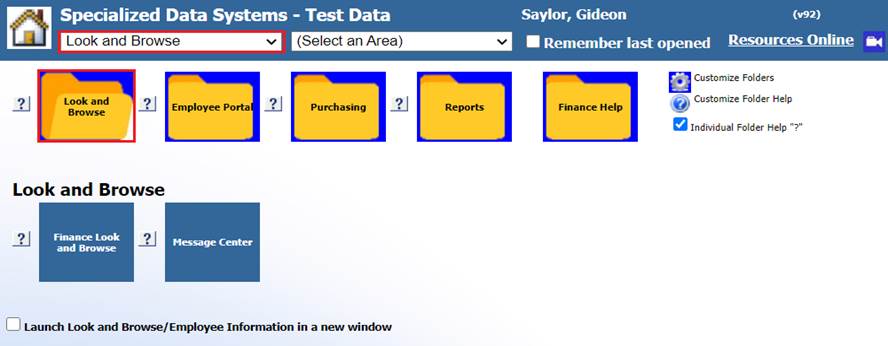
a. The dropdown box just to the right of that will display the options for the selected menu heading.

3. By selecting the Menu Folders, you can use the folder icon to select the Application to view.
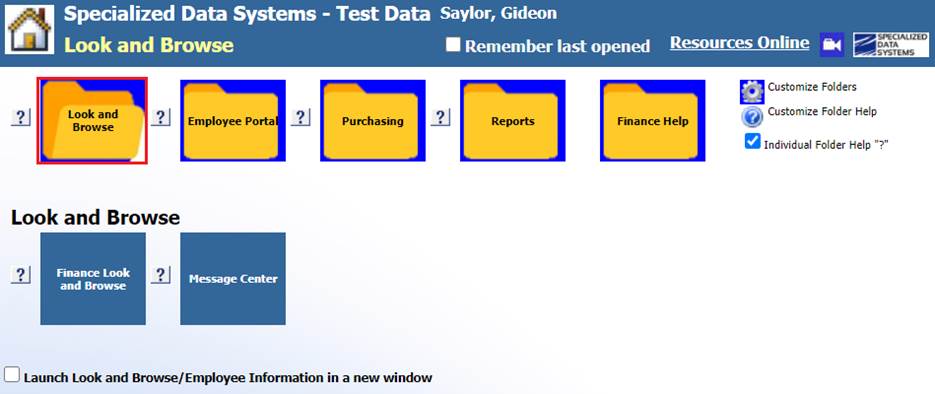
4. The Program folders within the Applications, will be listed below the highlighted Application
5. Select the Home icon to select a different Program or Applcation.

Logout
To logout, select the Logout at the top left or top right depending on the log in method that was used.
Menu Review
Please note, that you may not have all the options on your menu. You will see what your security is setup to see. If you would like more or less options, mention it to your administrator/tech to change your user security.
View Your Information
In this area you will first be able to view the Demographics tab which displays all your demographic information.

Contract Balance
This tab will list your contracts for current and prior year.
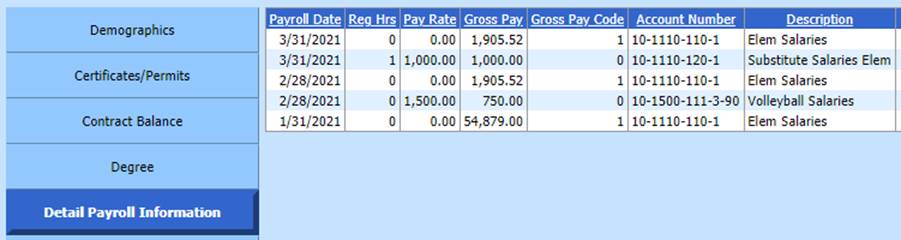
Detail Payroll Information
This tab will list all your most recent payrolls.
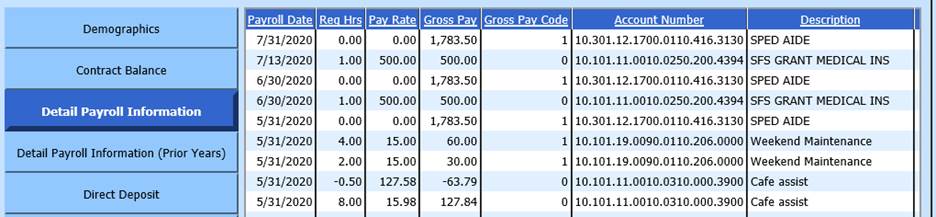
Detail Payroll Information (Prior Years)
This tab will list any prior year payroll detail that was paid to you before your database was in SDS Web Financial Office.

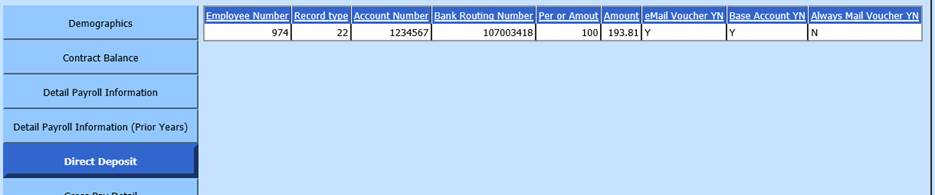
Direct Deposit
This tab will display your banking routing number and account number.
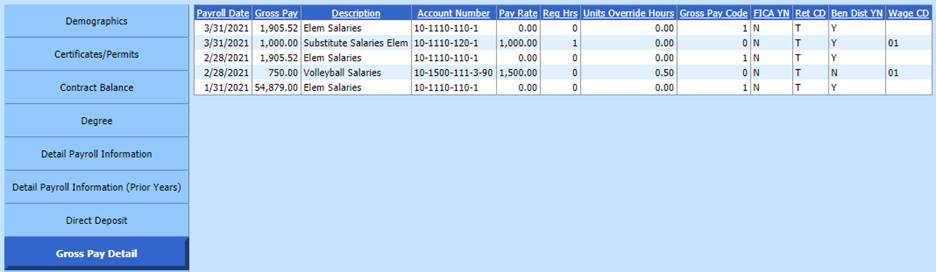
Gross Pay Detail
This tab will show the account number and gross amount of pay for each payroll.
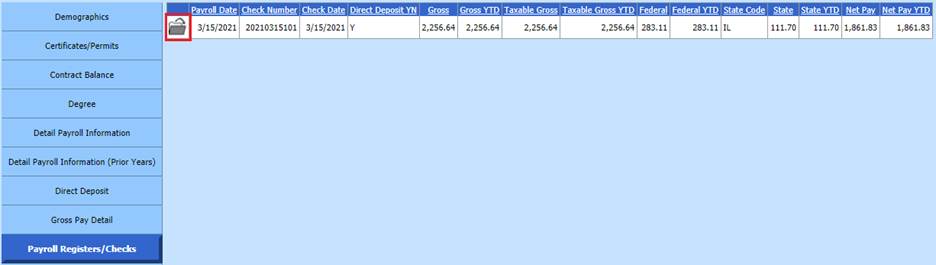
Payroll Registers/Checks
This tab displays the gross pay, all deductions and net pay for each payroll.
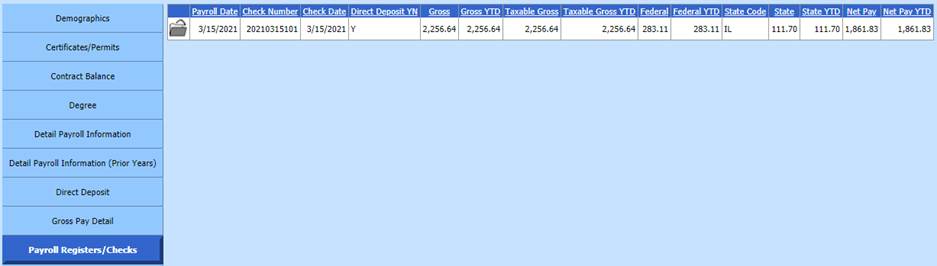
You can select the file folder to the left of the field “Payroll Date” to view your payroll voucher for each payroll.
Year to Date
This tab displays your payroll information for the current payroll, month, quarter, calendar year, and fiscal year.

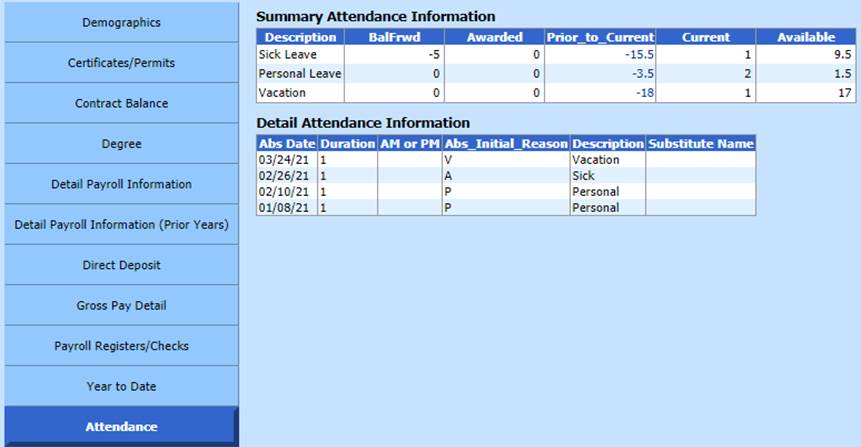
Attendance
This tab displays any attendance records entered to your employee record
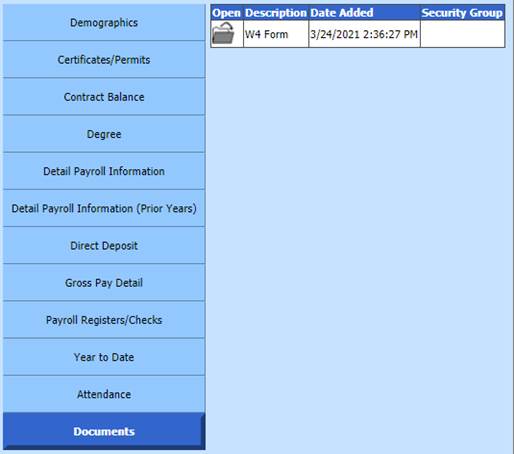
Documents
This tab displays any documents attached to your employee record
Change Basic Information
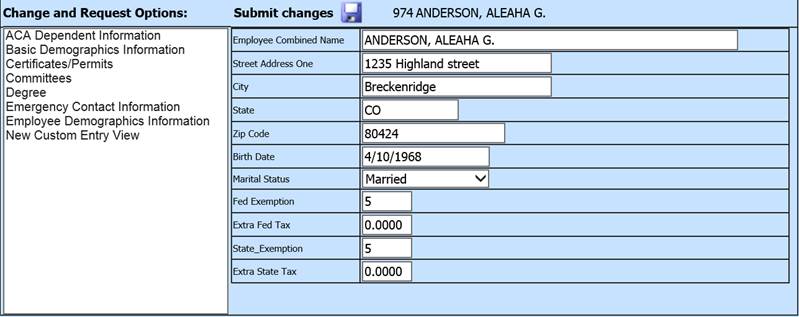
To change records follow the instructions below:
1. Select the “Change and Request Option” you would like to change (i.e. Basic Demographic Information)
a. The areas you have to select from are based on your security settings.
2. Update your information by clicking in the white box next to what you want to update and type what you want it to be.
3. Click  to submit your changes.
a. The data you changed will not be updated in the system until it is approved by the human resource or payroll supervisor. Once approved it will be updated in the WFO system.
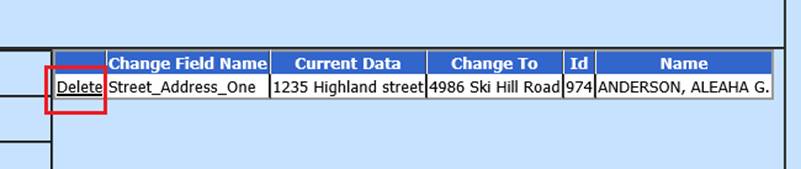
Below is an example of what the screen will look like after you have made a change:

To delete a record you changed and don’t want recorded simply click on “Delete” next to the record.
E-time Sheet Employee Payroll Approval
There are three different options depending on how you are setup. You can either see the e-time sheet process, time clock process or a combination of the two.
Note: Please jump to the view that you have in your view.
E-time Sheet Process
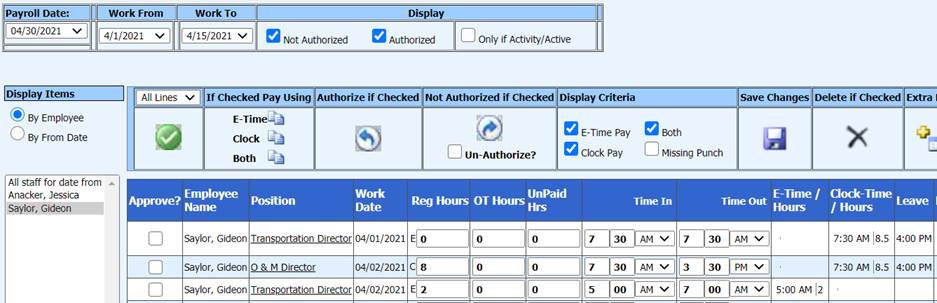
If you see the screen below this means you only see the e-time sheet.
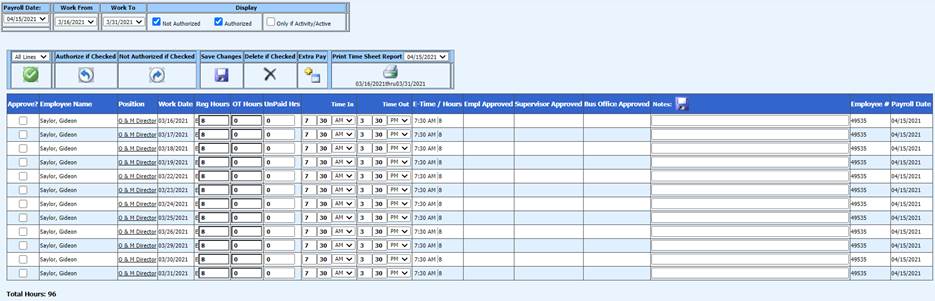
•This screen will also display your name, position you were working, work date, regular hours, overtime hours, and any unpaid hours. The unpaid hours relate to the time you will not be paid for, such as a lunch break. It also shows the time you are required to be at the school and the time you are to leave. This also shows the e-time hours for each day.
•On this screen you will also see all of the days that you were assigned to work. If the hours need to be adjusted, you can make the appropriate changes by clicking in the white boxes and then save the changes by selecting the “Save Changes” button.
•You should verify your hours. This can be done on a weekly basis.
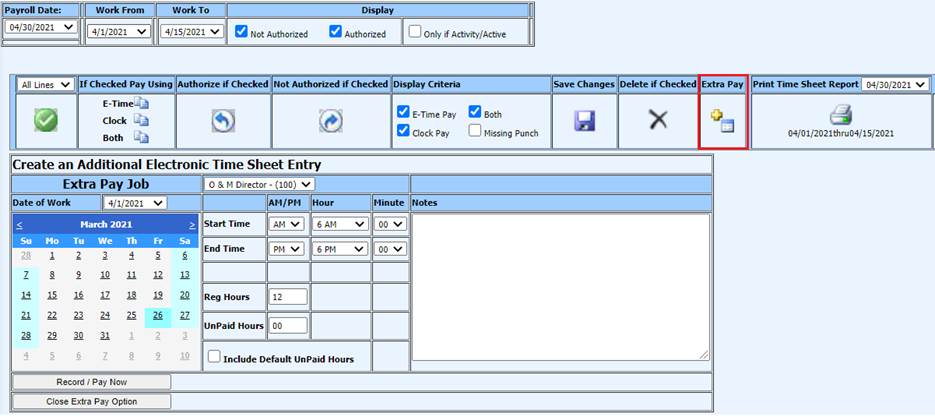
•If additional time needs to be recorded for extra work performed you can do this by selecting the option under “Extra Pay.” When this button is selected, the system will allow a job to be selected and the date of the extra pay. Then, the hours and start time need to be entered into the appropriate fields. Once all of the information has been filled into the fields, select the “Save Changes” button to save the extra pay record.
•After the save option has been selected, the extra pay will move to the grid area and will show with the other time information for the date the time was added.

•After the time has been verified, the e-time cards need to be authorized (approved) by you. This is done by selecting the green check option which will mark all of the e-time cards and then select the “Authorized if Checked” button. This will authorize all of the e-time cards that are displayed for the payroll time period.
•There isn’t a notification sent to you that the time has been approved. Therefore, you will need to check the e-time sheet information on a weekly or monthly basis depending on the payroll time period.
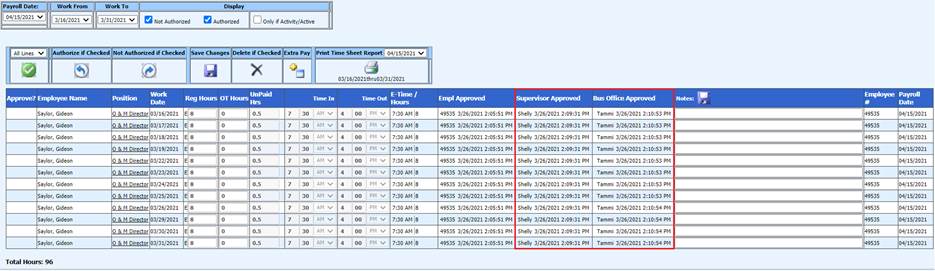
•Once you have approved the e-time sheets the screen will show that the e-time sheets have been approved by you. It will also show a time stamp of when they were approved.
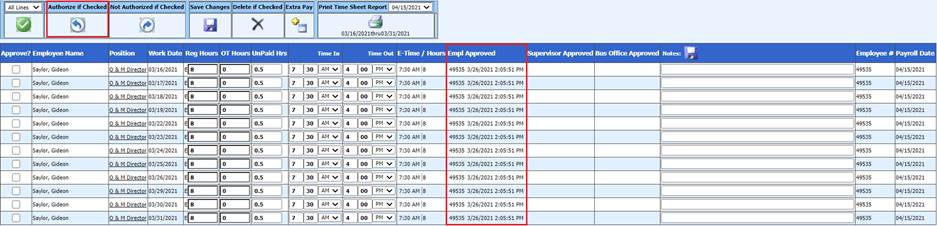
•Once the Supervisor and the Payroll Department have authorized the e-time sheets, you will see the time stamp for each approval process.

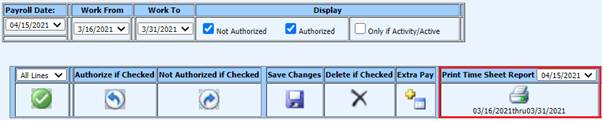
•The e-time sheet information can be viewed by selecting the print icon under the heading “Print Time Sheet Report”. If you want to see the information for a different payroll date then select the drop down and pick a different payroll date.

Time Clock Process
If you see the screen below this means you only see the time clock process.

•You will see all of the days that you logged into the time clock system. You will also be able to see the positions that you have logged into the system with and the time for each position as well as the day.
•You should verify your hours. This can be done on a weekly basis or monthly basis depending on the payroll setup.
•If you have more than one position that you are clocking in and out for, you will see a red area in the “Approve?” field on the second position you clocked in for. Since the time for you is only coming from the time clock this warning can be ignored.
•If additional time needs to be recorded for extra work you performed, this can be done by selecting the option under “Extra Pay.” When this button is selected the system will allow a job to be selected and the date the extra pay will be for. Then the hours and start time need to be entered into the appropriate fields. Once all of the information has been filled into the fields select the “Save changes” button to save the extra pay record.

•After the save option has been selected, the extra pay will move to the grid area and show with the other time information for the date the time was added.
•If you clocked into the system and selected the wrong position, you can correct/change the position from the wrong one to the correct one. This can be done by selecting the wrong position under the Position field. The underscore under the position name is a hot link which will open up an option at the bottom of the screen to make the necessary changes.
•The screen below shows how the bottom opens up after the hot link of “Business Manager” was selected.
•Then in the “Position” field select the drop down that shows “Business Manager” and change it to “Payroll/HR”.
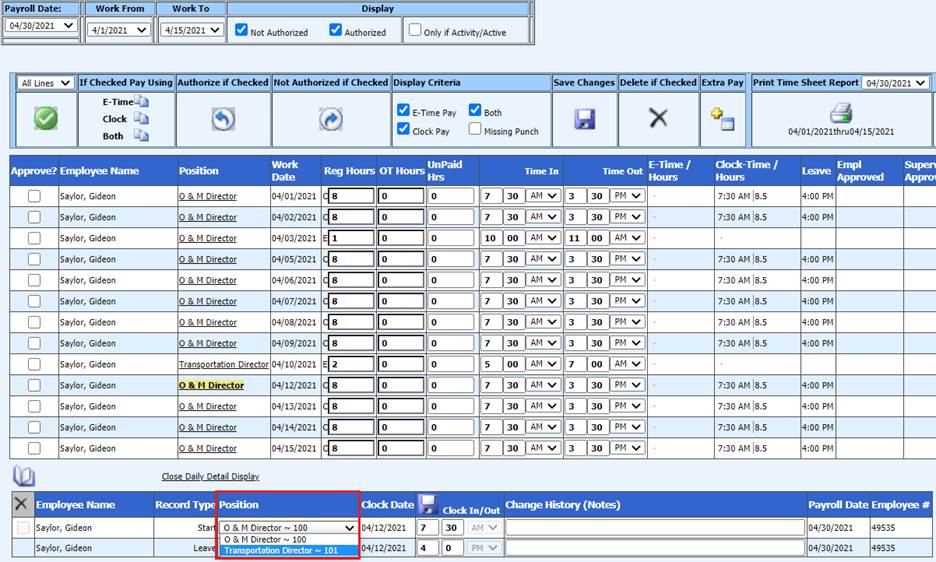
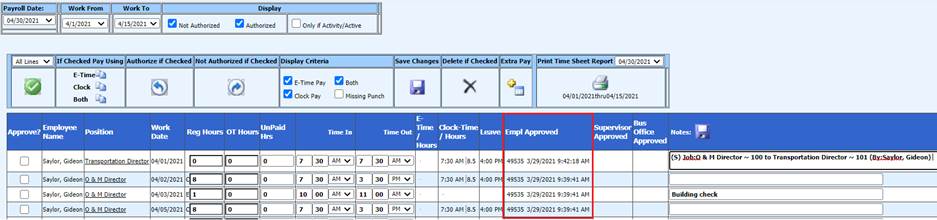
•Once the position has been changed from “Business Manager” to “Payroll/HR” this part of the screen will close and the change will be seen in the main screen area. The system will also show in the “Notes” field that a change was made on the position and when the change was done.
•In the previous screen, if the time for a time clock entry is missing or the time is not correct, the time can be adjusted by adding extra pay and then saving the record. The original clocked in time or clocked out time that was not correct needs to stay on the screen so that the supervisor can see the variance and make the necessary adjustment.
•After the time has been verified, the time clock entries need to be authorized (approved) by you. This is done by selecting the green check option which will mark all of the time clock entries. Once those have been selected, the “Authorize if Checked” button needs to be selected. This will authorize all of the time clock entries that are displayed for the payroll time period.
•There is not any notification that is sent to you saying that it’s been approved. Therefore, you will need to check the time clock information on a weekly or monthly basis depending on the payroll time period.
•Once you have approved the time clock entries, the screen will show that the time clock entries have been approved by you the employee. It will also show a time stamp of when they were approved.
•After they have been authorized by you the Supervisor will see them on their screen to authorize them.
•Once the Supervisor and the Payroll Department have authorized the time clock entries you will see the time stamp for each approval process.
•You can view the time clock information by selecting the print icon under the “Print Time Sheet Report”. If you want to see the information for a different payroll date then select the drop down and pick a different payroll date.
E-time Sheet and Time Clock Process
If you see the screen below this means you can see e-time sheet and time clock process.
•You will see all of the days that you were assigned to work through the e-time sheet or that you logged into the system through the time clock. If the hours need to be adjusted you can make the appropriate changes and then save the changes by selecting the “Save Changes” button for the e-time sheet hours.
•If the hours or the position needs to be changed for the time that was recorded through the time clock you can select the position name that has the underscore for the date that needs to be changed. This is a hot link that will open the screen below the grid that shows all of their time. Once this has been opened at the bottom of the screen the time and or position can be changed and saved.

•You should verify your hours. This can be done on a weekly basis or monthly basis depending on the payroll setup.
•The e-time sheet screen will show your name, position worked, work date, regular hours, overtime hours and any unpaid hours. The unpaid hours relate to the time you will not be paid for, such as a lunch break. It also shows the time you are required to be at the school and the time you are to leave. This also shows the e-time hours for each day and the time posted from the time clock.
•If additional time needs to be recorded for extra work performed this can be done by selecting the option under “Extra Pay.” When this button is selected, the system will allow a job to be selected and the date the extra pay will be for. Then the hours and start time need to be entered into the appropriate fields. Once all of the information has been filled into the fields select the “Save Changes” button to save the extra pay record.
•After the save option has been selected the extra pay will move to the grid area and show with the other time information for the date the time was added.
•After the time has been verified the e-time entries and the time clock entries need to be authorized (approved) by the employee. This is done by selecting the green check option which will mark all of the time clock entries. Once these have been selected the authorized if check button needs to be selected. This will authorize all of the entries that are displayed for the payroll time period.
•No notification is sent to you once time is approved. Therefore, you will need to check the time clock information on a weekly or monthly basis depending on the payroll time period.
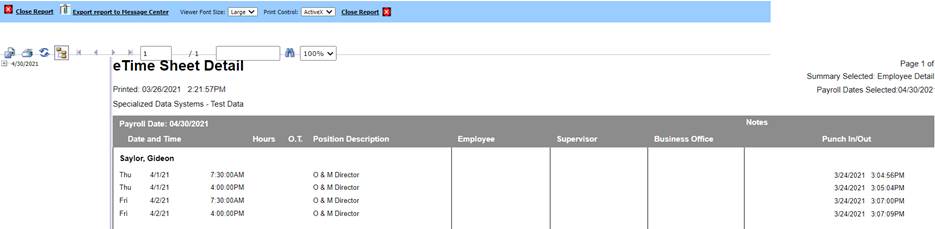
•Once you have approved the entries, the screen will show that the e-time entries and the time clock entries have been approved by the employee. It will show a time stamp of when they were approved. See the screen print below for an example.
•After you have authorized them your Supervisor will see them on their screen to authorize them.
•Once the Supervisor and the Payroll Department have authorized the e-time sheet and time clock entries you will see the time stamp for each approval process. See screen print below.
•The e-time sheet and time clock information can be viewed by selecting the print icon under the “Print Time Sheet Report.” If you want to see the information for a different payroll date, you can select the drop down and pick a different payroll date.
Request Center
In this area you can request time off, request an expense reimbursement, use the wellness tracking, and also request time for professional development.
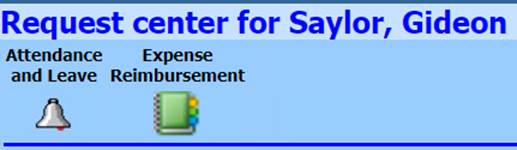
Attendance and Leave

1. #1 Select the dates that are being requested. One date can be selected by having that date on both calendars or a range of dates can be selected from the calendars.
2. #2 Select the Category, Duration Type (days or hours)
3. #3 Enter the reason for the leave.
4. #4 Select the green plus button to enter the request for the dates selected.
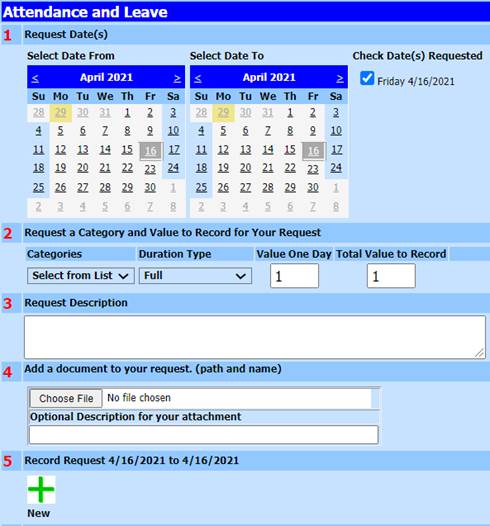
5. #5 Record Request:
6. #6 Attendance and Leave Approval by Day: Below the Record Request area the days that have been selected will show as submitted until the supervisor has approved them.

o Once the supervisor has approved the time the attendance record will show approved on the employees screen.
o To see all of the days that have been requested select the “Display All Pending Attendance and Leave Requests.” This will show all of the days that have been requested.

7. You can then select to display only Pending Approval Attendance and Leave Request.

8. Summary Attendance Information and Detail Attendance Information

9. If a date is denied by the supervisor, the screen for the employee will show this information once the employee selects the “Display All Attendance and Leave Requests”.

10. If a requested date has been denied, the system will automatically add back the day that was requested by the employee when it was denied by the supervision.
11. Once the supervisor has approved the days, requested or denied the days the employee will receive an email notification, if this process has been setup in the system to use.
12. If you decide you no longer want to request the day off, select the box under the “Delete” column. Once this is selected an “X” will appear. Select the “X” and the record will be deleted. The days will be added back for you.

Expense Reimbursement
1. #1 Expense Date: Enter in the date for the reimbursement. The date has to be selected from the calendar.
2. #2 Amount: Enter amount
3. #3 Description: Enter a description
4. #4 Account to Charge Expense: The account that the reimbursement should be paid. This may or may not be required, depending on your districts setup. If the correct account is not available for you to select from, contact your administrator to setup the correct account for you. If this area is just blank, you are not required to enter in an account number
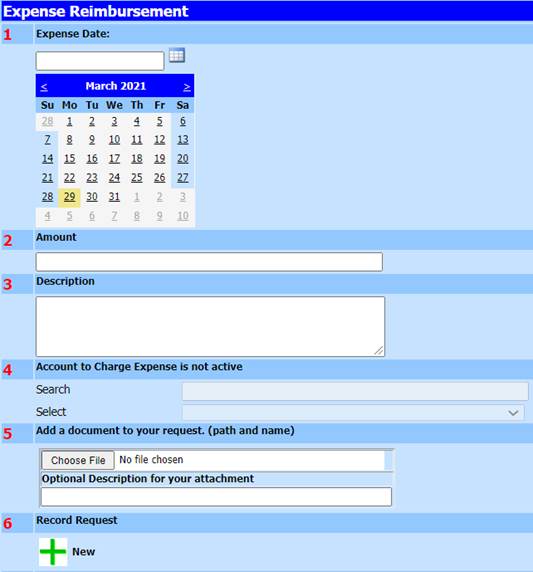
5. #5 Add a document to your request. (path and name): Add backup/supporting documentation for this reimbursement
6. #6 Record Request: Selecting this green plus icone, will add the reimbursement you are requesting to the “Display All Reimbursements” area.

7. Once the reimbursement has been approved, the description under the “Status” field will change from “submitted” to “approved”.

Project Your Pay if You Change a Deduction
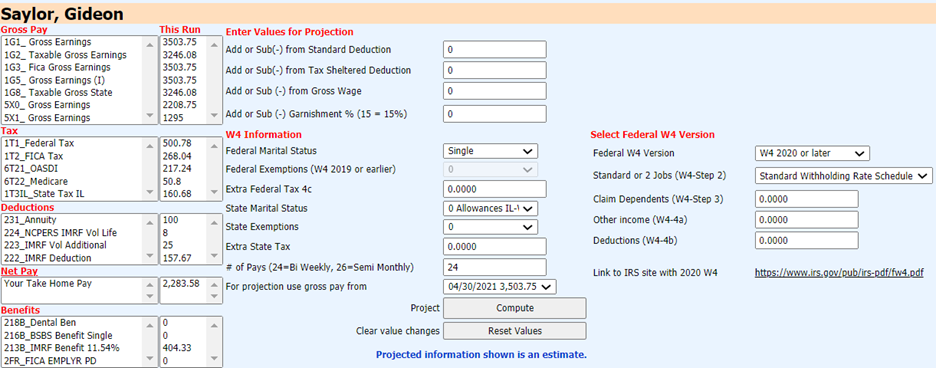
•Under the column “Enter Vales for Projection”, you can make changes to these field(s). Example, add a tax sheltered amount in the Add or Sub(-) from Tax Sheltered Deduction. Change the number or exemptions or your marital status. Once the items have been changed, select the compute button.
•The system will compute the changes that were made in the “Enter Vales for Projection” fields. It will show the original amount under the column “Original”, the new amount under the column “This Run” and the difference from the computation under the column “Change”.
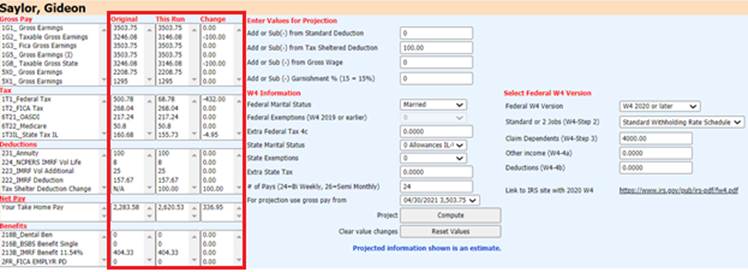
•This allows you to try various options and then contact the human resources or payroll departments with the changes you would like to have made to your payroll. See the next screen print for an example.
Message Center
1. The Message Center gives you access to reports that have been sent to you through the message center. You may also have access to your payroll direct deposit vouchers; W2’s and answer questions that have been sent to you through the Message Center from the Business office or the Human Resource Department, if they have chosen to use this feature.
2. To read the message, you will need to select “Read” on the message that has been sent to you. To view attachment (if one has been sent), select the paper clip. This will bring the report or document to the screen.
3. You will also receive a message at the bottom of your screen when you first log in if you have something that has been sent to your Message Center. The message is in red “You have a new message”. The message can be selected and it will take you directly to your Message Center. Once the message has been read the message at the bottom of the screen will disappear.
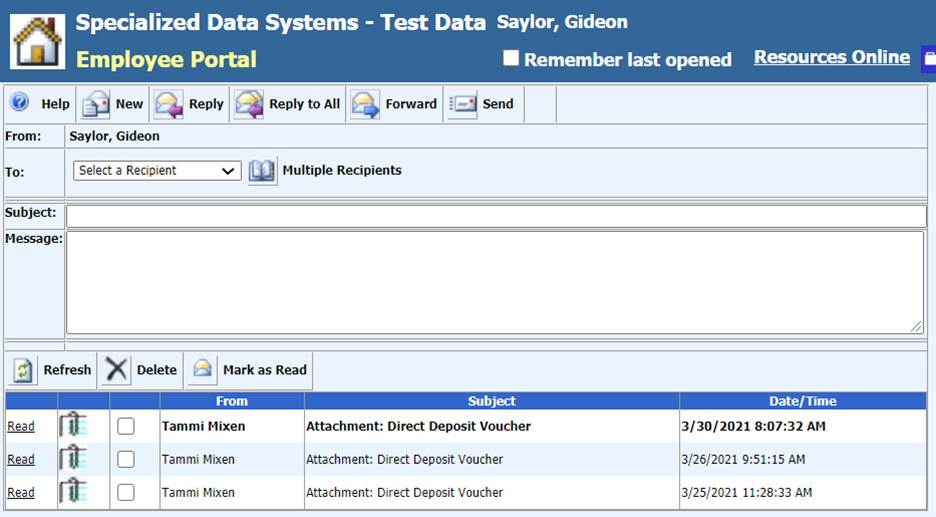
4. You can also send a message by “selecting a recipient” which will be anyone that has been set up in security.
5. Then enter the subject of the message and then the message. You can attach a document from your workstation and then select “send” to send the message.
Notes for Office on the Message Center Q & A
Reports with questions for you can be sent through the Message Center. An example of this type of report would be an open contact report or the employee master list. A question that could be asked on the open contract report would be if the contract amount is correct. A question that could be asked on the employee master report would be is your address correct.
The report with questions for the employee to answer will be generated by the Business Office or the Human Resource Department and it will be sent to the employee’s message center. When the message is opened the employee will see the questions for the report and will be able to answer with a simple “Yes” or ‘No”, or they may have to enter in some information depending on the question that is asked. Once the question has been answered select the “Save & Finalize Your Answer” button. This will send the information to the person that originated the report.