Pre Tax Deduction

After Tax Deduction

***Pre Requisite
***
Setup of PERS deductions before
running the report is mandatory for Pre and After Tax
Classifications
PERS requires contributions to be noted for Pre Tax
deduction or After Tax Deduction. Follow these steps to complete the proper
setup of these deductions:
1. Enter Web Financial Office.
2. From the menu tree select Master Code and File Entry | Master File Data Entry
3. Select Deductions/Benefits Master
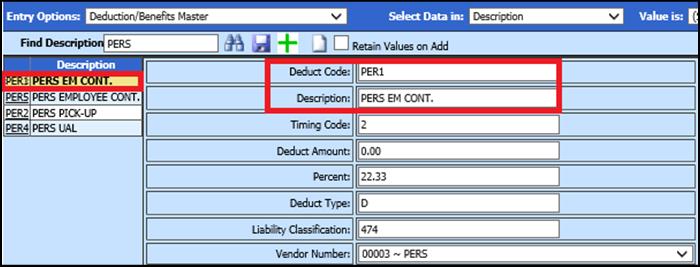
4. Select each PERS deduction(s)
5. Under Misc Code 1 field place a P for Pre Tax or a A for After Tax
6. Save.

Pre Tax Deduction
After Tax Deduction
Running the Report:
The payroll(s) should be closed before creating this file.
7. Enter Web Financial Office.
8. From the menu tree select Payroll Processing |State and Federal Reporting.
9. Select Oregon from the state dropdown.
10. Select PERS (EDX File Creation) from the report
dropdown.
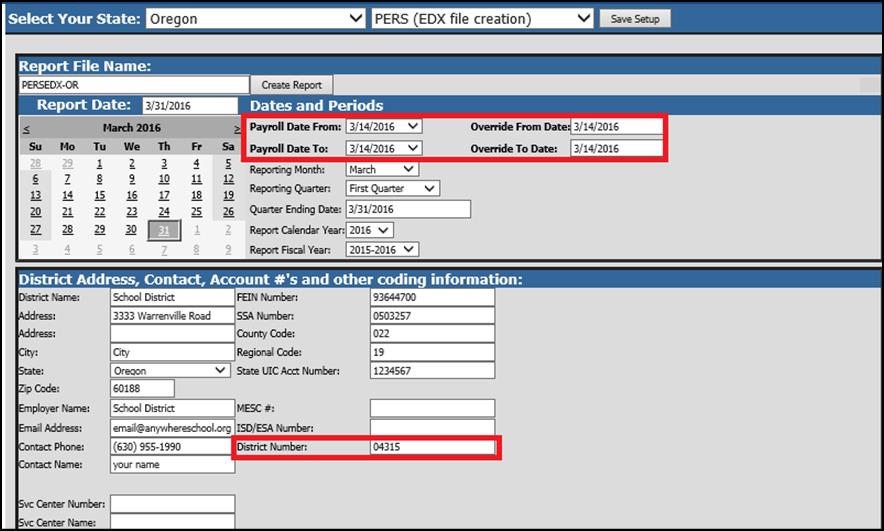
11. Enter the employer information and reporting month, etc. required on the screen.
12. Calendar Starting and Calendar Ending Dates: Enter the SDS payroll calendar starting and ending dates covered in this reporting period. If one payroll is being reported, the starting and ending dates will be the same. If more than one payroll is being reported, it will be the first and last payroll calendar dates.
13. Report Date: The report date on the calendar on the screen is used for the pay date being reported to PERS.
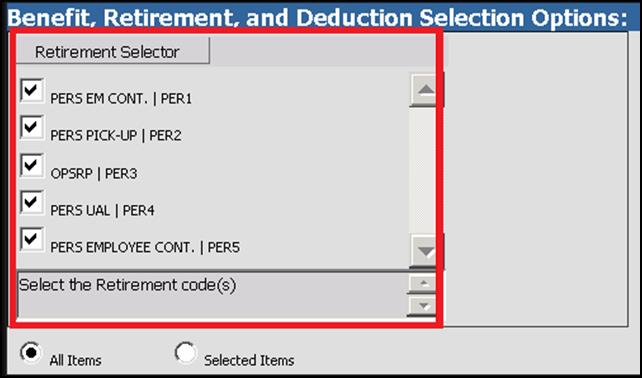
14. Under the Retirement Selector, select the retirement
codes to be reported.

15. After all of the items have been filled in on the screen select the Save Setup button.
16. To create the file, select the Create Report button.
•The file that is created will be listed at the top of the screen when first created. When you re-enter this report it will be displayed under Show/Hide Historic Reports. All files created will have a date and time stamp on them for when they were created.
o 
The file name created will be the District Number.Reporting Period End Date.dat. The District Number comes from the District Number Field on the reporting screen. The Reporting Period End Date comes from the Period Ending Date on the screen.
Saving and Re-naming the file directions:
1. Right click on the yellow folder and select Save Target as
2. Select where to save the file under Save in (desktop or other desired location on your computer)
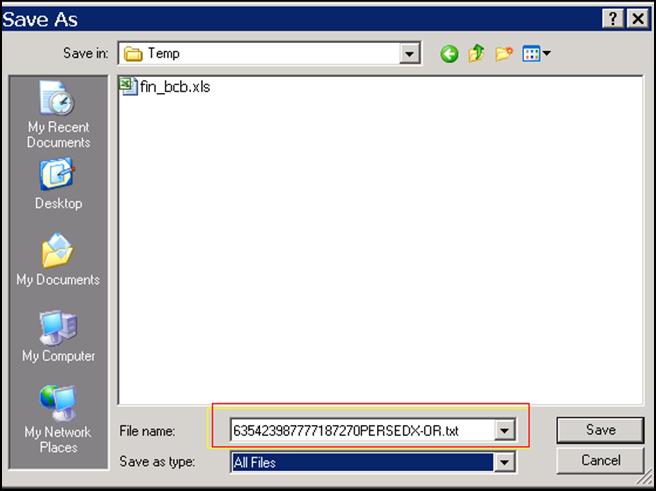
3. Save as type: select All Files
4. File Name: highlight and type over the file name with the same name the file was named when created
5. Select save
6. Now it can be uploaded to the PERS site
7. If you open the file to review it do not save it to upload for opening the file and saving it will change the format of the file and therefore create error when uploaded.

File Details
The file that gets created will be composed of several different record types. Bold = Field Name and next to is the table and field used in SDS
Header
•PERS Employer Number: Screen - District Number
•Employer Name: Screen- Employer Name
•Report Date: Screen - Period Ending Date
•Date Created: System Date (mmddyyyy)
•Service Center Number: Screen –Svc Center Number
•Service Center Name: Screen –Svc Center Name
•Format Version Code: 2 = current format
DTL2 – Wage and Service
Record
The Wage and Service record (DTL2) will be created for
employees who have earnings in the reported pay period. Data required for these
records will come from several different areas.
•PERS Employer Number: Screen – District Number
•Social Security Number: Social Security Number field on the Employee Master
•Last Name: Employee Name field on the Employee Master
•First Name: Employee Name field on the Employee Master
•Middle Name: Employee Name field on the Employee Master
•Pay Date: Screen – Period Ending Date
•Hours Worked (Regular): Gross Pay Entry Screen Reg Hrs field + Retirement Hrs Days Field
•Hours Worked (Overtime): OT Hrs field on Gross Pay Entry and Adjustments entry screen
•Wage Code: Employee Wage Code field on Gross Pay Entry and Adjustments entry screen
•Subject Salary, Regular: Gross Pay field on Gross Pay Entry and Adjustments entry screen
•Subject Salary, Overtime: OT Wages field on Gross Pay Entry and Adjustments entry screen
•Gross Salary: Gross Pay field on Gross Pay Entry and Adjustments screen
•Non-Subject Salary: Gross Pay field that has a Retirement code = N on the Gross Pay Entry and Adjustments entry screen
•Lump Sum Payoff: Gross Pay field that has Notes = LSP on the Gross Pay Entry and Adjustment entry screen
•Member Paid After-Tax Contribution: Employee YTD Detail History - Deduction Master if Misc Code 1 = A
•Employer Paid Pre-Tax Contribution: Employee YTD Detail History – Deduction Master if Misc Code 1 = P
•Unit Contribution: N/A – not used for Teachers:
•Optional Employer Matching % IAP: N/A – not used for Teachers
•Optional Employer Matching Amount IAP: N/A – not used for Teachers
•PERS Job Class Code: blank
•Average Overtime Hours Code: N/A – not used for Teachers
•Employer Site Distribution Code: N/A – not used for Teachers
•Non PERS Data Memo: N/A – not used for Teachers
•Work Period Begin Date: Screen – Period Starting
•Work Period End Date: Screen – Period Ending
•Lump-sum Vacation Payoff: Gross Pay field that has Notes = LSV on the Gross Pay Entry and Adjustment entry screen
Footer
•PERS Employee Number: Screen Prompt – District Number
•Employer Name: Screen Prompt - Employer Name
•Total Detail Records: Total Records Reported