Revised: 4/2021
Set Seg is a third party administrator for the
Affordable Care Act Reporting Requirements. The report options within SDS will
allow for creation of files/reports that can be submitted to Set Seg.
The SDS Web Financial Office uses specific informational views which
organize the information needed for upload to Set Seg. SDS also uses an internal
data upload to pull data from various areas throughout the SDS program and
consolidate this information into three views that can be found in the
Entry Views dropdown menu in Employee, Contract, Deductions/Benefits. These
specific ACA views become a work area where the information for upload to Set
Seg can be reviewed/edited/changed prior to creation of the files for
submission.
Note: The first step in this
process should be the ACA Data Upload under Human Resources/Human Resources
Control Center. The ACA Data Upload will automatically place data into the ACA
Data Views within the system.
THE FIRST TIME THE ACA DATA UPLOAD UTILITY
IS RUN, THE “RESET OPTION” NEEDS TO BE UNCHECKED.
What does the ACA Data Upload do?
The automated ACA Data
Upload goes through a process of updating fields needed for ACA reporting. The
Data Upload prepares specific fields with the most common expected entry. The
data upload will do the bulk of the “prep” work so the user can spend their time
in review of the standard entry and make needed changes on those records that
are outside the normal expectancy.
What Fields are affected by the
ACA Data Upload?
•Updates the last names of dependants if blank using employees last name.
•Adds a Y to the Covered_All_12 field if all other 12 month fields are blank
•Adds a Y to the Dependent_Offered_Benefits field if blank
•Adds a Y to the Dependent_Accepted_Benefits field if blank
•Adds a Y to the Covered_All_12 field if all other 12 month fields are blank
•Adds EF to the Dependent_Offered_Benefits field if blank (EF=Employee and Family)
•Adds EF to the Dependent_Accepted_Benefits field if blank (EF=Employee and Family)
•Adds 2015 to the Coverage_Year field if blank
•Adds 1E to the Offer_Of_Coverage_All_12 field if all other 12 month fields are blank
•Adds FT to the ACA_Employee_Designation_Code field if blank
•Adds FT to the ACA_Employee_Class_Code field if blank
•Adds “Full Time” to the ACA_Employee_Class_Label field if blank
•Updates the ACA_Job_Title field if blank using Title field from the Employee Master
•Updates the ACA_Current_Status field if blank using Pay field from the Employee Master
o if Y converts to A (active)
o if N converts to G (terminated)
•Updates the ACA_PayRate field if blank (using the following hierarchy)
o Using Hourly_Rate field from the Employee Position if > 0. Also adds HY (per hour) to the ACA_PayType field and adds H (hourly) to the ACA_Pay_Type_Classification_Code field
o Using Rate_1 field from the Employee Master if > 0. Also adds HY (per hour) to the ACA_PayType field and adds H (hourly) to the ACA_Pay_Type_Classification_Code field
o Using the total of ALL Contracts in the Orig_Contract field from the Employee Contracts if Balance > 0. Also adds YY (per year) to the ACA_PayType field and adds S (salary) to the ACA_Pay_Type_Classification_Code field
•Updates the ACA_Pay_Cycle_Frequency field if blank using Tax_Table field from the Employee Master
o if >15 and < 24 adds SM (semi-monthly)
o if >24 adds BW (bi-weekly)
o if <16 adds MY (monthly)
ACA Data Upload
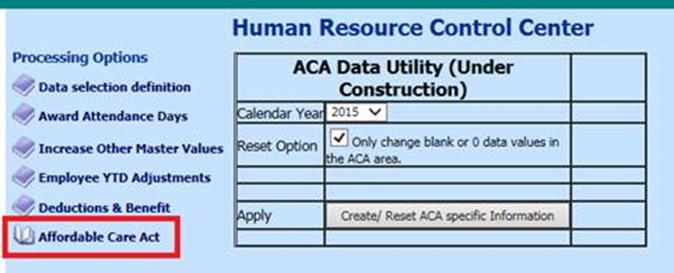
1. Select Human Resources
2. Select Human Resources Control Center
3. Select Affordable Care Act

4. Select the Calendar Year that you are reporting ACA information for (i.e. 2015)
5. Reset Option: The default setting on this
option is to leave the checkbox checked (displaying a checkmark)
If you
have made any manual changes in the ACA views and UNCHECK this option, the
system will undo manual changes that may have already been put into place.
6. Select “Create/Reset ACA Specific Information”
When
hovering over the “Create/Reset ACA Specific Information”, the message below
will appear for explanation.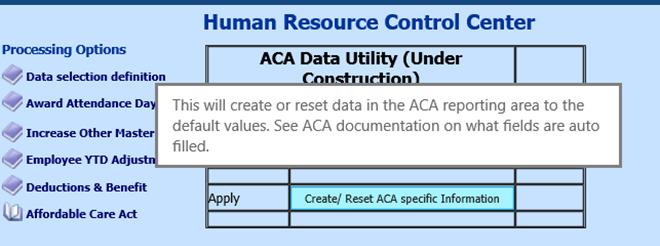
The warning message below will display after selecting
the Create/Reset button.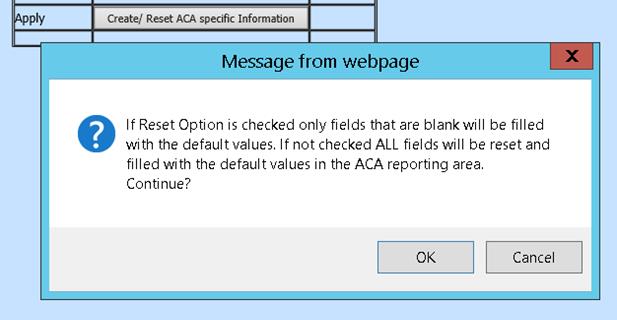
7. When it's done it will show a pop up that says "Done". Click OK and proceed to the next section.
Affordable Care Act (ACA) Views
To access the views where the ACA data will be
collected for submission to Set Seg follow the steps below:
1. Select Human Resources or Payroll Processing
2. Select Employees, Contract, Deductions/Benefits, etc. (Regular or Horizontal View)
3. Select the "Entry Views" Drop Down Menu to view the 3 views listed below: (You may have to use the scroll bar to scroll up to see these items at the top of the list)
o ACA Dependent Information
o ACA Employee Demographics
o ACA Employee Status Pay and Job
Preliminary Steps for Set
Seg Processing and Reporting
Security Settings
Make sure that any
user that will be working with entry, processing of data, or generating
reports/files for Set Seg have Security Rights to the below program areas.
To change a user’s security, enter Administrative Utilities
| Security - Application Area. Select the user and make sure they
have all access to the below areas:
•Human Resources Control Center
•Human Resources or Payroll Processing: Employees, Contracts, Deductions/Benefits views for ACA (listed above)
•Employee Information Changes (Horizontal)
•Payroll Processing State/Federal Reporting
Employee/Dependent Information Entry
If
dependent names are known for employees, a record can be initiated for each
dependent.
1. Select Human Resources or Payroll Processing/Employee Information Changes (Horizontal)
2. Select Employees Information Changes (Horizontal)
3. Select the Entry Views dropdown menu and select ACA Dependent Information
4. Place a checkmark in the option Q-List and
Add Option 
5. Select the employee from the Q-List at the left side of the screen.
6. Select to Add a Dependent Record for the
employee using the “Add” icon 
o Select the checkbox "Auto add if no records
found." next to the “Add” icon  to automatically add a record for the
selected employee if one does not exist.

7. Enter the Dependent First/Middle Name and other information, as available. Other information can be added at a later time, if necessary.
8. Dependent Last Name can be left Blank if the Last Name will be the same as the employee. The ACA Data Upload will automatically fill this field with the employee last name.
o * If the dependent Last Name is different than the employee’s last name, enter the last name of the dependent. The ACA Data Upload will not overwrite a last name that is different than the employee’s last name.
9.  Save once you are done.
View/Edit of the ACA Data
After the Mass Load of the
ACA data, the data should be reviewed.
Information from several areas are retrieved and evaluated to fill the fields
for ACA Reporting.
We suggest you review your data. You can
review it by accessing the following areas:
1. Select Human Resources or Payroll Processing
2. Then Select Employees, Contracts, Deductions/Benefits or Select Employee Information (Horizontal)
o What's the difference in the different views?
§ Review of the Data through “Employees, Contracts, Deductions/Benefits” will show a vertical view of the information for each employee in the ACA Views.
§ Review of the Data through “Employee Information Changes (Horizontal)” will show a horizontal view display of records that is conducive to review of groups of employee records at one time.
What to
Review
ACA Dependent
Information View
The ACA Dependent Information View holds a record
for each dependent of each employee.
1. Make sure that there is a record for each dependent of each employee
o To Add a Dependent Record
1. Select Human Resources or Payroll Processing/Employee Information Changes (Horizontal)
2. Select the Entry Views dropdown menu and select ACA Dependent information
3. Place a checkmark in the option Q-List and Add Option

4. Select the employee from the Q-List at the left side of the screen.
5. Select to Add a Dependent Record for the employee using the “Add” icon
6. Select the checkbox next to the “Add” icon to automatically add a record for the selected employee if one does not exist.

2. Check the Fields that were filled by the ACA Data Utility (run through Human Resources Control Center)
o Coverage Year System auto adds the Year selected in the ACA Data Utility
o Dependent Offered Benefit System auto adds a Y
o Dependent Accepted Benefit System auto adds a Y
o Covered_All_12 System auto adds a Y
3. Edit any dependent records that should have a
different setting than the
automated answers placed by the ACA Data Utility.
o Example: If a dependent was not covered all 12 months of the year, go to that dependent record and remove the “Y” in “Covered_All_12” and place a “Y” in the specific months, January through December, that the dependent was covered.
4. Review all other fields in the ACA Dependent
Information view to ensure that
each record is accurate and complete.
Make manual changes to any individual records in any fields as needed.
Select the diskette icon to “Save” all entries each time you move between pages
of records.
OR
If there is a field that is not automatically
filled by the ACA Data Utility but that should be filled with the same
information for each dependent’s record, the Employee Information Changes
(Horizontal) screen allows for mass data changes to specific fields.
Mass Changes to a Specific
Field
This example will take you
through the steps to change all the data in Benefit_Effective_Date field to
1/1/2015. The fields and input discussed in this example may be modified to
match your mass change need.
1. Select Employee Information Changes (Horizontal).
2. Select the Entry Views dropdown Menu and select ACA Dependent Information
3. Select “First Field to Edit” in the mid center of the screen and select “Benefit_Effective_Date” from the drop down menu.

4. This will move the selected field to display as the first column on the screen
5. Select the Mass Change button

6. This will open the “Mass change of data available with the entry view”.
o Step 1 Change Field: Select drop down and choose Benefit_Effective_Date field
o Step 2 Replace selected value: Select drop down and choose a blank (if all records are currently blank) or select a value that you wish to replace with a new value.
o Step 3 Change by entering a new value: Enter 1/1/2015 (for this example).
o Step 4 Apply mass change: Select Prepare to Make Change button

o Data is prepared and screen indicates what changes will occur next to the “Prepare to Make Change” button.
o Select the Mass Change button under step 4 to make the changes if you agree with the indicated changes

ACA Employee Demographics
View
The ACA Employee Demographics
View holds personal information of each employee. Much of this information
should automatically be populated in the ACA Employee Demographics View if it
had been entered into the Employee’s Master record.
1. Select Employee Information Changes (Horizontal) under Human Resources or Payroll Processing to Add/Edit the information for this view.
2. Add any additional employee demographic information, as needed.
3. Review all other fields in the ACA Employee Demographics View to ensure that each record is accurate and complete.
ACA Employee Status Pay and
Job
The ACA Employee Status Pay and
Job view shows information regarding each employee’s status, pay information,
and insurance coverage.
1. Check the Fields that were filled by the ACA Data Utility (run through Human Resources Control Center)
o ACA Current Status System auto adds an “A” if the Pay field in the Master is “Y”. System auto adds a “G” if the Pay field in the Master is “N”.
o ACA Pay Rate and ACA Pay Type Classification Code - System auto fills the Pay Rate based on this hierarchy/order
1. If the Hourly_Rate field from the Employee Position is > 0, the system auto adds HY (per hour) to the ACA_PayType field and adds H (hourly) to the ACA_Pay_Type_Classification_Code field.
2. If the Rate_1 field from the Employee Master if > 0, the system auto adds HY (per hour) to the ACA_PayType field and adds H (hourly) to the ACA_Pay_Type_Classification_Code field.
3. If the Orig_Contract field from the Employee Contracts if > 0, the system auto adds YY (per year) to the ACA_PayType field and adds S (salary) to the ACA_Pay_Type_Classification_Code field.
o ACA Pay Cycle Frequency System auto fills this field based upon the entry in the Employee Master/Tax Table Field. The following values are auto assigned based on the Tax Table Field entry.
1. If the Tax Table entry is >15 and < 24 the system auto adds SM (semi-monthly)
2. If the Tax Table entry is >24, the system auto adds BW (bi-weekly)
3. If the Tax Table entry is > 16, the
system auto adds MY (Monthly)
o ACA Job Title System auto adds information from the Employee Master field “Title”
o Adds EF to the Dependent_Offered_Benefits field if blank (EF=Employee and Family)
o Adds EF to the Dependent_Accepted_Benefits field if blank (EF=Employee and Family)
o Adds 2015 to the Coverage_Year field if blank
o Adds 1E to the Offer_Of_Coverage_All_12 field if all other 12 month fields are blank
o Adds FT to the ACA_Employee_Designation_Code field if blank
o Adds FT to the ACA_Employee_Class_Code field if blank
o Adds “Full Time” to the ACA_Employee_Class_Label field if blank
2. Edit any employee Status/Pay records that should have a different setting than the automated answers placed by the ACA Data Utility.
3. Review all other fields in the ACA Employee
Status Pay and Job View to ensure that each record is accurate and complete.
Make manual changes to any individual records in any fields as needed.
Select the diskette icon to “Save” all entries each time you move between pages
of records.
OR
If there is a field that is not automatically
filled by the ACA Data Utility but that should be filled with the same
information for each employee’s record, the Employee Information Changes
(Horizontal) screen allows for mass data changes to specific fields.
ACA Benefits Type Offered
and Benefits Type Accepted
Benefits
Type Offered
Enter one of the
following valid codes for the Benefits Type Offered:
No = No Benefits
Offered
E = Employee Only
ED = Employee and Dependent(s) (Not
Spouse)
ES = Employee and Spouse (No Dependent(s))
EF =
Employee and Family. The system will convert this code to EDS when the file is
created to be sent to Set Seg
Benefits Type
Accepted
Enter one of the
following valid codes for the Benefits Type Accepted:
No = No Benefits
Accepted
E = Employee Only
ED = Employee and Dependent(s) (Not
Spouse)
ES = Employee and Spouse (No Dependent(s))
EF =
Employee and Family. The system will convert this code to EDS when the file is
created to be sent to Set Seg
Mass Changes to a Specific Field
This example will take you through the steps to change
all the data in Covered_All_12 field to a “Y”. The fields and input discussed in
this example may be modified to match your mass change need.
1. Select Employee Information Changes (Horizontal).
2. Select the Entry Views dropdown Menu and select ACA Employee Status Pay and Job.
3. Select “First Field to Edit” in the mid center of the screen and select “Covered_All_12” from the drop down menu.

4. This will move the selected field to display as the first column on the screen
5. Select the Mass Change button

6. This will open the “Mass change of data available with the entry view”.
o Step 1 Change Field: Select drop down and choose Covered_All_12 field
o Step 2 Replace selected value: Select drop down and choose a blank (if all records are currently blank) or select a value that you wish to replace with a new value.
o Step 3 Change by entering a new value: Enter the letter “Y”.
o Step 4 Apply mass change: Select Prepare to Make Change button

7. Data is prepared and screen indicates what changes will occur next to the “Prepare to Make Change” button.
8. Select the Mass Change button under step 4 to make the changes if you agree with the indicated changes

SDS Database Layout for Set Seg Reporting
Each of the Set Seg Reports are
listed below in separate grids showing the field name set by Set Seg for the
report, the length each field will hold on the report, the Table and Field from
where the information will be pulled from within the system, and for some
fields, the format of the data.
The information in these grids is
instrumental in allowing SDS users to be able to quickly find the location of
each field used for ACA reporting to Set Seg. If a change or edit needs to be
made to a specific field or to a specific location in the file, these grid
layouts will help for locating the needed field and making the needed
changes.
Employee Information Report Layout
|
Field name |
Field Length |
Table & Field used |
Format |
|
|
|
|
|
|
SSN |
9 |
Employee_Master.Social_Sec_Numb |
|
|
FEIN |
9 |
Screen Prompt - FEIN Number |
|
|
EmployeeID |
255 |
Employee_Master.Employee_Number |
|
|
CurrentStatus |
1 |
Employee_SR_2.ACA_Current_Status |
|
|
MostRecentHireDate |
10 |
Employee_Master.Hire_Date |
mm/dd/yyyy |
|
**** Note: MostRecentHireDate Rehire date used if entered |
|
*** Employee_Master.ReHire_Date |
|
|
TerminationDate |
10 |
Employee_Master.Termination |
mm/dd/yyyy |
|
FirstName |
255 |
Employee_Master.Employee_First_Name |
|
|
LastName |
255 |
Employee_Master.Employee_Last_Name |
|
|
MiddleName |
255 |
Employee_Master.Employee_Middle_Name |
|
|
PayRate |
10 |
Employee_SR_2.ACA_PayRate |
99999999.99 |
|
PayType |
2 |
Employee_SR_2.ACA_PayType |
|
|
PayCycleFrequency |
2 |
Employee_SR_2.ACA_Pay_Cycle_Frequency |
|
|
HomeAddressLine1 |
255 |
Employee_Master.Street_Address_One |
|
|
HomeAddressLine2 |
255 |
Employee_Master.Street_Address_Two |
|
|
HomeAddressCity |
255 |
Employee_Master.City |
|
|
HomeAddressState |
2 |
Employee_Master.State |
|
|
HomeAddressZIP |
9 |
Employee_Master.Zip_Code |
|
|
HomeAddressCountry |
3 |
Default - USA |
|
|
NotificationEmail |
255 |
Employee_Master.Email_Name |
|
|
DateOfBirth |
10 |
Employee_Master.Birth_Date |
mm/dd/yyyy |
|
Gender |
1 |
Employee_Master.Sex |
|
|
EmployeeClassCode |
255 |
Employee_SR_2.ACA_Employee_Class_Code |
|
|
EmployeeClassLabel |
255 |
Employee_SR_2.ACA_Employee_Class_Label |
|
|
ACAEmployeeDesignationCode |
2 |
Employee_SR_2.ACA_Employee_Designation_Code |
|
|
ACAEmployeeCategoryCode |
255 |
Employee_SR_2.ACA_Employee_Category_Code |
|
|
ACAPayTypeClassificationCode |
1 |
Employee_SR_2.ACA_Pay_Type_Classification_Code |
|
|
JobTitle |
255 |
Employee_SR_2.ACA_Job_Title |
|
Payroll Details Report Layout
|
Field name |
Field Length |
Table & Field used |
Format |
|
|
|
|
|
|
SSN |
9 |
Employee_Master.Social_Sec_Numb |
|
|
FEIN |
9 |
Screen Prompt - FEIN Number |
|
|
TransactionID |
255 |
Not Required |
|
|
PayDate |
10 |
Time_Cards.Payroll_Date |
|
|
PayPeriodStartDate |
10 |
Screen Prompt - Payroll Date From |
mm/dd/yyyy |
|
PayPeriodEndDate |
10 |
Screen Prompt - Payroll Date To |
mm/dd/yyyy |
|
PayRate |
10 |
Employee_SR_2.ACA_PayRate |
99999999.99 |
|
PayType |
2 |
Employee_SR_2.ACA_PayType |
|
|
PayCycleFrequency |
2 |
Employee_SR_2.ACA_Pay_Cycle_Frequency |
|
|
CompensationType |
255 |
Time_Cards.Contract_Type_Code |
|
|
AdjustmentKey |
255 |
Not Required |
|
|
HoursWorked |
10 |
(Time_Cards.Reg_Hrs + Time_Cards.OT_Hrs + Time_Cards.Retirement_Hrs_Days) |
99999999.99 |
|
GrossPay |
10 |
Time_Cards.Gross_Pay |
99999999.99 |
|
W2Box1Deductions |
10 |
Employee_Ytd_Detail_History - Tax sheltered deductions |
99999999.99 |
|
EmployeeId |
255 |
Employee_Master.Employee_Number |
|
|
GLAccountCode |
255 |
Time_Cards.Account_Number |
|
|
ORSWageCode |
255 |
Time_Cards.Employee_Wage_Code |
|
Leave of Absence
Information Report Layout
|
Field name |
Field Length |
Table & Field used |
Format |
|
SSN |
9 |
Employee_Master.Social_Sec_Numb |
|
|
FEIN |
9 |
Screen Prompt - FEIN Number |
|
|
LOAReasonCode |
255 |
Employee_Leave.Leave_Reason |
|
|
LOAReasonLabel |
255 |
Employee_Leave.Leave_Reason |
|
|
LOAStartDate |
10 |
Employee_Leave.Leave_Start_Date |
mm/dd/yyyy |
|
LOAEndDate |
10 |
Employee_Leave.Leave_End_Date |
mm/dd/yyyy |
|
LOAHours |
10 |
Employee_Leave.Total_Leave_Work_Days |
99999999.99 |
|
EmployeeId |
255 |
Employee_Leave.Employee_Number |
|
Offer of Coverage Report Layout
|
Field name |
Field Length |
Table & Field used |
Format |
|
|
|
|
|
|
EmployerFEIN |
9 |
Screen Prompt - FEIN Number |
|
|
EmployeeFirstName |
255 |
Employee_Master.Employee_First_Name |
|
|
EmployeeLastName |
255 |
Employee_Master.Employee_Last_Name |
|
|
EmployeeSSN |
9 |
Employee_Master.Social_Sec_Numb |
|
|
EmployeeID |
255 |
Employee_Master.Employee_Number |
|
|
JobTitle |
255 |
Employee_SR_2.ACA_Job_Title |
|
|
BenefitsEffectiveDate |
10 |
Employee_SR_2.Benefit_Effective_Date |
mm/dd/yyyy |
|
MonthlyCostEmployeeOnly |
10 |
Employee_SR_2.Employee_Share_All |
mm/dd/yyyy |
|
BenefitsTypeOffered |
3 |
Employee_SR_2.Offered_Benefits |
|
|
BenefitsTypeAccepted |
3 |
Employee_SR_2.Accepted_Benefits |
|
|
AcceptedPlanIsSelfInsured |
1 |
Default is zero |
|
Dependent Offer Report
Layout
|
Field name |
Field Length |
Table & Field used |
Format |
|
|
|
|
|
|
EmployerFEIN |
9 |
Screen Prompt - FEIN Number |
|
|
EmployeeFirstName |
255 |
Employee_Master.Employee_First_Name |
|
|
EmployeeLastName |
255 |
Employee_Master.Employee_Last_Name |
|
|
EmployeeSSN |
9 |
Employee_Master.Social_Sec_Numb |
|
|
EmployeeID |
255 |
Employee_Master.Employee_Number |
|
|
JobTitle |
255 |
Employee_SR_2.ACA_Job_Title |
|
|
DependentFirstName |
255 |
Employee_Supplemental_Info_2.Dependent_First_Name | |
|
DependentMiddleName |
255 |
Employee_Supplemental_Info_2.Dependent_Middle_Name | |
|
DependentLastName |
255 |
Employee_Supplemental_Info_2.Dependent_Last_Name |
|
|
DependentSuffix |
255 |
Not used |
|
|
DependentType |
1 |
Employee_Supplemental_Info_2.Dependent_Type |
|
|
DependentSSN |
9 |
Employee_Supplemental_Info_2.Dependent_SSN |
|
|
DependentDOB |
10 |
Employee_Supplemental_Info_2.Dependent_DOB |
mm/dd/yyyy |
|
BenefitsEffectiveDate |
10 |
Employee_Supplemental_Info_2.Benefit_Effective_Date |
mm/dd/yyyy |
Set Seg Reporting
The Reports and Files for
submission to Set Seg are produced under Payroll Processing |State/Federal
Reporting.
** CURRENT PAYROLL
MUST BE CLOSED PROR TO CREATING THE PAYROLL DETAIL FILE**
The
steps are listed below for each report.
Employee Information Report
1. Select Payroll Processing
2. Select State/Federal Reporting
3. In the “State” dropdown menu, select “Set-Seg ACA Tracking”
4. In the “Select a Report” dropdown menu, select “Employee Information”
5. Enter the Set Seg Account # in the center right of the screen
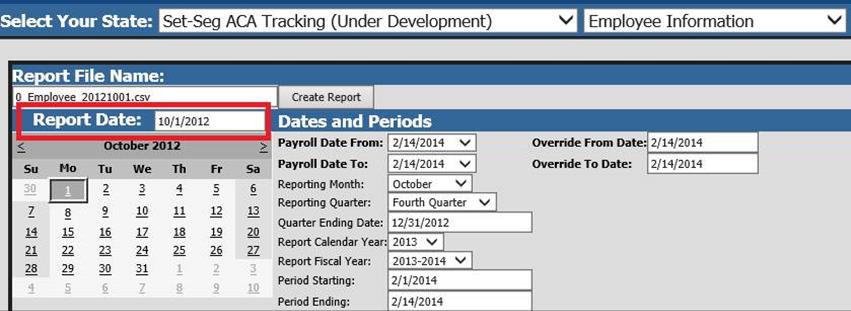
6. Select the starting date for the report on the calendar or type the date into the field “Report Date”.
o The system will use the date in the “Report Date” field as the starting date for the report. The report will include any employee that has a termination date that lies on or after the starting date for the report. If an employee has a termination date that was before the “Report Date” selected, the employee will not be included on the report.
o Ex: If the report should reflect all information from 10/1/2012 forward, enter 10/1/2012 in the “Report Date” field. All Employees with a termination date prior to 10/1/2012 will NOT be included on the report.
o If the report should reflect all information from 10/1/2013 forward, enter 10/1/2013 in the “Report Date” field. All Employees with a termination date prior to 10/1/2013 will NOT be included on the report.
7. Select “Create Report”
o When the Report is created, it will be listed at the top of the screen in the file grid.
o TO VIEW THE DATA ON THE FILE
§ To view the file, double click on the folder. This action will open the folder for viewing in Excel.
§ After viewing the file, close the report and answer “NO” when asked if changes should be saved.
o TO SAVE THE FILE FOR SUBMISSION
§ Right click on the folder and select “Save Target As”.
§ Save the file to a desired location on your computer.
§ Retain this location for browsing the report upon submission to Set Seg
Payroll Details Report
1. Select Payroll Processing
2. Select State/Federal Reporting
3. In the “State” dropdown menu, select “Set-Seg ACA Tracking”
4. In the “Select a Report” dropdown menu, select “Payroll Details Report”
5. The Date Selection is very important for this report.
6. Enter the dates for the Payroll Period being Reported in the following areas:
o Payroll Date From:
o Payroll Date to:
o Period Starting:
o Period Ending:
o EX: If the report should reflect data starting from
2012, select a 2012 date in the “Payroll Date From” field
If the report
should reflect data starting from 2013, select a 2013 date in the “Payroll Date
From” field
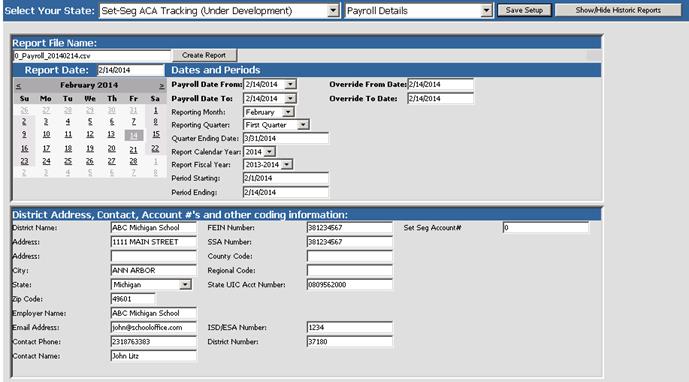
7. Enter the Set Seg Account # in the center right of the screen
8. Select “Create Report”
9. When the Report is created, it will be listed at the top of the screen in the file grid.
o TO VIEW THE DATA ON THE FILE
§ To view the file, double click on the folder. This action will open the folder for viewing in Excel.
§ After viewing the file, close the report and answer “NO” when asked if changes should be saved.
o TO SAVE THE FILE FOR SUBMISSION
§ Right click on the folder and select “Save Target As”.
§ Save the file to a desired location on your computer.
§ Retain this location for browsing the report upon submission to Set Seg
Leave of Absence Information Report
1. Select Payroll Processing
2. Select State/Federal Reporting
3. In the “State” dropdown menu, select “Set-Seg ACA Tracking”
4. In the “Select a Report” dropdown menu, select “Leave of Absence Information Report”
5. The Date Selection is very important for this report.
6. Enter the dates for the Payroll Period being Reported in the following areas:
o Payroll Date From:
o Payroll Date to
o Period Starting:
o Period Ending:
o EX: If the report should reflect data starting from
2012, select a 2012 date in the “Payroll Date From” field
If the report
should reflect data starting from 2013, select a 2013 date in the “Payroll Date
From” field
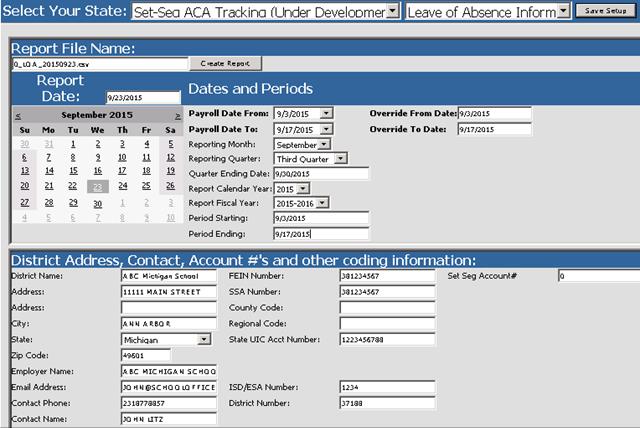
7. Enter the Set Seg Account # in the center right of the screen
8. Select “Create Report”
9. When the Report is created, it will be listed at the top of the screen in the file grid.
o TO VIEW THE DATA ON THE FILE
§ To view the file, double click on the folder. This action will open the folder for viewing in Excel.
§ After viewing the file, close the report and answer “NO” when asked if changes should be saved.
o TO SAVE THE FILE FOR SUBMISSION
§ Right click on the folder and select “Save Target As”.
§ Save the file to a desired location on your computer.
§ Retain this location for browsing the report upon submission to Set Seg
Offer of Coverage
Information Report
NOTE: TO
BE INCLUDED ON THE REPORT, AN EMPLOYEE MUST MEET THE FOLLOWING CRITERIA in the
ACA OFFER AND COVERAGE VIEW:
1. MUST HAVE INFORMATION IN THE FOLLOWING 2 FIELDS:
o BENEFIT EFFECTIVE DATE
o COVERAGE YEAR
2. THE COVERAGE YEAR MUST BE THE SAME AS THE YEAR BEING REPORTED
Example of Employees who WOULD be included on the report
for the 2016 Calendar Year
Example of an employee who would NOT be reported on the
report for the 2016 Calendar Year
1. Select Payroll Processing
2. Select State/Federal Reporting
3. In the “State” dropdown menu, select “Set-Seg ACA Tracking”
4. In the “Select a Report” dropdown menu, select “Offer of Coverage Information”
5. Select the Calendar Year being reported from the dropdown in the field "Report Calendar Year"
6. Enter the Set Seg Account # in the center right of the screen
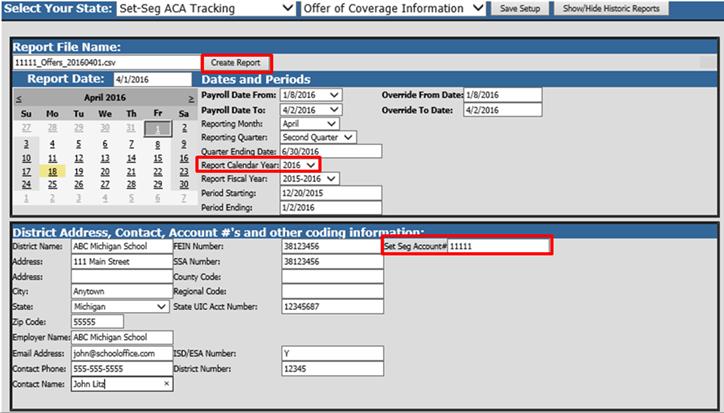
7. Select “Create Report”
o When the Report is created, it will be listed at the top of the screen in the file grid.
o TO VIEW THE DATA ON THE FILE
§ To view the file, double click on the folder. This action will open the folder for viewing in Excel.
§ After viewing the file, close the report and answer “NO” when asked if changes should be saved.
o TO SAVE THE FILE FOR SUBMISSION
§ Right click on the folder and select “Save Target As”.
§ Save the file to a desired location on your computer.
§ Retain this location for browsing the report upon submission to Set Seg.
Dependent Offer Information
Report
NOTE: TO BE INCLUDED ON THE DEPENDENT OFFER INFORMATION REPORT, A
DEPENDENT RECORD MUST MEET THE FOLLOWING CRITERIA IN THE ACA DEPENDENT
INFORMATION VIEW:
1. MUST HAVE INFORMATION IN THE FOLLOWING 2 FIELDS:
o BENEFIT EFFECTIVE DATE
o COVERAGE YEAR
2. THE COVERAGE YEAR MUST BE THE SAME AS THE YEAR BEING REPORTED
Example of Dependents who WOULD
be included on the report for the 2016 Calendar Year
Example of a dependent who would NOT
be reported on the report for the 2016 Calendar Year
1. Select Payroll Processing
2. Select State/Federal Reporting
3. In the “State” dropdown menu, select “Set-Seg ACA Tracking”
4. In the “Select a Report” dropdown menu, select “Dependent Offer Information”
5. Select the Calendar Year being reported from the dropdown in the field "Report Calendar Year"
6. Enter the Set Seg Account # in the center right of the screen
o 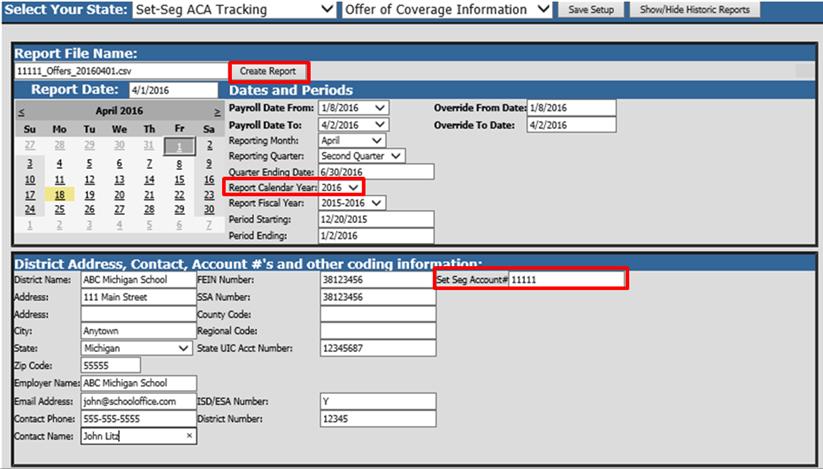
7. Select “Create Report”
o When the Report is created, it will be listed at the top of the screen in the file grid.
o TO VIEW THE DATA ON THE FILE
1. To view the file, double click on the folder. This action will open the folder for viewing in Excel.
2. After viewing the file, close the report and answer “NO” when asked if changes should be saved.
o TO SAVE THE FILE FOR SUBMISSION
1. Right click on the folder and select “Save Target As”.
2. Save the file to a desired location on your computer.
3. Retain this location for browsing the report upon submission to Set Seg