
Revised: 4/2021
Accounts Payable Security
You will want to verify the Group Authorization settings have been activated.
1. Select Administrative Utilities.
2. Select SDS Web Office Settings.
3. Under the Finance tab, select the Group Authorization Option – if Activate is listed with an “N”, you will need to change to a “Y”.
NOTE: if this option is not listed in the Finance tab, this option has already been activated.
4. If you have made a change, select Save Changes.
5. Log out of the system to activate the new settings.
6. Log back into the system.
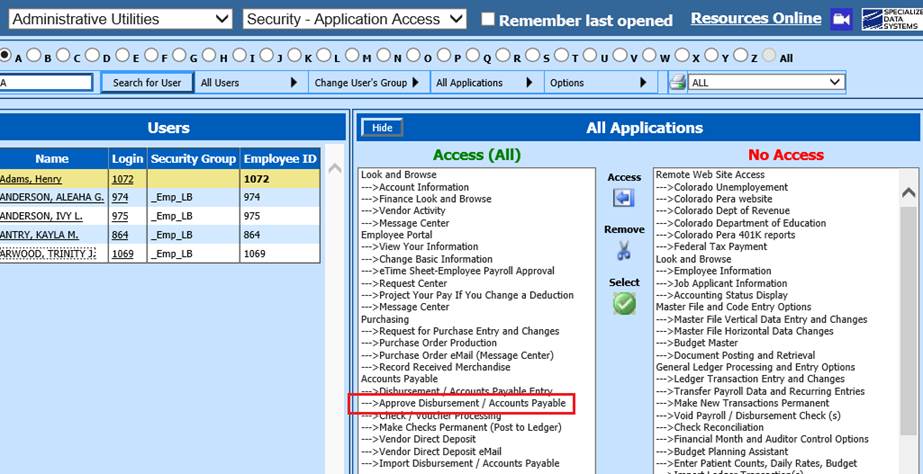
Security Application Access
You will need to determine the
access and flow needed for the Accounts Payable Authorization process
1. Select Administrative Utilities
1. Select Security – Application Access
2. Make sure the User(s) who would need to approve the Accounts Payable invoices have access to the Approve disbursement/Accounts Payable Application.
Security – Request &
Approve
Setting up the Authorization User Assignment
1. From Administrative Utilities, select Security – Request and Approve.
2. Select Accounts Payable.
3. Under the Administrative Group, Select your Group or enter in your new Group name: i.e. Elementary.
4. To assign
the Requesters: Under Staff Not Assigned to a Group, choose the Users for this
group and use the Add  to move them into Admin Requesters.
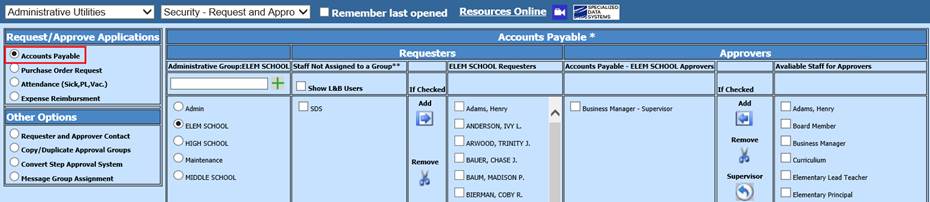
5. To assign
the Approvers: Under Available Staff for Approvers, select the Users and use the
Add  .
.
6. A
Supervisor Approver will override any other Approver. They may approve or deny
any request available to them. To assign a Supervisor Approver to your selected
“Admin Approvers”, check the box next to the users name and select the  .
.
NOTE: If you are using the Approval process in the other Applications available, you will want to verify the Approval settings in each group as Accounts Payable, Purchase Order, and Attendance requesters use the same administrative group.
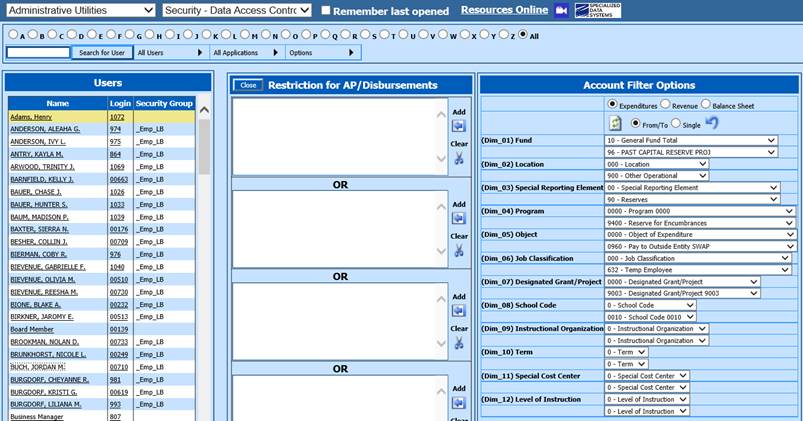
Security – Data Access Control
Setting up the specific Data
Restrictions for the User with Accounts Payable Access
Determine if there are any security data
restrictions needed:
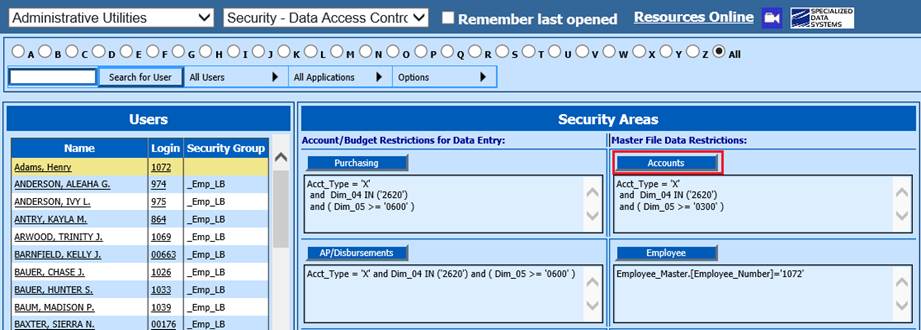
1. From Administrative Utilities, select Security – Data Access Control.
2. Select the User.
3. Under the section Accounts/Budget Restrictions for Data entry, select “AP/Disbursements”.

4. Add the Account Filter Options. Select the Account type: Expenditures, Revenues, Balance Sheet. (If no restrictions listed, they will be defaulted to Expenditure accounts upon data entry of AP).
5. Select the
“From/To” for a range of accounts to add, or “Single” for individual account
selection. Click on  to refresh your accounts.
6. After you
have refreshed and verified your accounts, Select Add  to move the formula into the
Restriction area.
to move the formula into the
Restriction area.
7. Once you
have completed your account restrictions, verify the accounts the user has
access to under “Access to 32 Accounts”, then select  .
.
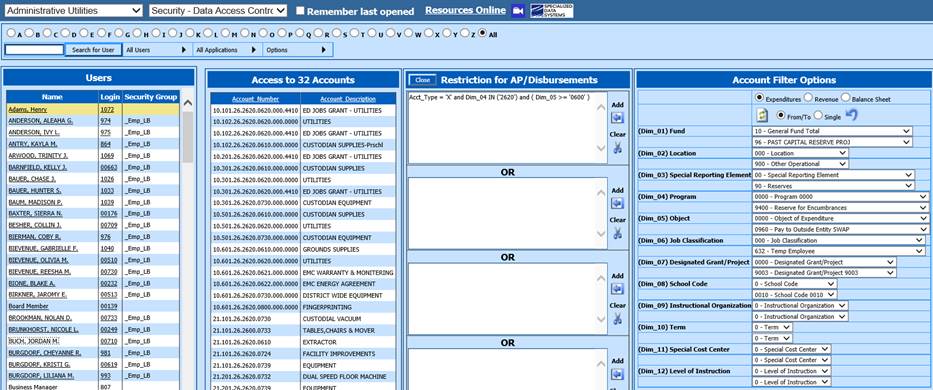
8. If this User needs access to view Accounts Payable reports, you need to set up the “Master Data Restrictions” also. Select the “Accounts” selection and add the restrictions needed following the same steps as “AP/Disbursements”.
9. Under Detail “Data Entry/View Restrictions”, select “User will see”.
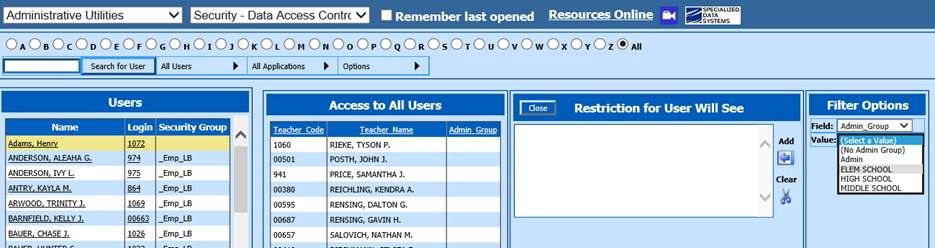
10. Under the
Filter Options, under Value: select the Group for the User to see, then select
Add .
11. Select 

Authorize Accounts Payable Invoices
Once an invoice has been
entered, the Approvers will receive a notification bar when they log into an
Application within the system. 
Note: The authorization does
not have to happen in any specific order. All Approvers can authorize the
invoice at any time. They do not have to wait for one person to authorize it
before they authorize it.
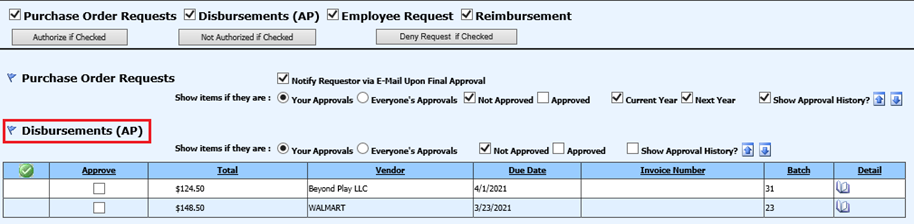
1. From Accounts Payable, select “Approve Disbursement/Accounts Payable” or select the red notification bar.
2. Under Disbursements (AP), you will see the invoices that are waiting for approval, if “Not Approved” is selected. If you need to see Approved requests, place a check in “Approved”.
•If the User has the “Supervisor” status in their Security setting, they have the “Everyone’s Approvals” selection available. If they use this selection, their approval will override the other Approvers.
3. If you
have more than one request to approve, click  to Check All Lines to expedite this
process.
to Check All Lines to expedite this
process.
4. When selected, the Show Approval History will display who entered the request and all that have or need to approve.

5. Selecting the book under Detail, will show the details of the invoice.

6. To Approve the invoice, place a check in the “Approve” column and select “Authorized if Checked”.

7. If you have already Authorized the invoice and need to change this, select “Not Authorized if Checked”.
8. If an authorizer decides that this should not be authorized, they can type in the reason for denial in the Internal Notes field and select “Deny Request if Checked” .