Revised: 4/2021
Enable
Active X Controls
Since only Internet Explorer recognizes ActiveX
controls, to print from any other browser the user must have the Adobe Acrobat
viewer installed (See link below). The report will be loaded into Adobe and then
they print from there.
https://www.adobe.com/products/catalog.html
Make sure you download the most current viewer for
MAC
Below are important steps so that you can view and print
your reports with Active X through WFO.
To enable active X controls:
1. Click on "Tools" menu in the browser.
2. Select "Internet Options"
3. Click on the "Security" tab on the top portion.
4. Select the “Trusted Sites” zone.
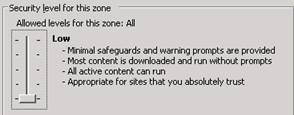
5. Set your “Trusted Sites” zone security to low.
o 
6. Click on Sites.
7. Type in the URL of your SDSWebOffice site in “Add this website to the zone”. Note that you will need to uncheck the “Require server verification (https:)” check box if you are not using https.
8. Click Add, and then Close.
Trouble Viewing or Printing Reports –
ActiveX
If you have completed all the steps above to enable your
ActiveX control and you are still having problems viewing your reports please
check out the other suggestion below and contact your Tech to assist you. Your
Tech can search for solutions for your specific setup as well.
To
initially install the ActiveX control you need to be the Local
Administrator.
1. Set your “Trusted Sites” security to low.
o In I.E. select |Tools |Internet Options |Security |Trusted Sites |Custom Level or Default |Select Low |Click Ok |Try running a report.
2. Add the URL to your trusted sites list on every Internet Explorer client.
o In I.E. select |Tools |Internet Options |Security |Trusted Sites |Click on Sites |Enter URL if not selected |Click Add.
3. There may be some program blocking ActiveX controls or Pop-Ups. Either a setting in IE or another program, such as Google, FireFox or Symantec Internet Security.
o If adding the Web Office URL as trusted sites check other programs that may be blocking it such as Norton.
4. Verify that the various ActiveX options are Enabled or at least set to Prompt.
o In I.E. select |Tools |Internet Options |Security |Internet |Custom Level |Active X Control and Plug-ins |Verify Enabled is selected |Click OK |Try running a report.
5. Try to manually install the ActiveX control:
o Please note: If you're hosted at SDS please submit a X-Connect case. There are different versions of crystal reports depending on which server you are hosted on. A support person will instruct you which file to download from the sds ftp site.
o If sds web office is on your server, locate the Printcontrol.cab file on your web server. The PrintControl.cab is on the web server on the C: drive. Normally it is in C:\Program Files\Business Objects\Common\3.5\crystalreportviewers115\ActiveXControls.
o Copy the PrintControl.cab file to your computer.
o Extract the .cab file into a temporary folder.
o Right-click the PrintControl.inf file and then and click 'Install'.
o Sometimes the PrintControl.dll file doesn’t register properly and it will need to be manually registered.
1. For Windows 32-bit:
o Open a Command Prompt. You need to open the Command Prompt using the “Run as Administrator” option
o Copy the PrintControl.dll file to the Windows\System32 folder using XCOPY. If you put the printcontrol.dll in C:\TEMP the XCOPY command would be: XCOPY C:\Temp\printcontrol.dll C:\<ENTER>
o Then at the Command Prompt type REGSVR32 C:\printcontrol.dll <ENTER>
2. For Windows 64-bit:
o Open a Command Prompt. You need to open the Command Prompt using the “Run as Administrator” option.
o Copy the PrintControl.dll file to the Windows\SysWOW64 folder using XCOPY. If you put the printcontrol.dll in C:\TEMP the XCOPY command would be: XCOPY C:\Temp\printcontrol.dll C:\<ENTER>
o Then at the Command Prompt type REGSVR32 C:\printcontrol.dll <ENTER>
6. LAST RESORT - Reset the browser to the factory defaults.
o In I.E. select |Tools |Internet Options |Advanced Tab |Click the Reset button.
o Follow Steps 1-6 again.