Revised: 4/2021
Data View Definition allows the design or modification of
custom screens for data entry or viewing purposes. You may make it your design
only; assign the custom screen to a group of users or several individuals
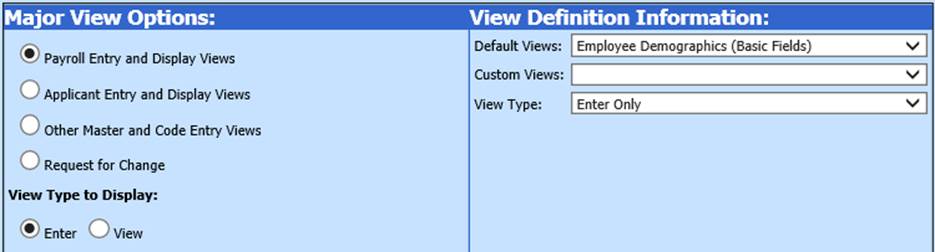
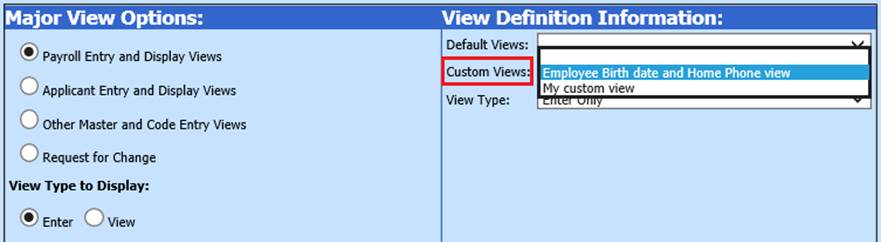
Major View Options: There are four areas for you to select from:
Payroll Entry and Display Views, Applicant Entry and Display Views, Other Master
and Code Entry Views and Request for Change
•Payroll Entry and Display Views: These views will appear in Human Resources, Payroll, Employee Contracts, Deductions/Benefits, etc.
•Applicant Entry and Display Views: These views will appear in Human Resources, Job Applicant Information
•Other Master and Code Entry Views: These views will appear in Master File, Code Entry Options, Master File Data Entry and Changes
•Request for Change: These views will appear in the Employee Portal
•View Type to Display: There are two selections for you to chose from; Enter or View
o Enter: Using this selection, you can enter and see data in the Views
o View: Using this selection, you can only see those Views in Look and Browse
View Definition Information: You can select from the Default or Custom Views.
•Default Views: These views are the system default views. You can create your custom view by selecting the default view to build from
•Custom Views: These are the custom views you have already set up in your system
•View Type: The three different view types are Enter Only, View Only (Look and Browse) or Request for Change
Setting Up a New Entry
View
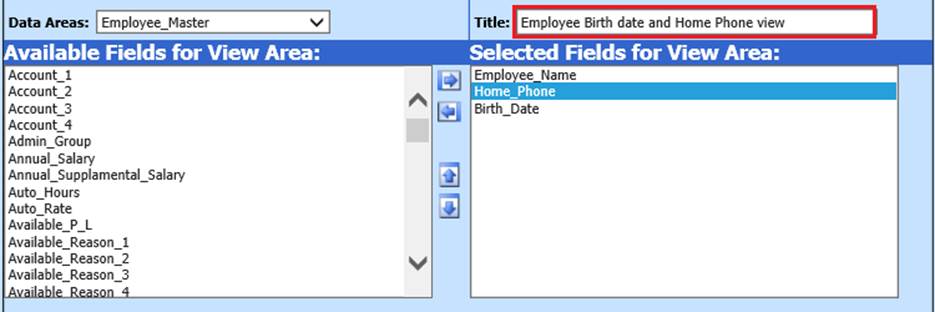
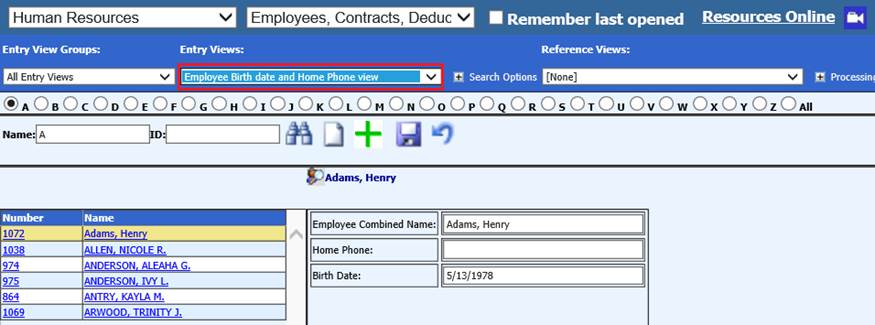
Example #1: In
Human Resources, if you wish to have a Date Entry View with just the employee
birth date and home phone.
1. Select Administrative Utilities
2. Select Data View Definition
3. Under “Major View Options”, select “Payroll Entry and Display Views”
4. Under “View Definition Information”, in the drop down selection next to “Default Views”, select Employee Demographics (Basic Fields)
5.
In the ‘Selected Fields for View Area’, highlight the Field to remove and
use  to deselect the fields you do not want in
this new view
to deselect the fields you do not want in
this new view
6.
In the ‘Available Fields for View Area’: Highlight the Field to be added
and use  to move into ‘Selected Fields for View
Area’.
to move into ‘Selected Fields for View
Area’.
7.
To rearrange the order of fields, highlight the field on the right and use  to relocate fields.
8. To save the new view, change the name in the “Title” area.
9. Place a check in: ‘This is my view only (and my security group)’, for this view to be viewed by just you and your security group unless you want all users with access to the views do not select this option.

10. Select “Save New View”.
11. The new view is now available under Human Resources, Employees, Contracts, Deductions, Benefits, etc., Entry Views: Select your new view.
Changing a View:
If you find you need to change a custom view already set up:
1. Under “View Definition Information”: “Custom Views”, select your custom view
2. Make the needed changes under “Selected Fields for View Area”
3. Place a check in: “This is my view only (and my security group)”, for this view to be viewed by just you and your security group unless you want all users with access to the views do not select this option.
4. Select “Save Changes”.

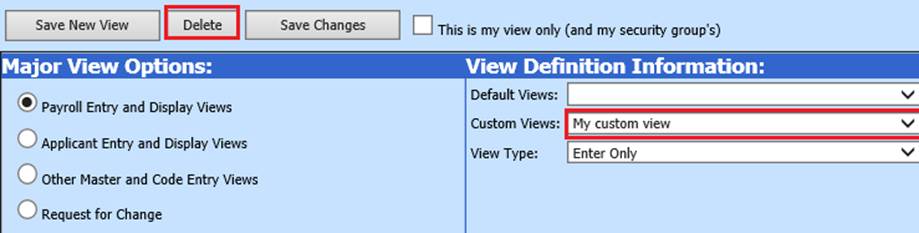
Deleting a View
If you find you have a custom view that you no longer are using or need in the future, you can delete the view:
1. Under “View Definition Information”: “Custom Views”, select the view to delete
2. Select “Delete”