Revised: 6/2021
The Excel Control center
provides the ability to transfer information from the Web Financial Office to an
Excel workbook. The Excel Control center consists of two menu
selections. One to define the relationship between your Excel workbook and
the Web Office data and a Second web page to automatically summarize and post
information from Web office to your Excel workbook.
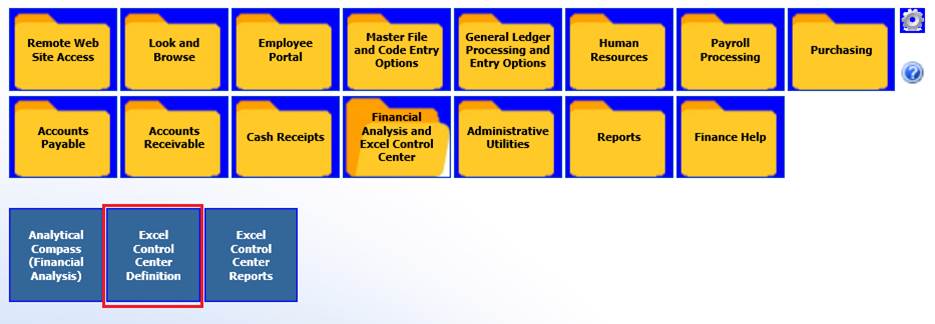
1. Select Financial Analysis and Excel Control Center
2. Select Excel Control Center Definition
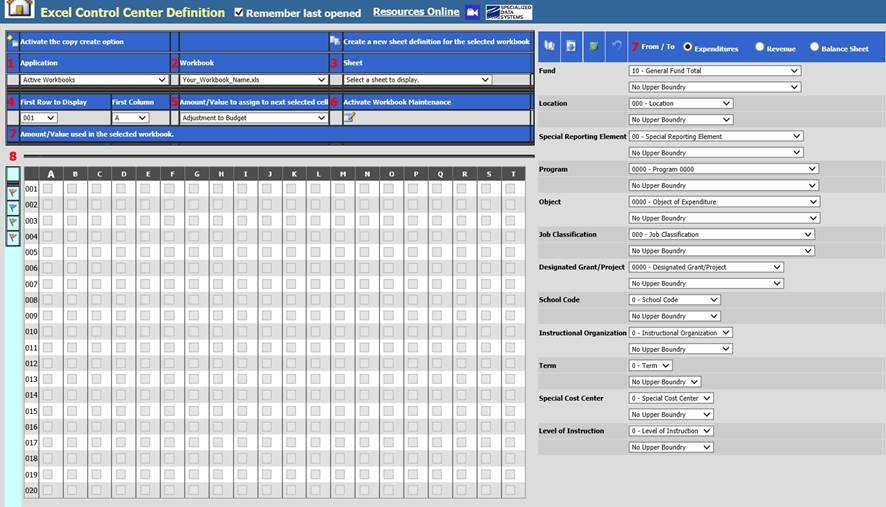
3. The following screen will be displayed.
Before you begin working in this area evaluate the Excel workbook and each sheet within the workbook you wish to transfer information to from the Web Office system.
This is an example of an Excel workbook which has been designed to report summarized financial information. Typically this type of document requires manual input each reporting period. If however you define its layout with the “Excel Control Center Definition” you will then be able to have the program enter the number in the appropriate column and rows.
Sample workbook sheet.

Sample completed workbook definition.

Sample workbook sheet after
refreshing its information using the completed definition.

These are the
steps follows to create the interface between Excel and Web Office.
Evaluate your workbook and determine how each number to be transferred
is determined. For example the Year to Date salaries on in our example would be
a summary of all expenditures cross all funds in the current fiscal year.
Salaries in this example consist of general ledger accounts with an object code
greater than or equal to 0100 and less than 0210. Benefits >= 200 and <
300, Purchase Services >=300 and <400 and so on.
Also notice that
test information is being inserted in some specific cells. D3 for example has
the words “Year to Date” recorded and C10 has the word “Total”. These values
could be simply entered in the workbook or as in this example they can be
transferred.
Let’s break down each part of the definition screen and how
it is used to create the interface between Web Office and excel.
1. Select the application area with a workbook you would like to define. If you do not have a workbook yet established,copy the sample delivered with the system and modify it.

2. Select the workbook which will contain your definition. The name does not need to match your workbook name but for consistency purposes it is suggested.

3. Select the workbook which will contain your definition.

4. Select the name of the sheet within your workbook. This name must be exactly the same as the actual name of the sheet in your excel workbook.

5. Select the first row and first column you will be initially working with. As you complete one area of the spread sheet you change the first row and/of column to define other cells.
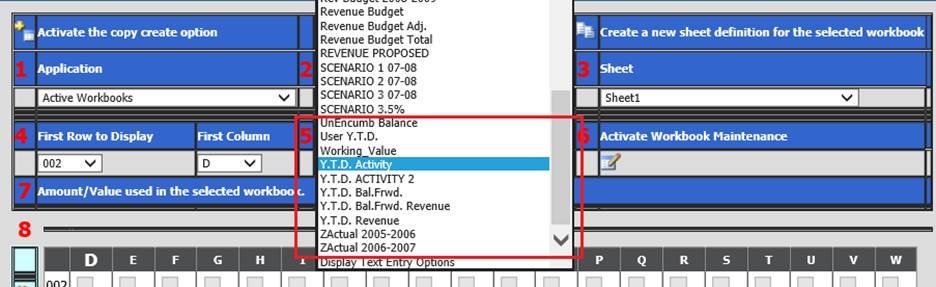
6. Select from the drop down list the value or amount you wish to have summarized and posted to your spread sheet.

7. Push this button to “Activate Workbook Maintenance”. During the definition process the program automatically saves your work. If before exiting the program or selecting another workbook or application you wish to undo your work you can simply push the “Reverse changes made this session” button. If you have did leave the program and at a future time decide to reverse your changes select the heading “Reverse changes made this session”.
8. The system will then provide you with the date and time from previous activations. The last five activations will be available. You then select one of the available options and push the button to restore your definition to a previous version.

9. Indicate
the type of accounts you wish to select from your general ledger. In this case
“Expenditures” have been selected from the radial button at the top of the
screen. From the first dropdown next to object 100 – Salaries has been selected
then 210 – Retirement from the second (to) dropdown with object codes. Note. 210
happen to be the lowest value in the 200 range of fringe benefit object
codes.
10. A formula has
been created based on your selection of information in step seven.
Based on
our evaluation of the Excel workbook sheet the Year to date salaries are to be
posted to cell D3. To make that happen place a check mark in cell D
003.
11. To complete the
workbook select other values as in step 5 and step 7, check the appropriate cell
and your definition is complete.
After your workbook has been defined you
are then ready to post information from Web Office to the Excel workbook sheet.
From the menu select “Excel Control Center Reports”. The
following screen will display. 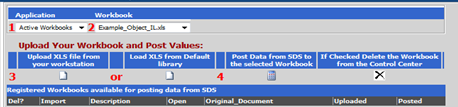
1. Select Active Workbooks

2. Select the application area which contains the workbook definition you wish to use as your template to post data from Web Office to Excel.

3. Select the
workbook definition you have setup for the Excel Workbook you wish to have
information transferred.
4. If the Excel workbook is a standard or default workbook supplied by SDS push the button under “Load SLX from Default library will display. If it is not a standard XLS file or if you wish to upload a different version, push the button under the caption “Upload XLS file from your workstation.

5. After the Excel workbook has been upload or registered push the button below the caption “Post Data from SDS to selected Workbook”. The program will now interpret your definition and post summarized information to your workbook.
6. Select the Open icon to load and display our updated workbook.
