Revised: 10/2020
To watch video recording for TRS Payroll Calendar Schedule Setup process: https://recordings.join.me/9fJX9Sxi6ky_gmeLUW_7_Q
The Payroll Calendar Schedule Setup is an important piece of the TRS Gemini Reporting within SDS & eliminates the need for processing separate payrolls for different date ranges.
The First/Last Work dates that are assigned to each Payroll Date will determine the date range of pay that is reported to TRS. That date range looks at the Payroll Calendar that the staff member is assigned to and reports the number of days worked for a specific payroll date. If there is any variation in the First/Last Work dates (i.e. teachers vs. administrators) that should be reported to TRS, this option allows the set up of 4 Alternate Payroll Schedules to accommodate these different pay date ranges.
In addition, this option allows for:
•Setup of a new Payroll Date
•Editing of Check Date, First Work, Last Work Date on any Payroll Date
•Deletion of Payroll Date(s) with no activity
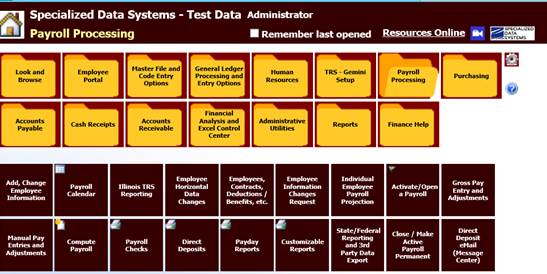
ACCESS PAYROLL SCHEDULE SETUP
1. Select Payroll Processing Folder
2. Select Illinois TRS Reporting
3. The
Illinois TRS Reporting Screen will display the Payroll Dates that have been
recorded for the Fiscal Year selected in the upper left corner.
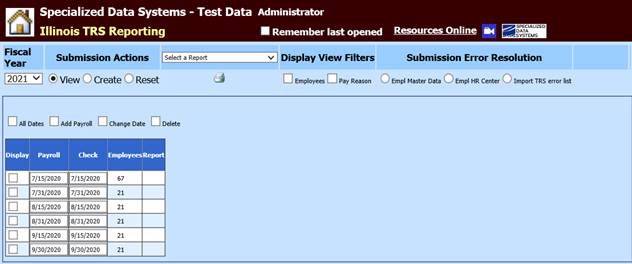
VERIFY STANDARD PAYROLL SCHEDULE
1. Click the checkbox “All Dates”
2. The default schedule is the “Standard Schedule”
3. All dates that were added to the Payroll Calendar will display with the Check Date and First/Last Work Dates assigned to that Payroll Date.
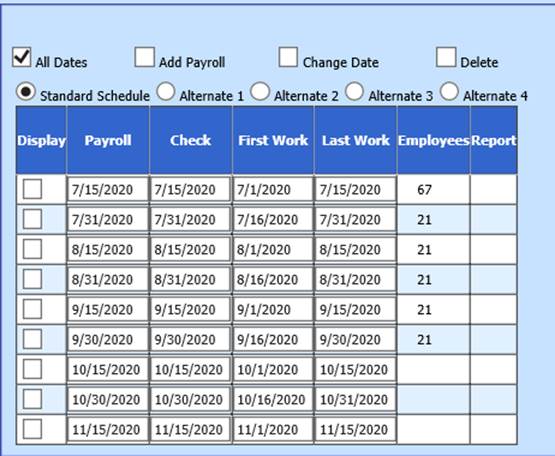
4. The “Standard Schedule” will contain the default First/Last Work Dates that will be reported on the Gemini Report. If different First/Last Work Dates should be reported for other employees, they should be assigned to an Alternate Payroll Schedule.
STANDARD PAYROLL SCHEDULE VS ALTERNATE PAYROLL SCHEDULE
If groups of employees need to be reported with different First/Last Work Dates than is set with the Standard Schedule, an Alternate Payroll Schedule(s) can be setup, maintained, and assigned to specific employees. If an employee is assigned to an Alternate Schedule, the Gemini report will look at that Alternate Payroll Schedule and use the First/Last Work Date assigned under that Alternate Schedule.
CREATE AN ALTERNATE PAYROLL SCHEDULE
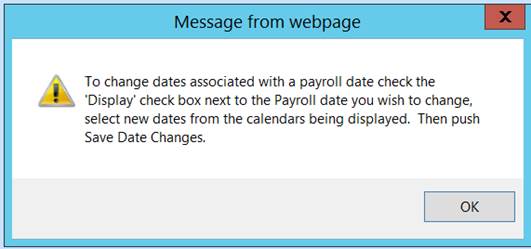
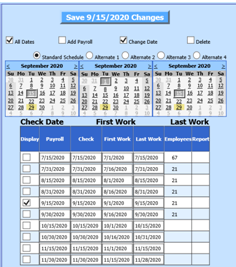
1. Click in the “Change Date” checkbox to assign First/Last Work Dates to the selected Payroll Schedule.
2. Click OK when the message below appears
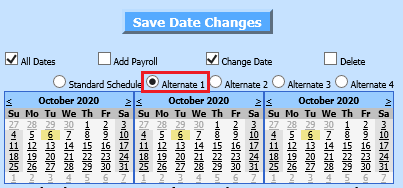
3. Select the Alternate Schedule to work with. For this documentation, we will select Alternate 1.
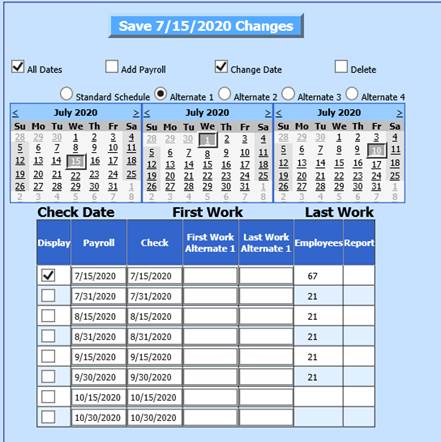
4. Check the “Display” checkbox to the left of the Payroll Date you wish to assign alternative First/Last Work Dates to.
5. The series of Calendars displayed are defined with the titles: Check Date, First Work, Last Work
Check Date: Select the Check Date to use with Alternate 1
First Work: Select the First Work Date for Alternate 1
Last Work: Select the Last Work Date for Alternate 1
6. Select “Save X/XX/XXXX Changes” above the “Change Date” selection option.

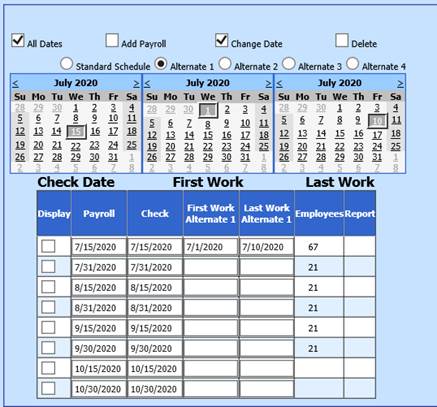
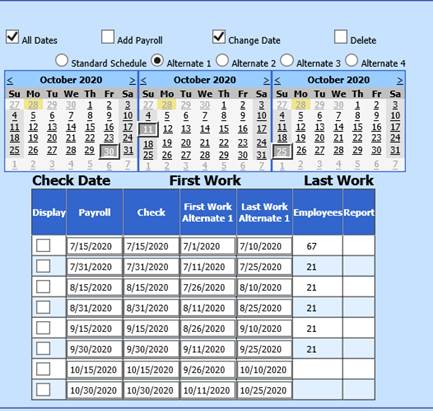
7. The new First/Last Work Dates will appear in the Payroll Date Line for the Alternate 1 schedule
8. Continue through each Payroll Date listed and assign the Check Date, First Work, and Last Work Dates for the Alternate 1 schedule.
9. Repeat the Instructions for setup of Alternate 2, Alternate 3, or Alternate 4 Payroll Schedules, as needed.
Note: Each District may have a different need in the way they use the Schedules and the number of Schedules needed in order to report the First/Last Work Days accurately, for each employee, on the Gemini Report.
ASSIGN AN EMPLOYEE TO AN ALTERNATE PAYROLL SCHEDULE
•If an employee’s First/Last Work Dates coincide with the dates assigned on the “Standard Payroll Schedule”, their employee record will default to that schedule.
•If an employee should be assigned to one of the Alternate Schedules, this Schedule will need to be assigned to their employee master record.
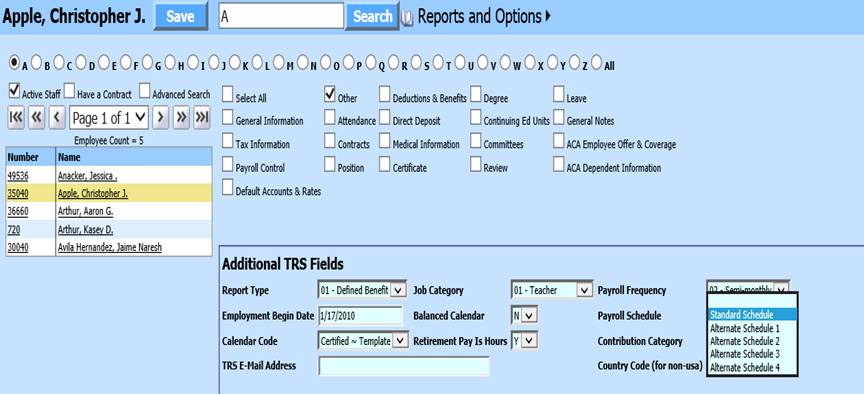
1. Select Payroll Processing
2. Select Add/Change Employee Information
3. Select to view the “Other” Option at the top of the screen.
4. Select an employee to assign to an Alternate Schedule
5. In “Additional TRS Fields”, locate the field “Payroll Schedule” field, and assign the Alternate Schedule the system will reference for Check Date/First Work/Last Work information for that employee.
6. Select “Save” at the top of the screen.
7. Repeat these steps for each employee that should be assigned to an Alternate Schedule.
ADD A NEW PAYROLL DATE
An additional option under Payroll Processing/Illinois TRS Reporting is the ability to add new Payroll Calendar Dates. Typically, a new Payroll Date is added to the Payroll Calendar under Payroll Processing/Activate/Open a Payroll.
You may now use this option to add all new payroll dates. If you add a new Payroll Date in this option, you can add all associated Check Dates/First Work/Last Work Dates for the Standard Schedule, and you can also update any Alternate Schedules that are being utilized.
To Add a New Payroll Date:
1. Select the “Add Payroll” checkbox
2. The Standard Schedule should be selected
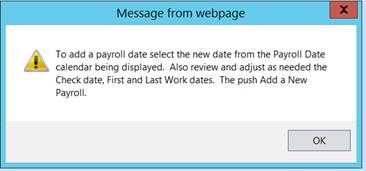
3. A message will appear that prompts you with directions, select “Ok”
4. Select a Payroll Date, Check Date, First Work, and Last Work from each of the 4 displayed Calendars.
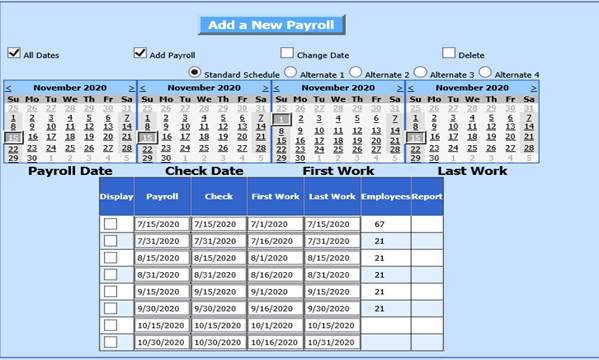
5. Select “Add a New Payroll” at the top of the work area to record the new Payroll information.
6. If you need to assign an alternative schedule for that payroll date, select the “Change Date” checkbox
7. Choose the Alternate Schedule
8. Select the Display box next to the new date
9. Choose the dates from the displayed calendars
10. Select to Save Changes
CHANGE DATE
To Add/Edit/Change the First Work or Last Work Dates on a Payroll Schedule
1. Select the “Change Date” checkbox at the top of the work area
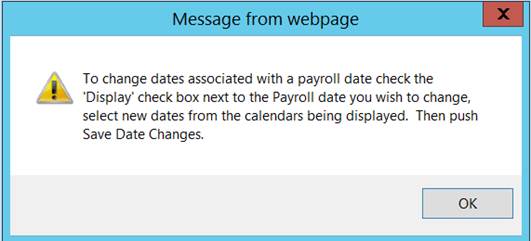
2. The message below will display to guide your process. Select “OK” to proceed.
3. Select the Standard Schedule or the Alternate Schedule to work with
4. Check the “Display” Checkbox next to the payroll date you wish to Change Dates for
5. The Calendars will display the dates that are currently assigned to that payroll on the selected Payroll Schedule.
6. Select the new dates.
7. Select “Save X/XX/20XX” Changes” at the top of the Work area.
8. The newly selected dates will display in the Payroll Schedule.
DELETE A PAYROLL DATE
A Payroll Date can be deleted if it has not been used. If a Payroll Date has been opened or processed, it cannot be deleted.
To Delete a Payroll Date:
1. Select the “Delete” checkbox at the top of the work area.
2. The message below will display. Select “OK” to proceed
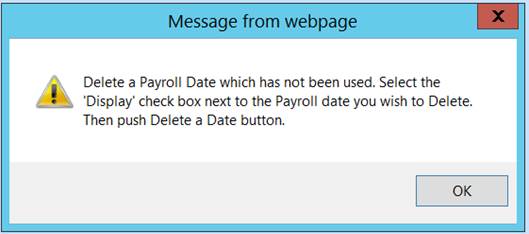
3. Select the “Display” column next to the Payroll Date you wish to Delete
4. Select “Delete Payroll Date XX/XX/XXXX” at the top of the work area to delete the payroll

NOTE: If you try to delete a payroll that has activity posted to it, a message will display that will indicate the delete operation has been aborted.