
Revised: 4/2021
Setup for Green Accounting
If you have not begun using Green Accounting, check for your Unique Green Accounting Product Activation Key from SDS. The key is located in Administrative Utilities |SDS Web Office Settings | Product Activation, Green Accounting Product Key. If you have a question, please Xconnect for assistance in obtaining your key.
•Purchase a Scanner - This can be an inexpensive general scanner. The scanner is used to save supporting document images as PDF files. You might want something that has a feed option depending on your needs.
•Determine a drive/directory & create a folder for the scanned items to be saved into. If you have more than one person scanning items, you can create the folder on a network that everyone can access. You will want a separate folder for each area you will be utilizing (Invoices, Cash Receipts, Journal Entries, Timecards, Accounts Receivable).
Set up a Web Services Send Files for Green Accounting
1. Create a Web Services for Green Accounting folder on desktop. Name this file as you wish, you will access this folder when uploading your PDF’s into your Finance Web Office.
2. Select Administrative Utilities
3. Select Security - Web Services
4. Select Add New Web Services User. Note: User name should not contain a space, it should be continuous.

5. Type in user name
6. Select Create
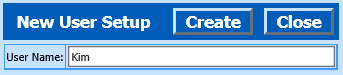
7. A message will appear stting the user has been created
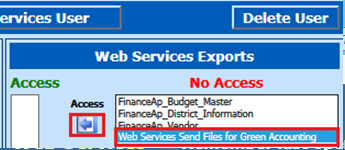
8. Select the new Web Services User
9. Under Web Service Exports, No Access column select “Web Services Send Files for Green Accounting”
10. Select Access Arrow to move into Access column
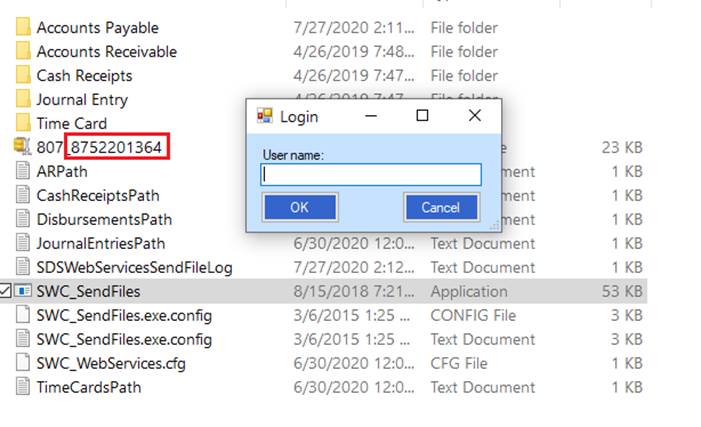
11. This will give you a unique password to access Send Files to upload your scanned PDF’s into your Web Finance Office. This is located on the Web Services screen next to the name of the User in Brackets (Kim (8752201364)) and will also be the last half of the zip file

12. Right click on down arrow next to name
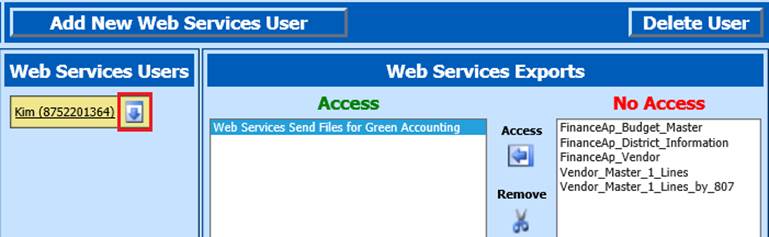
13. Select Save Target As
14. Navigate to the Green Accounting Folder on the Desktop
15. Select Save
16. In the Web Service folder right click on the saved file and select “Extract All”
17. Change where the file will be extracted to by removing the numbers from the file (you want it to be in the Web Services folder on the desktop)
18. Select Extract
19. This will place an executable application file in the folder that you will use to send your files
Accounts Payable Scans
1. When invoices are received, write or stamp any relevant information on the invoice, this can also include the account number(s) the invoice is to be paid out of. Scan as PDF files. (Scan using a good quality, but not a photographic quality, 300x300dpi black and white works good)
2. Scan the invoice and name the file with the Vendor Name and the Invoice amount. i.e. SpecializedDataSystems 500.00.pdf. If the vendor name and invoice amount are displayed in the file name, the system can detect these fields and automatically and complete a Vendor search, with adding the amount when the invoice is selected for payment.
Scanning multiple documents
If you have a group of documents, you may scan all documents into one PDF file. The key is in naming the file by adding “-MP” just before the file extension. For instance: “Central Office-MP.pdf” this will trigger the program to split the scanned images in the PDF file into multiple pages, labeling each the name of the file and an adding a page number before the date and time. Central Office-MP.pdf-1(date and time), Central Office-MP.pdf-2(date and time), etc. When scanning with a multifeed is very helpful.
Transfer Scanned Invoices to SDS
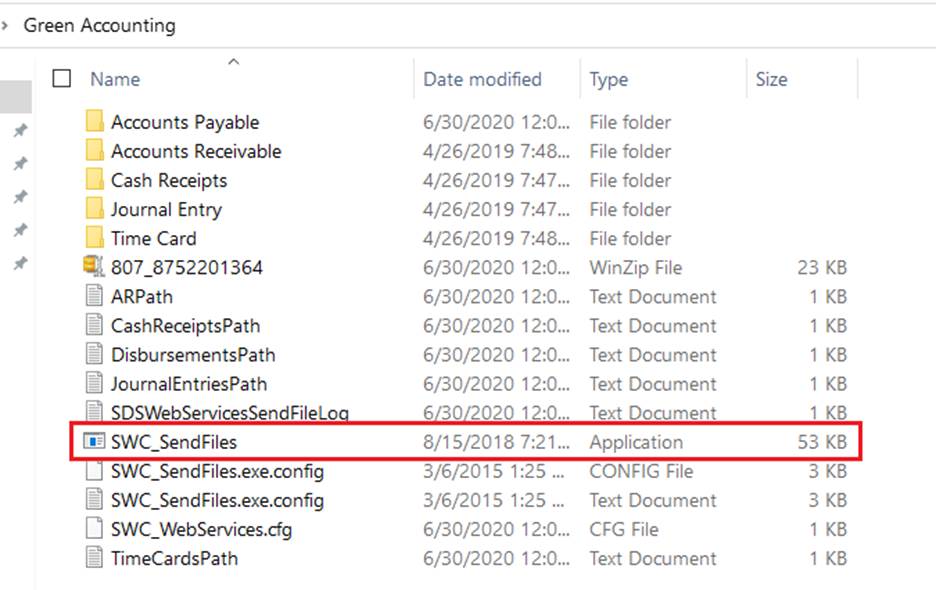
3. Access Green Accounting folder.
4. Double Click the SWC_SendFiles.exe
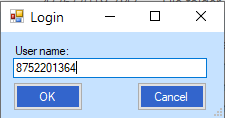
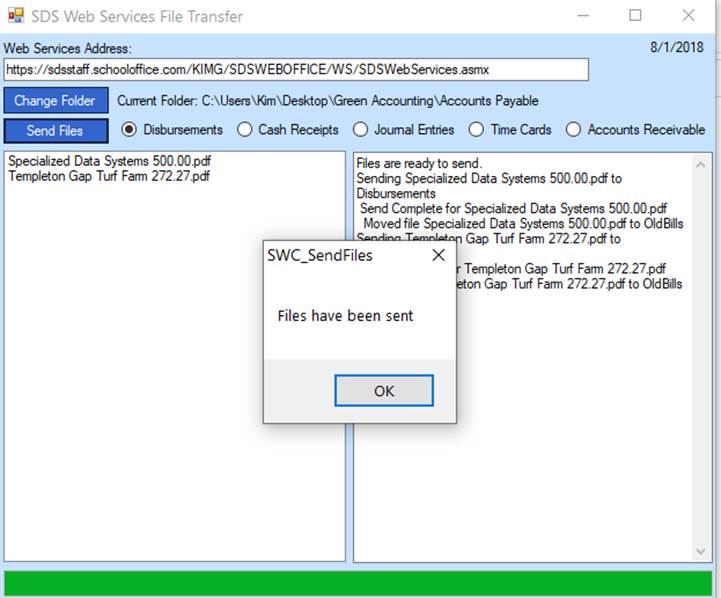
5. Enter unique number, select OK
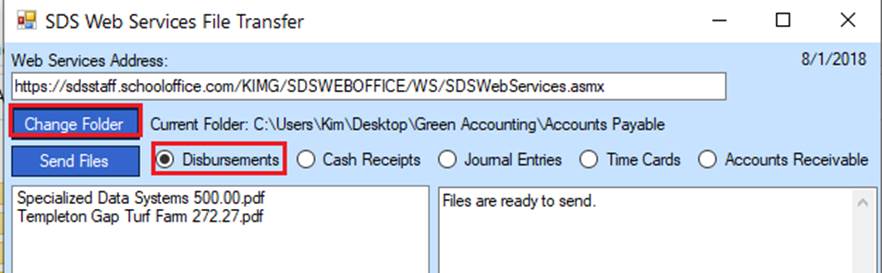
6. This will open your SDS Web Services File Transfer screen. Select Disbursements, select “Change folder” and navigate to your PDF folder for the selected area to upload (IE: Bills). As soon as the folder is selected the PDF’s in that folder will be available for upload in a list on the left.
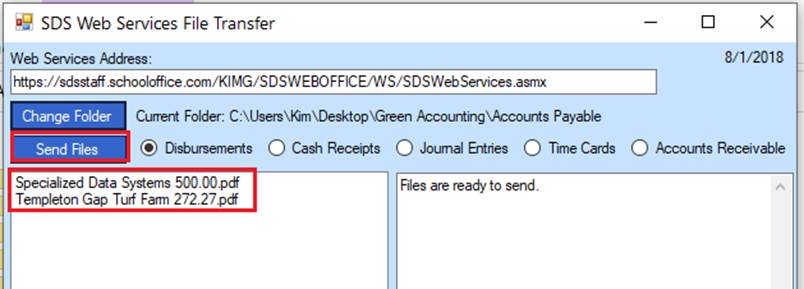
7. Select “Send Files” to upload.
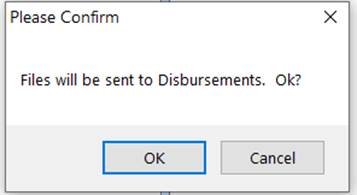
8. You will receive a Confirmation message, read and select OK
9. You will receive a message that your Files have been sent, select OK
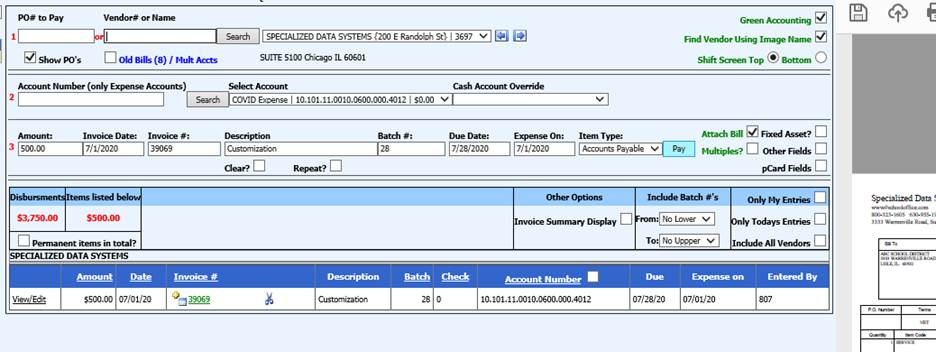
Disbursement/Accounts
Payable
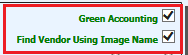
After entering the
Disbursement/Accounts Payable screen, place a check in Green Accounting and Find
Vendor Using Image Name. Bill images will show to the right side of the
display.
Selecting  Bottom will take you to the Quick Entry on
the far right.
Bottom will take you to the Quick Entry on
the far right.
Selecting  in Quick Entry will take you back to the Main
display on the left.
in Quick Entry will take you back to the Main
display on the left.
Make sure “Attach Bill” is
selected at all times when paying an invoice from a scanned image.
This tells the system to attach the selected image to the bill when PAY or Enter
is selected. 
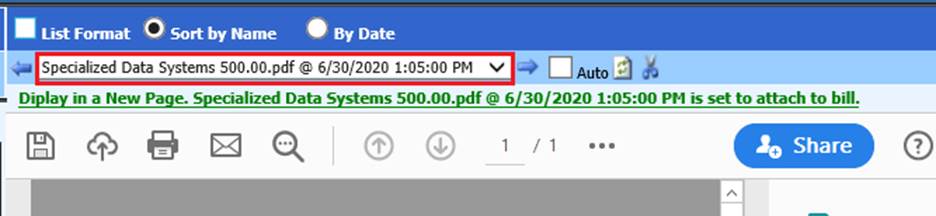
Invoice List Format,
Sorts by Name, By Date: 
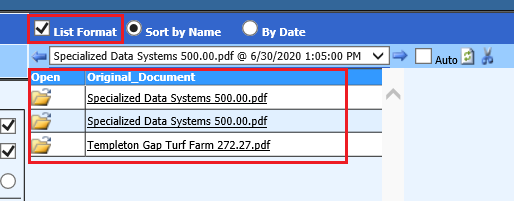
1. List Format: This option when checked will display the Invoices in a list, otherwise will display in a dropdown selection to choose from.
2. Sort by Name: This option is used to sort the scanned invoices by the File Name. If your file names contain the Vendor Name, the items would be sorted alphabetically by Vendor Name.
3. Sort by Date: This option is used to sort the scanned invoices by Date.
Invoice Display:
1. Select Small, Medium, Large, XL at the right of the image to control the size of the selected invoice.

2. Click the link to display the selected invoice in a New Page.

Ways to view scanned invoices:
1. Select the drop down arrow and select the bill to be displayed for payment.
2. Select the arrow keys on either side of the display box to move through the bills until the desired bill is displayed.
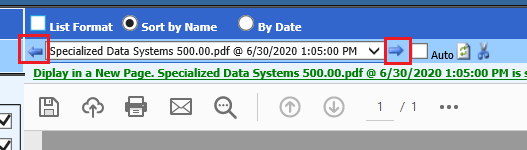
3. If you prefer to see the invoices in a list, click in the checkbox labeled ‘List Format’
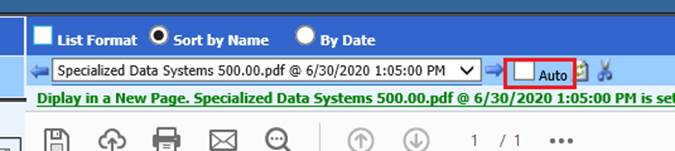
4. Checking the “Auto” will move to next image after an image has been attached to an invoice payment.
Note: Images that have been paid will remain in the bill
image list unless the refresh icon is selected  or until you exit the disbursement
area.
or until you exit the disbursement
area.
Select the Scissors  to remove an image from the
list, select the image and
to remove an image from the
list, select the image and
Paying an AP
Disbursement:
Using Bottom Shortcut Entry area to enter AP
invoice
Pay a bill from a Scanned Invoice using the shortcut entry areas to the right side of the scanned bill.
1. Select the Bill to be paid and review.
2. Select
Bottom will take you to the
Quick Entry on the far right.
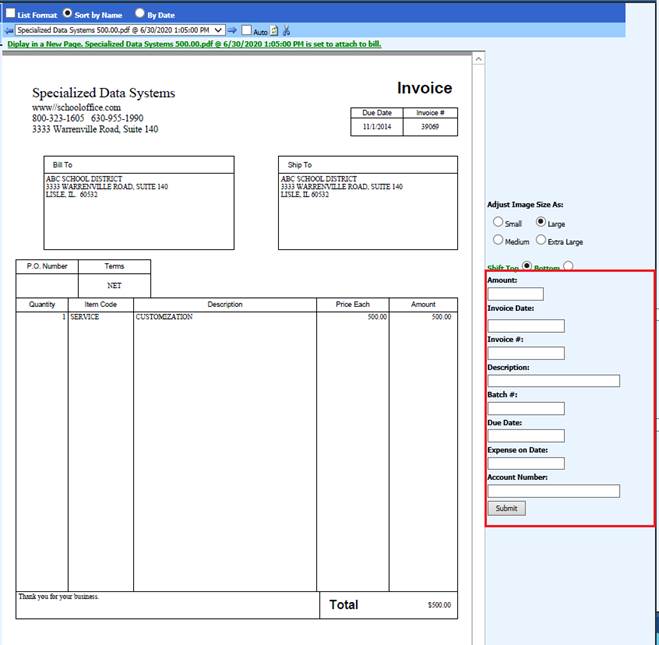
o Enter Amount.
o Enter Invoice Date
o Enter Invoice #
o Enter Description.
o Enter Batch Number.
o Enter Due Date
o Enter Expense On Date
o Enter Account Number (if you would need to search on the account number, you may do so after selecting Submit).
3. Select Submit and the screen will now show the regular disbursement entry screen
4. Review the Vendor to ensure the correct vendor is selected.
5. Review all information and make any additions or changes needed to any fields.
6. Press Pay or Enter
Attach multiple documents to a disbursement
The ability to attach another document(s) by selecting another scanned document and the plus under Invoice #. You will receive a message, select OK. Select the hotlink to display all documents associated.

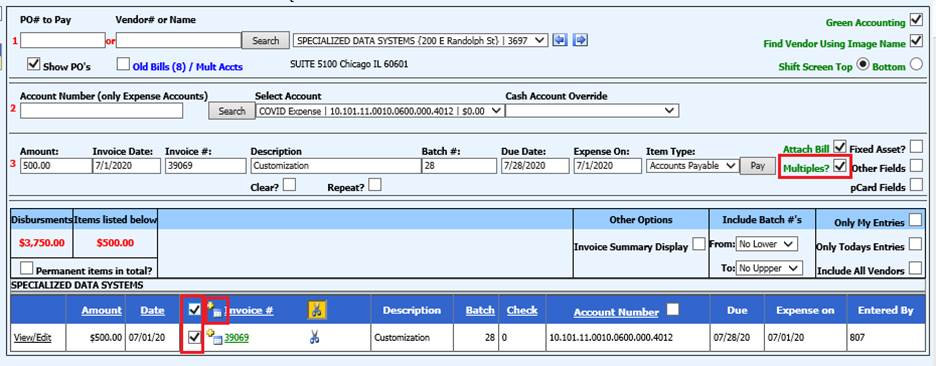
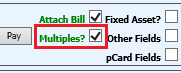
Attach a document to multiple disbursements
The ability to attach a document to multiple disbursements. Select Multiples?. Select the document to attach. Check the line items to attach the document to. Select the Plus to attach. You will receive a message, select OK. Select the hotlink to display all document associated.
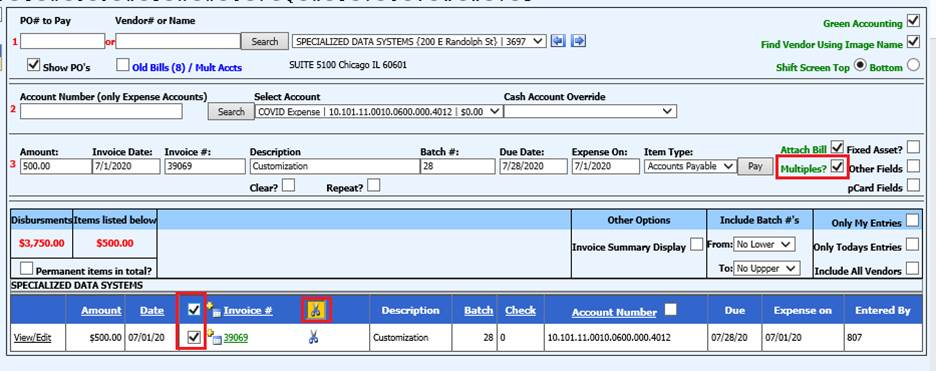
To Remove document(s)
Select Multiples?. Check the line items to remove the documents from. Select the Scissors. This will remove any and all documents associated and place them back in the list.
Under Invoice #, there is a hotlink; select the hotlink to display the scanned document.

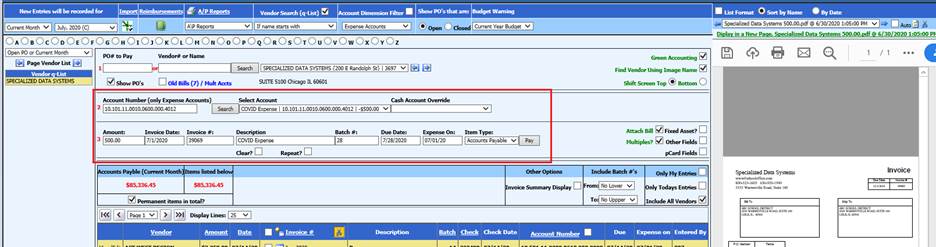
Using Top Entry area to enter AP invoices
1. 1 Select Vendor or check “Find Vendor Using Image Name”
2. 2 Accounts Number, Enter Account number to expense
3. 3 Enter Amount, Invoice Date, etc.
4. Verify “Attach Bill” is selected
5. Select Pay
Attaching or Removing
Image(s) to Previously Paid Disbursements
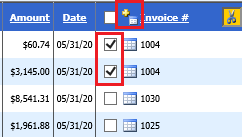
Attach images:
1. In AP Disbursement
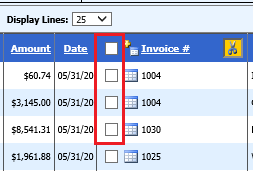
2. Check the box for “Multiples”
o This activates a check box on every invoice line
3. Check the box next to the items the invoice displayed should be attached to and push the attach button
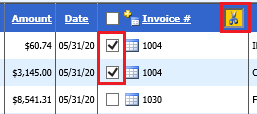
Remove images:
1. Check the box for “Multiples”
.
o this activates a check box on every invoice line.
2. Check the box next to the items you wish to remove an image from. Push the remove button in the invoice column heading.
o The check box in the heading, if selected, will check all invoices.