Revised: 4/2021
A. How to download a backup of your database to your workstation:
1. Create a directory (folder) and call it SDS Reports on your workstation.
2. Login Web Financial Office.
3. Select Administrative Utilities
4. Select Control Center
5. Select File Transfer.
6. Select “Send Database to SDS”.
7. Select “Send .bak”.
8. Place a check in the box next to “Create zip file only”.
9. Enter your SDS login password, a “File Name” and “Password”.
i. Make sure you write these down for your reference.
10. Click “Send Database to SDS”.
11. You will receive a message “A file called ToSdsFile.zip is available to download to your workstation.” Click OK after reading the message.
12. Select “Save File to Workstation”.
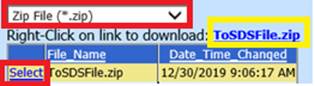
13. Click on the dropdown on the right under FTP folder and finance Folder and select “Zip file (*.zip)”.
14. Click on Select next to the file “ToSDSFile.zip”.
15. The row will highlight in yellow, and the file name will appear above the table.
16. Right click on the link to download ToSDSFile.zip and select “Save Target As” or “Save Link As”.
17. Click on the dropdown box under FTP folder and Finance folder and select “UDL file (*.udl)”.
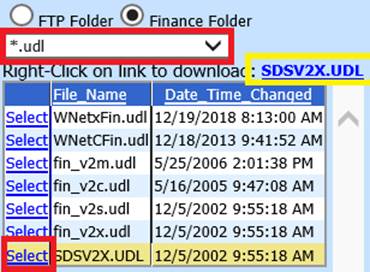
18. Click on Select next to the file “fin_v2x.udl”.
19. The row will highlight in yellow, and the file name will appear above the table.
20. Right click on the link to download sdsv2x.udl and select “Save Target As” or “Save Link As”.
21. Save into your SDS Reports folder you created in Step 1.
22. Open the SDS Reports folder you created in Step 1.
23. Right click on the ToSDSFile.zip file and select Extract.
24. Rename sdsxfin.bak to sdsxfin.mdb.
i. Remember your backup file is a copy of your database from when you last preformed a backup, not of your live database.
B. To download a report to your desktop follow the below instructions:
1. Navigate to Administrative Utilities
2. Select Control Center
3. Select File Transfer
4. Select Save File to Workstation.
5. Select from the drop down to the far right Crystal Reports (*.rpt).
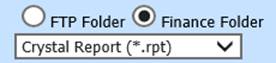
6. Click Select next to the report you would like to download. It will appear in the top right hand corner of the report file name box as a blue link.
7. Right click on it and select SAVE TARGET AS and save the file to your SDS Reports folder (REMEMBER TO CHANGE THE FILE NAME BY REMOVING EVERYTHING BEFORE THE START OF THE REPORT NAME and the .TXT after .RPT so it looks something like (i.e. swf_emp.rpt)
8. Open the report in Crystal Reports.
9. When finished editing the report, save it as swfcemp.rpt, where the italicized portion represents the rest of the file name (such as “emp”).
C. To upload the report to your SDS system follow the below instructions:
1. Navigate to Administrative Utilities
2. Select Control Center
3. Select File Transfer.
4. Select Send File to Server.
5. Click Browse to locate your file (i.e. swfcemp.rpt).
6. Select Upload File.
7. Run it from General Accounting Reports to make sure it runs ok. If you customized an existing report, the word (Custom) will appear after the report’s title in the menu.
D. To add a report to the system with a report name not named with swfc:
1. Navigate to Administrative Utilities |Control Center |Add Report to a Report Group
2. Select a report group 1.
3.
Click on the 2  -or- select a report in the middle
box.
-or- select a report in the middle
box.
4. In box 3 type in a Description for your report.
5. In box 4 type in the Crystal Report name (i.e. Employee Contact List.rpt).
6.
Click 5  .
.
7. Navigate to Reports
8. Select General Accounting Reports
9. Select the Report Group to which you added the report.