 and OK to the message.
Revision: 5/2023
The instructions for the Payroll Accrual Process are listed in Basic and Detailed format. If you are an advanced user, you can use the Basic format as a check list to complete each process. If you are new to the system or new to your district, you may want to use the Detail instructions, as they will demonstrate where to go in the program while including screen shots.
BASIC Payroll Accrual Process Instructions Format (IL)
Setting up the Payroll Accrual Account
This is a one-time setup. If you have used an accrual process previously, this should already be completed.
1. Create a Balance Sheet Account for Accrual Use
2. Add Accrual Account to the Ledger Interface.
Processing the July & August Payrolls
1. Process and complete your June 2023 payrolls. When done with the June payrolls, we recommend that you print out the Open Contract Report, located in the General Accounting Reports/Employee Master and Attendance Group, in case your auditors want that information.
2. July & August payrolls - Enter, compute, and verify the payroll.
3. You will NOT create your Direct Deposit vouchers, payroll checks, nor Direct Deposit file.
4. Close/Make Active Payroll Permanent.
5. Choose “Close Current Payroll”.
6. Select Ok to the message.
7. Choose “Close Current Payroll Without Printing Check, Vouchers or Creating a Direct Deposit File”.
8. Select “Create an Accrual and a Reverse Accrual entry for this payroll”.
9. A message will appear. Click OK.
10. June 30, 2023 will be the default accrual date on the calendar. That accrual date can be used for each payroll.
11. Select and OK to the message.
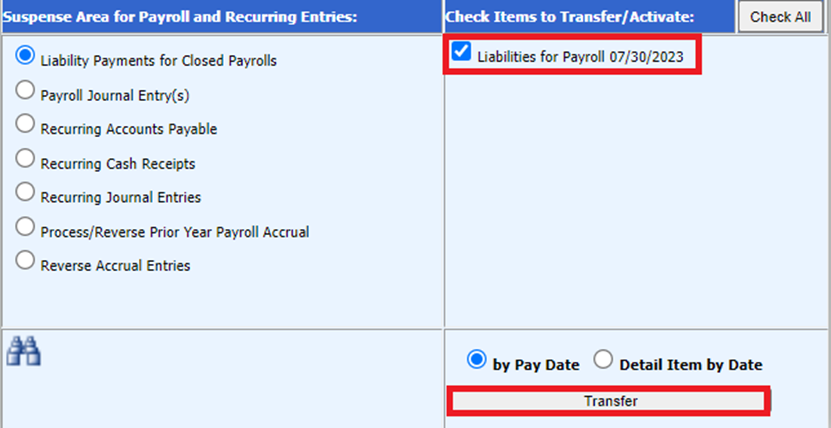
12. Go to General Ledger Processing | Transfer Payroll Data and Recurring Entries.
13. Select “Liabilities for Closed Payrolls” and then select Transfer.
14. Select Ok to the message.
15. Select “Payroll Journal Entry(s)”. There will be 3 journal entries to transfer.
a. The Accrual
b. The Reverse Accrual
c. The payroll transaction for the payroll date
16. Select Transfer.
17. Select OK to the message.
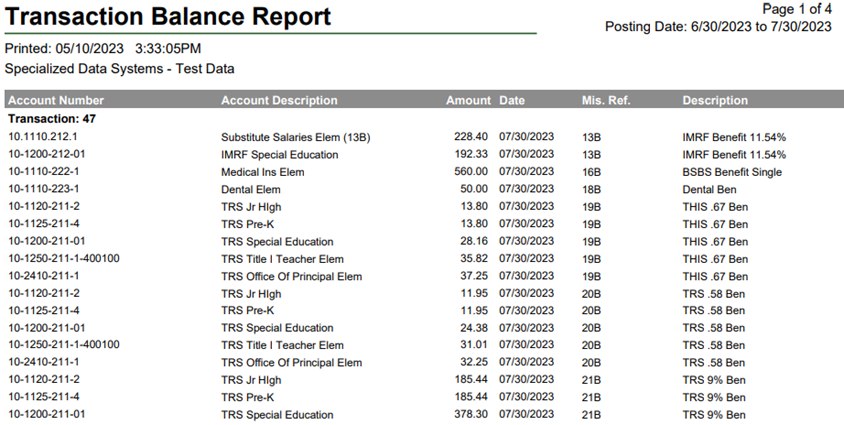
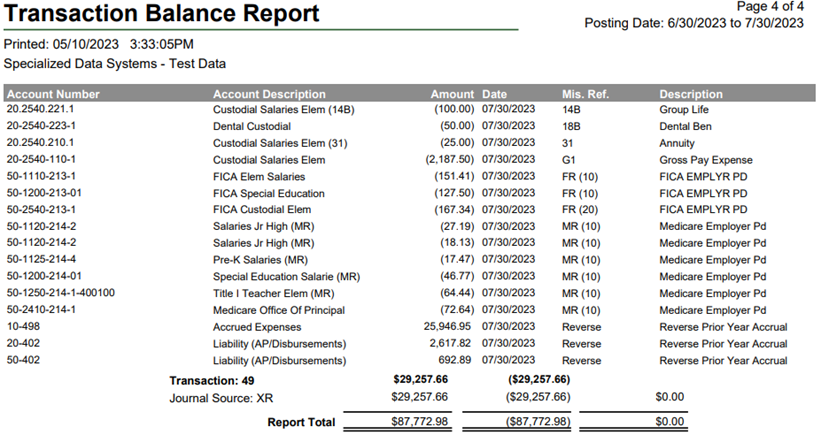
18. Print a Transaction Balance report for the 3 transactions.
19. Make the Payroll and Accrual Transactions Permanent.
This completes the accrual process.
Processing Checks, Vouchers, creating a Direct Deposit file, and Paying Liabilities for Accrued Payrolls
Activate Payroll Processing
1. Payroll Processing | Close / Make Active Payroll Permanent.
2. Select Ok to the message “You must first compute the payroll you wish to process”.
3. Select the down arrow next to Select Payroll Date in the Payrolls needing Checks, Vouchers, or DD File section.
4. Choose the payroll date you want to process and select “Activate”.
5. Select OK to the messages.
Print the Payroll Checks
1. Navigate to Payroll Processing | Payroll Checks.
2. Select the payroll date to process in the “Payrolls needing Checks, Vouchers, or DD File” section.
3. Complete the fields to print the checks.
4. Follow normal process for printing checks.
Run the Direct Deposit Vouchers and Create the File
1. Navigate to Payroll Processing | Direct Deposits.
2. Select the payroll date to process in the “Payrolls needing Checks, Vouchers, or DD File” section.
3. Complete the fields to run the vouchers.
4. Follow the normal process for running vouchers.
5. Select Create File Options.
6. Follow the normal process for creating and submitting the file to the bank.
Finalize the Payroll
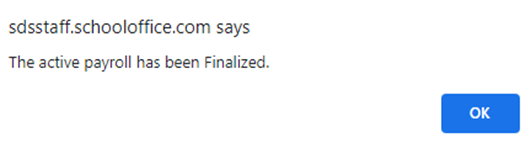
1. After running the vouchers, checks and creating the direct deposit file, select Finalize.
2. Select OK to the message.
3. Verify tasks are complete | Select Finalize.
4. Select OK to the message.
Pay the Payroll Accrual Liabilities
1. Follow the normal processes for paying the liabilities.
2. When selecting a check or voucher date for the accrued liabilities, use a Check Date within the month you are sending the payment regardless of the payroll date.
DETAIL Payroll Accrual Process Instructions Format (IL)
Setting up the Payroll Accrual Account
This is a one-time setup. If you have used an accrual process previously, this step should already be completed.
Create a Balance Sheet Account for Accrual Use
Setup a Balance Sheet Accrual Account for each fund used for the accrual payroll.
1. Select Master File and Code Entry Options
2. Select Master File Vertical Data Entry and Changes
3. Entry Options: Budget Master (Basic Fields by ASN)
4. Select the Balance Sheet Accounts
5. Select the Green + sign
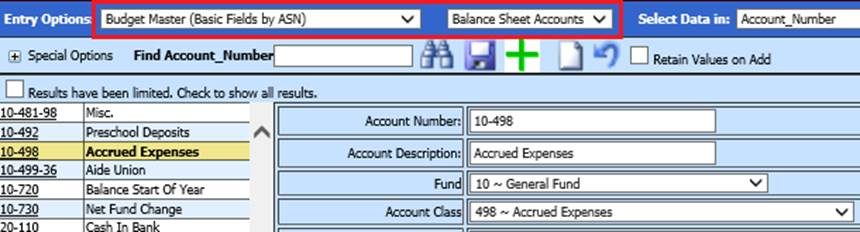
6. Enter the account number, description, fund and account class (if you are unsure about the account class, please contact your auditor)
7. Select Save
See below link for more information on Budget Master Account creation:
http://help.schooloffice.com/FinanceHelp/#!Documents/budgetmastersortedbyasnnumber.htm
Add Accrual Account to the Ledger Interface
After creating the balance sheet accounts, add them to the corresponding fund(s) record in the Ledger Interface.
1. Master File Vertical Data Entry and Changes
2. Entry Options: Select Ledger Interface
3. For each fund being used, key the accrual number in the Account Number Accrual field
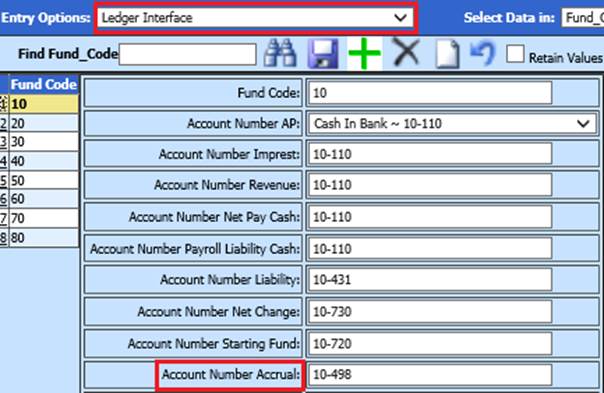
4. Select Save
See below link for more information on Ledger Interface:
http://help.schooloffice.com/FinanceHelp/#!Documents/ledgerinterface.htm
Processing the July & August Payrolls
•Process and complete your June 2023 payrolls.
•When done with the June payroll, we recommend that you print out the Open Contract Report, located in the General Accounting Reports/Employee Master and Attendance Group, in case your auditors want that information.
•July and August payrolls will be processed one at a time. You will follow the normal payroll processes up to the point of creating checks and vouchers.
o ILLINOIS Clients - When setting the payroll calendar dates, choose the Fiscal Year based on what year the creditable earnings were earned. *The Payroll Date may be 7/30/23, but the wages were earned in Fiscal Year 2023. *

- Before Activating your payroll, ensure that you are selecting the appropriate Payout Category for the contracts you are needing to pay:
1. Complete the entire payroll process (Enter, compute, and verify the payroll).
2. No checks or vouchers will be printed, and the direct deposit file will NOT be created at this time. You will go straight to closing the payroll.
3. Select Close / Make Active Payroll Permanent
4. Select “Close Current Payroll”

5. A message will appear that vouchers/checks have not been printed, but you can continue. Select OK

6. Select “Close Current Payroll Without Printing Check, Vouchers or Creating a Direct Deposit File”

7. Select “Create an Accrual and a Reverse Accrual entry for this payroll”
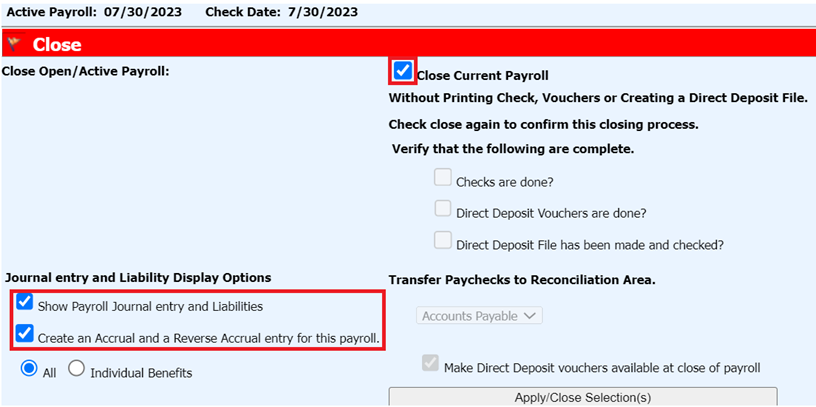
8. A message will appear. Select OK

9. June 30, 2023 will be the default accrual date on the calendar. That accrual date can be used for each payroll.
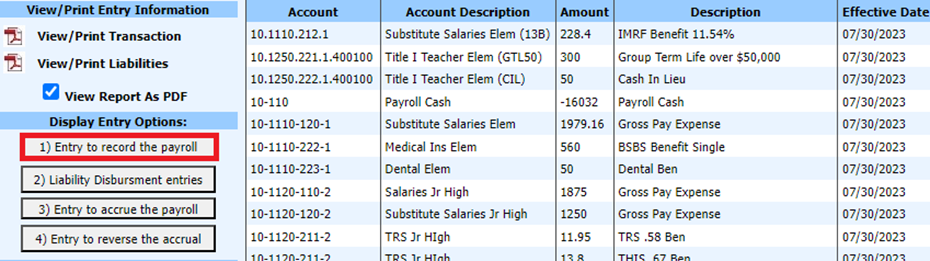
o The “View/Print Transaction” and “View/Print Liabilities” will produce the Payroll Transaction report and the Payroll Liability report for the payroll date.
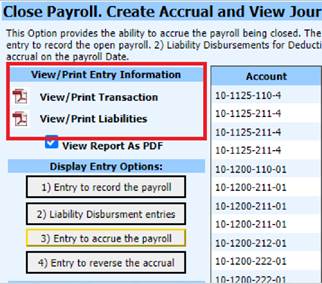
o When selected, the options in the Display Entry Options section will show the journal entries for each selection or the liability disbursement entries.

o These are demonstrated in the following screen shots:
Entry to Record Payroll – Shows the journal entry that will post for the payroll date in the “Effective Date” column. This will post the expenses and liabilities.
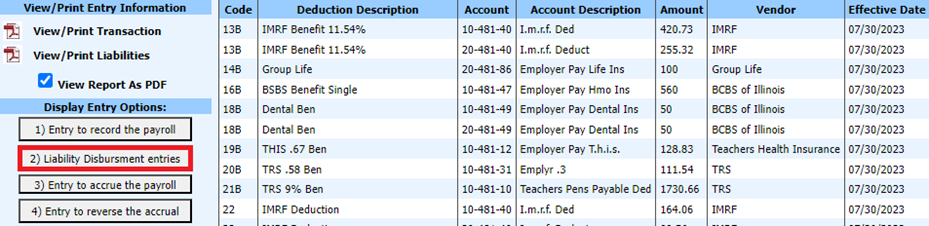
Liability Disbursement Entries – This is a list of the liabilities for the payroll date in the “Effective Date” column.
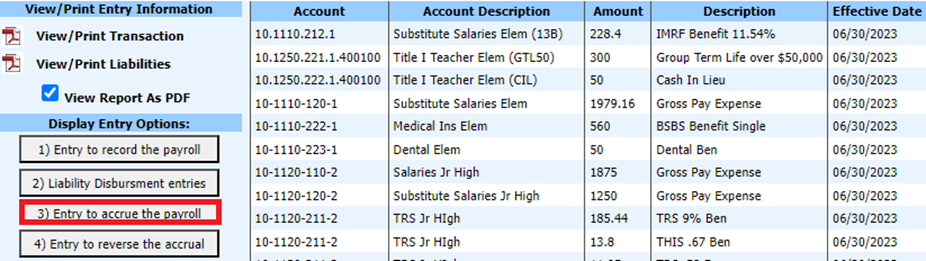
Entry to Accrue the Payroll – This is the journal entry that will post to June to accrue the payroll. This entry will debit (+) the expense accounts and credit (-) the Accrual Account that was setup.
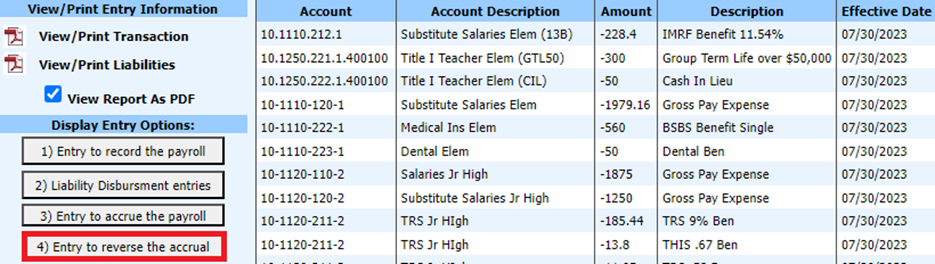
Entry to Reverse the Accrual – This is the entry that will post for the payroll in the “Effective Date” column to reverse the expenses from “Entry to record the payroll” transaction. This entry will credit (-) the expenses and debit (+) the accrual account so that it nets to zero.
10. Select
11. Select OK to the messages
12. Go to General Ledger Processing on the Main Menu.
13. Select Transfer Payroll Data and Recurring Entries
14. Select Liability for Closed Payrolls
15. Select Transfer
16. Select Ok to the message
17. Select Ok to the message
18. Select Payroll Journal Entry(s)
19. Select each of the Payroll Journal Entries. There will be 3 journal entries to transfer.
a. The Accrual
b. The Reverse Accrual
c. The Payroll Transaction for the payroll date
20. Select Transfer
21. Select OK to the message

22. Select OK to the last message
23. Run a Transaction Balance report for the 3 transactions.
a. Select Reports
b. Select General Accounting Reports
c. Select Finance Activity Reports
d. Select Transaction Balance Report
e. Set the calendar date to include the accrual date and the payroll date
f. Set the Auto Answer questions to the below settings:

g. Preview/Print the report (if other transactions show on the report, make them permanent, so that you will only see the payroll and accrual you are processing. Go to the report area and print the report.)
24. Make the Payroll and Accrual Transactions Permanent
a. Select General Ledger Processing and Entry Options
b. Select Make New Transactions Permanent
c. Select 6/2023.
i. Select the transaction with Journal Source code XA.
ii. Select Post Selected Ledger
iii. Select OK to the messages
d. Select 7/2023 or 8/2023.
i. Select the transactions with Journal Source codes PR and XR
ii. Select Post Selected Ledger
iii. Select OK to the messages
**Payroll Accrual Processing has been completed.**
Processing Checks, Vouchers, Creating a Direct Deposit file, and Paying Liabilities for Accrued Payrolls
Activate the Payroll to Process
1. Select Payroll Processing
2. Select Close / Make Active Payroll Permanent
3. Select the down arrow next to “Select Payroll Date” in the “Payrolls needing Checks, Vouchers, or DD File” section

4. Choose the payroll date you want to process and select “Activate”

5. Select OK to the message

6. Select OK to the message

Run the Payroll Checks
1. Select Payroll Processing
2. Select Payroll Checks
3. Select the payroll date to process in the “Payrolls needing Checks, Vouchers, or DD File” section

4. Complete the fields to print the checks
5. Follow the normal process for printing the check
Run the Direct Deposit Vouchers ad Create the File
1. Select Payroll Processing
2. Select Direct Deposits
3. Select the payroll date to process in the “Payrolls needing Checks, Vouchers, or DD File” section

4. Complete the fields to run the vouchers
5. Follow the normal process for running the vouchers
6. Select Create File Options
7. Follow the normal process for creating and submitting the file to the bank
Finalize the Payroll
1. After running the vouchers, checks and creating the direct deposit file, select “Finalize” from any of the following screens:
a. Payroll Checks
b. Direct Deposits
c. Close/Make Active Payroll Permanent

2. Select OK to the message

3. Verify tasks are complete

4. Select Finalize
5. Select OK to the messages
Pay the Payroll Accrual Liabilities
1. Follow the normal processes for paying the liabilities
2. When selecting a check or voucher date for the accrued liabilities, use a check date within the month you are sending the payment regardless of the payroll date.