Revised: 4/2021
Imprest is a cash account entity which will pay for routine expenses. Funds contained with Imprest are regularly replenished, to maintain a fixed balance. Checks can be processed, as normal accounts payable check processing is completed. When posting checks permanent they can be transferred to the Check Reconciliation area, Imprest check group. At the end of the month, Imprest funds can be reimbursed by the amount spent during the month.
There are a few steps to be completed for Imprest Accounts Processing:
•Set up Cash Account for Imprest Fund
•Set Up Ledger Interface with Imprest account
•Accounts Payable: Enter, print and post permanent checks
•Reimbursement of Imprest account
•Balance Imprest Cash Account
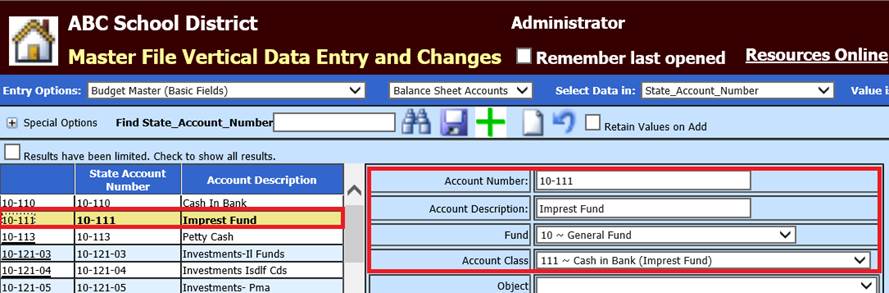
Set up Cash Account for Imprest
1. Select Master File and Code Entry
2. Select Master File Vertical Data Entry and Changes
a. Entry Options: Budget Master (Basic fields)
b. Select Balance Sheet Accounts
c. Setup Imprest cash account, associated with each fund
See below link for additional information setting up cash accounts: http://help.schooloffice.com/financehelp/#!Documents/budgetmasterbasicfields1.htm
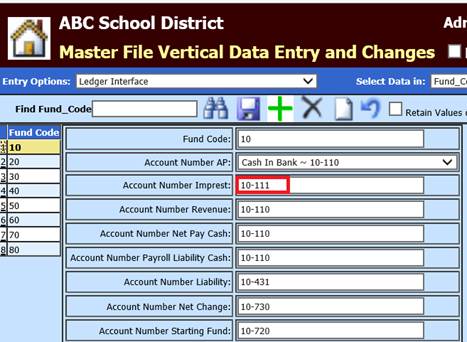
Ledger Interface Set up for Imprest
1. Continuing in Master File Vertical Entry and Changes
2. Entry Options: Ledger Interface
3. Select Fund
4. Account Number Imprest: Enter Imprest cash account
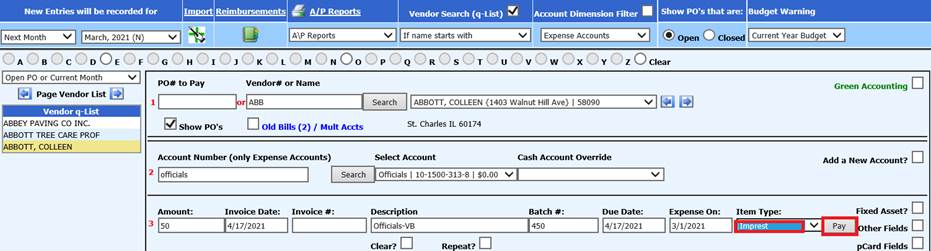
Enter Disbursements for Imprest
1. Select Accounts Payable
2. Select Disbursements /Accounts Payable Entry

3. 1 PO# to Pay or Vendor# or Name: Enter the Vendor Name or Number or enter the first few letters of the vendor name and select “Search”.
o If your vendor is not listed, please refer to following link for additional information on setting up a new vendor. http://help.schooloffice.com/financehelp/#!Documents/howtosetupanewvendor.htm
4. From the drop down selection, select the Vendor.

5. 2 Account Number: Enter in part or all of the Account number or Account Description.
6. Select “Search” or hit Enter.
7. From the “Select Account” drop down selection, select the account to expense.
8. If using the “Cash Account Override”, select the Cash Account associated with the expense entry.

9. 3 Complete the fields needed for the Invoice entry:
•Amount: Amount of Invoice line entry
•Invoice Date: Date of Invoice
•Invoice#: Invoice Number
•Description: Description of invoice, the account number description is defaulted
•Batch#: Defaulted number is day of month. Change batch number to something unique so it represents Imprest (e.g. 150,250,350)
•Expense On: Finance date expensed to the system, selected under New Entries will be recorded for
•Item Type: Select Imprest
10. Select “Pay” or hit Enter
11. The invoice information will be listed below the double line, with an Accounts Payable total for the Vendor.
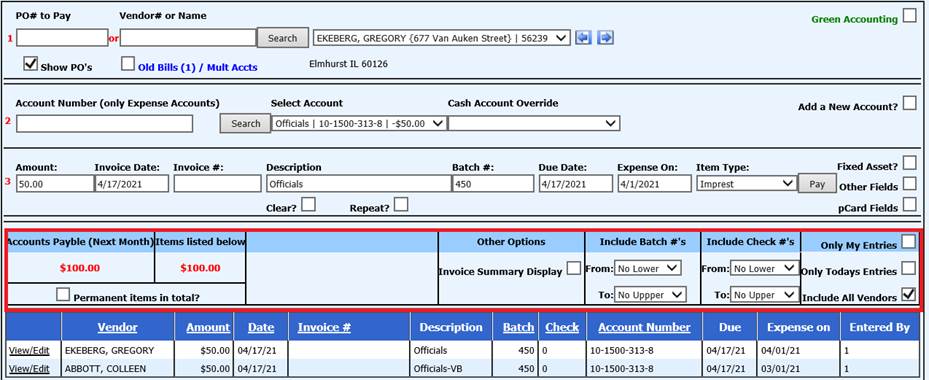
•Disbursements: This total includes all entries not made permanent.
•Items listed below: This total includes only the displayed items.
•Permanent items in total: This will display all entries made permanent.
•Other Options: Invoice Summary Display: This will display all items totaled by vendor and invoice amount.
•Include Batch #’s: Display the batch number range needed.
•Entry display view: View using Only My Entries; Only Todays Entries; Include All Vendors.
•Use Account Title for Description: Use the account title description instead of the PO description.
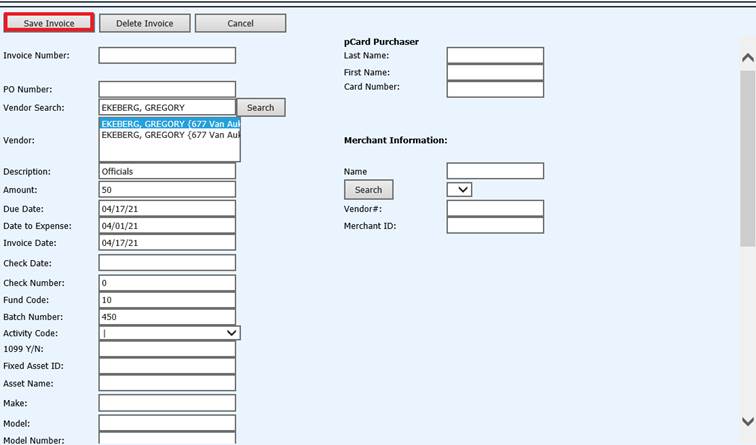
To View/Edit Invoices you have entered and saved:
Check the box to Show ALL Entries or Only Today’s Entries. When selected, the list of open invoices will appear in list form below the entry screen.
•If you find you need to make adjustments to the invoice previously entered, select the “View/Edit”.

•A new screen will populate. You can now make the needed changes to the invoice entered. If a check has already been produced, you will not be able to make any adjustments to the invoice; you will then need to complete the Void process.
See below link for additional information on Accounts Payable processing:
http://help.schooloffice.com/financehelp/#!Documents/disbursementaccountspayableentryprocessing.htm
Print checks for Imprest
1. Select Accounts Payable
2. Select Check Voucher Processing
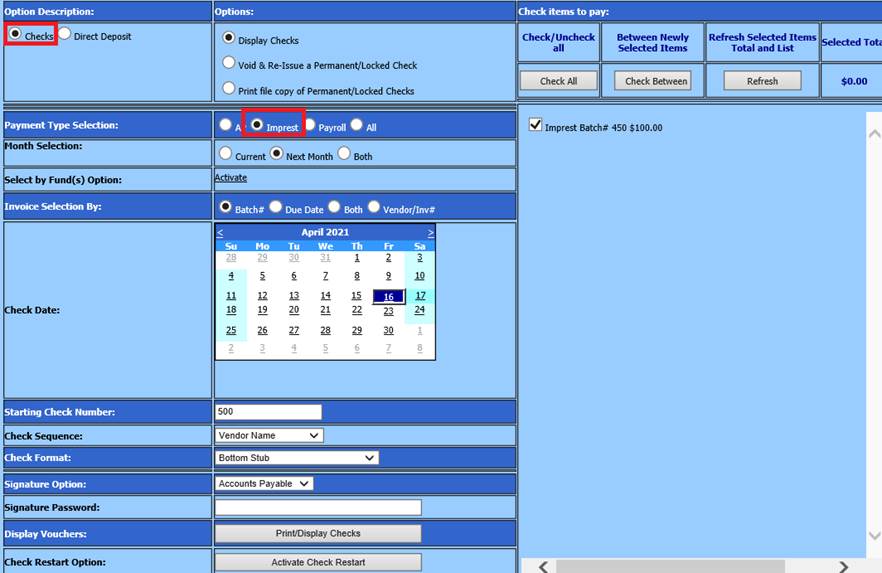
3. Option Description: “Checks” or “Direct Deposits”.
4. Options: Display Checks
5. Payment Type Selection: Select Imprest for the type of check to print.
6. Month Selection: Select Current, Next Month or Both.
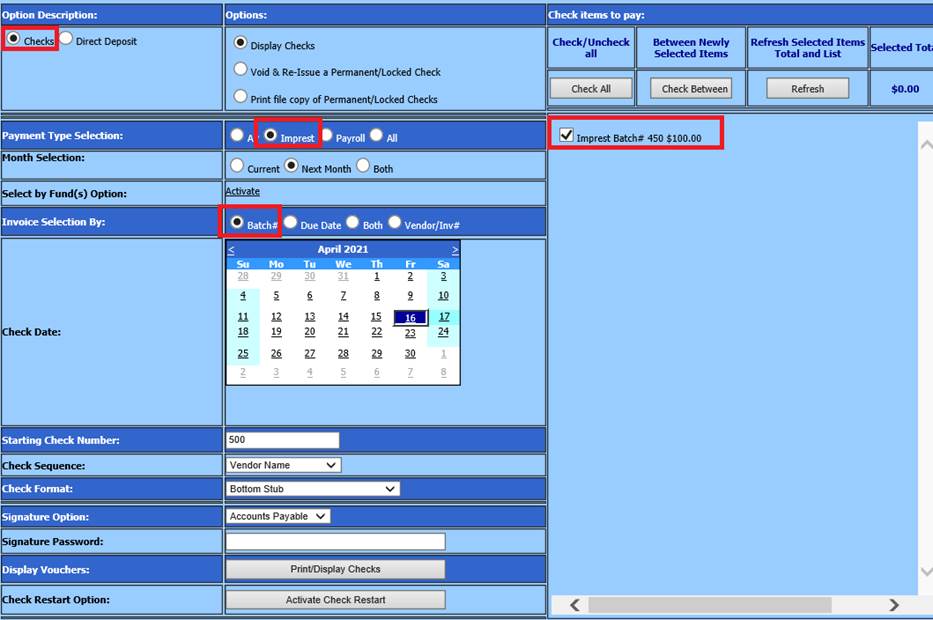
7. Select by Fund(s) Option: Select “Activate” This option will allow you to print checks by the specific funds instead of batch number.

8. Invoice Selection By: Select from the checks to be printed by Batch
Batch #
9. Select the Check Date, Starting Check Number, Check Sequence, Check Format, Signature Option (enter in password if used).
10. Select “Print/Display Checks”.
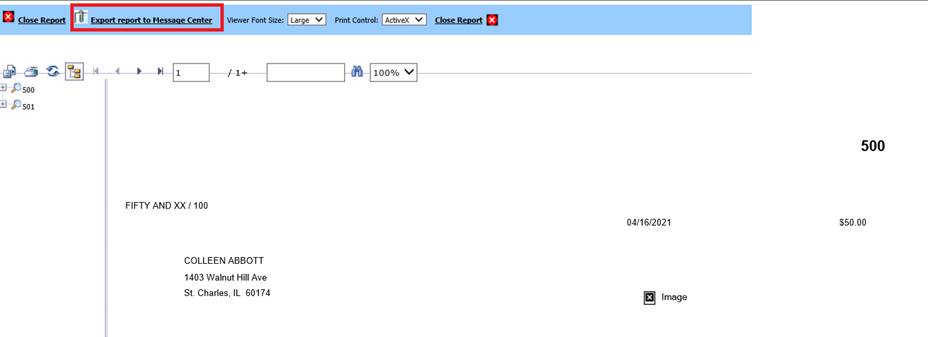
11. Print and select “Export Report to Message Center” to complete the Accounts Payable checks.
12. Print and verify AP reports
Make Checks Permanent for Imprest
1. Select Accounts Payable
2. Select Make Checks Permanent (Post to Ledger)
See below link for additional information with Making Check Permanent: http://help.schooloffice.com/financehelp/#!Documents/makecheckspermanentposttoledger.htm
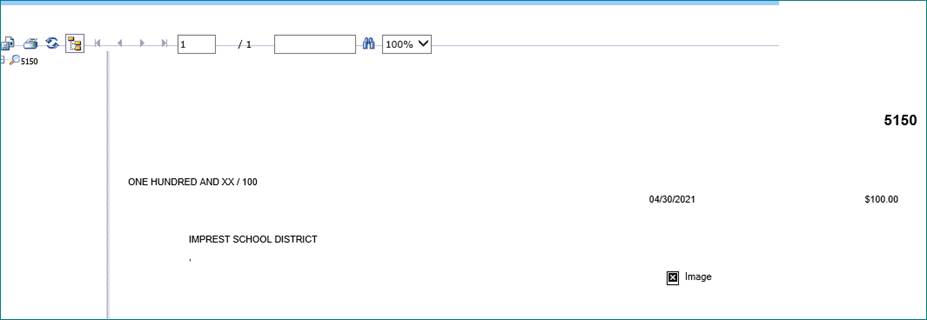
Reimbursing the Imprest Fund
To reimburse the Imprest account with items posted, a check to the Imprest Fund must be processed.
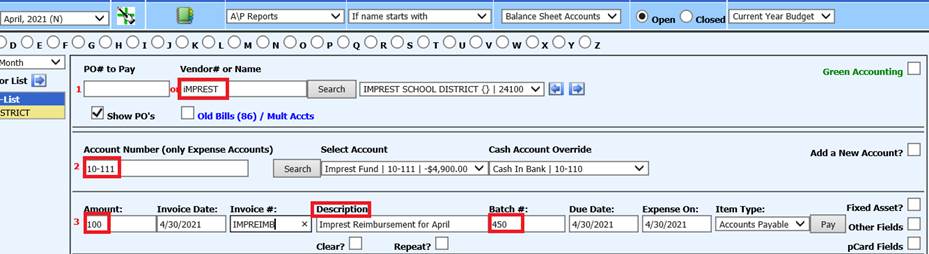
1. Select Accounts Payable
2. Select Disbursement/Accounts Payable Entry
3. Vendor: Imprest School District
4. Account: i.e. 10-111, Imprest cash account
5. Amount: Amount expensed
6. Description: Enter description i.e. “Reimbursing Imprest for month of xx”
This will reimburse the Imprest cash account, to the set amount the district assigned.
Process AP Check for reimbursement of Imprest account
1. Select Accounts Payable
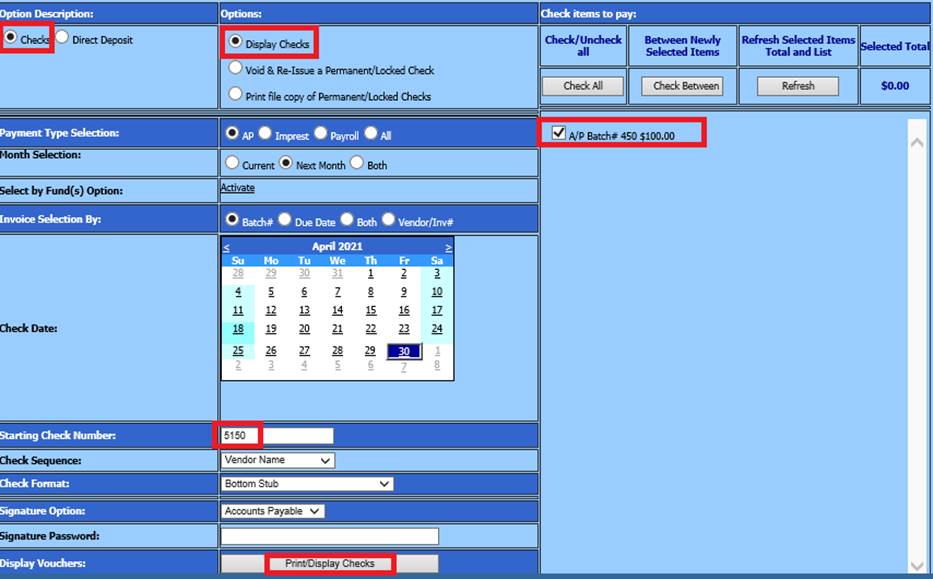
2. Select Check/Voucher Processing
3. Option Description: Checks
4. Options: Display Checks
5. Payment Type Selection: AP
6. Check mark the A;P Batch #
7. Month Selection: Current or Next Month
8. Check Date: Select the date on calendar
9. Starting Check Number: make sure it is correct
10. Select Print/Display Check
11. Preview check
Make Imprest check permanent
1. From Accounts Payable
2. Select Make Checks Permanent (Post to Ledger)
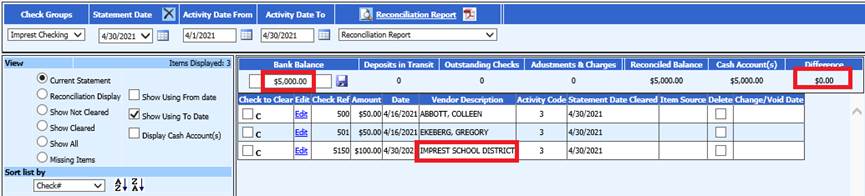
Balancing Imprest Cash Account
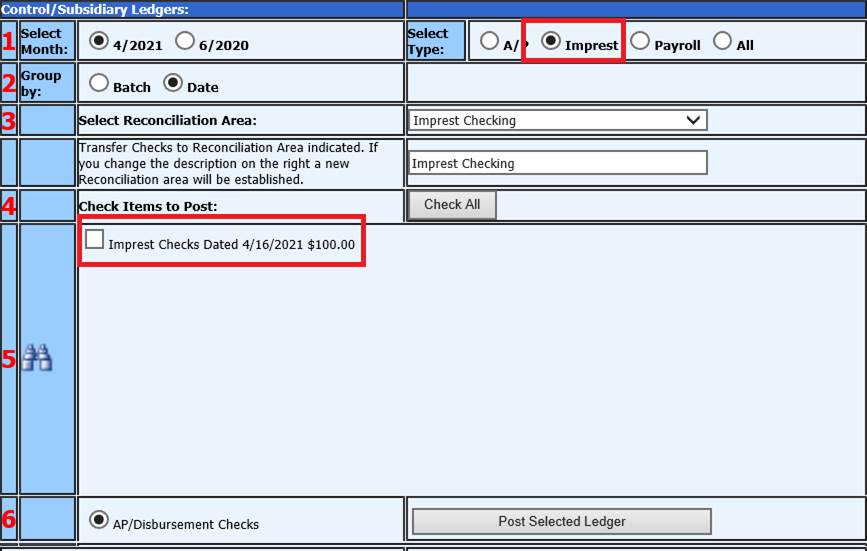
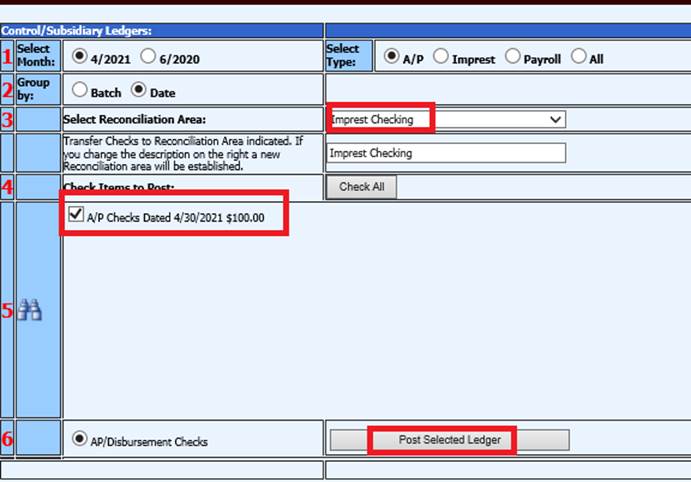
1. Select General Ledger Processing and Options
2. Select Check Reconciliation
3. Select “Imprest” Check Group
4. Select the
 to create a new
Statement Date
to create a new
Statement Date
5. Update the Activity Date From and Activity Date To dates, if needed. They will default to the date range of the statement date
6. Enter the Ending Bank Balance for the selected Check Group. Select the save diskette button

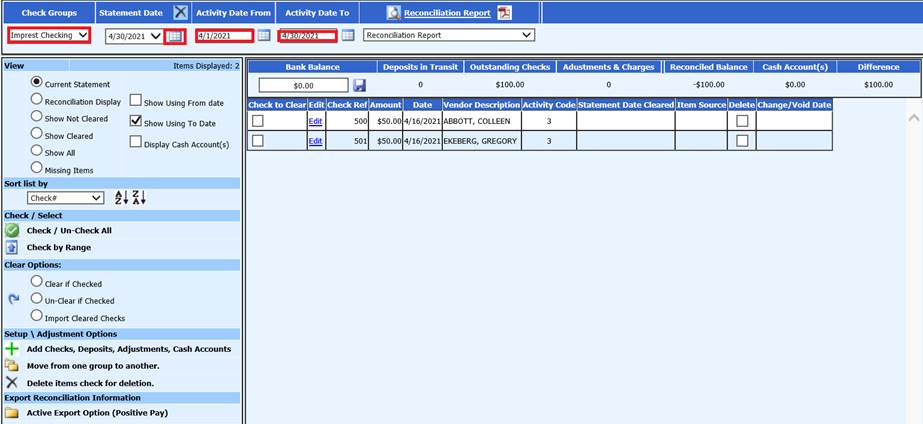
7. Under View section, determine what view to use for clearing items

See below link on additional detailed information on using Views:
http://help.schooloffice.com/financehelp/#!Documents/view.htm
NOTE: If using the Check Reconciliation process using statement date for the first time, add in cash account (s) used for the Check Group listed.

See below link for additional information using Add Checks, Deposits, Adjustments, Cash Accounts:
http://help.schooloffice.com/financehelp/#!Documents/addchecksdepositsadjustmentscashaccounts.htm
8. In Sort List by: Select how you would like to view the items to clear

See below link for additional information using Sort list by: http://help.schooloffice.com/financehelp/#!Documents/sortlistby.htm
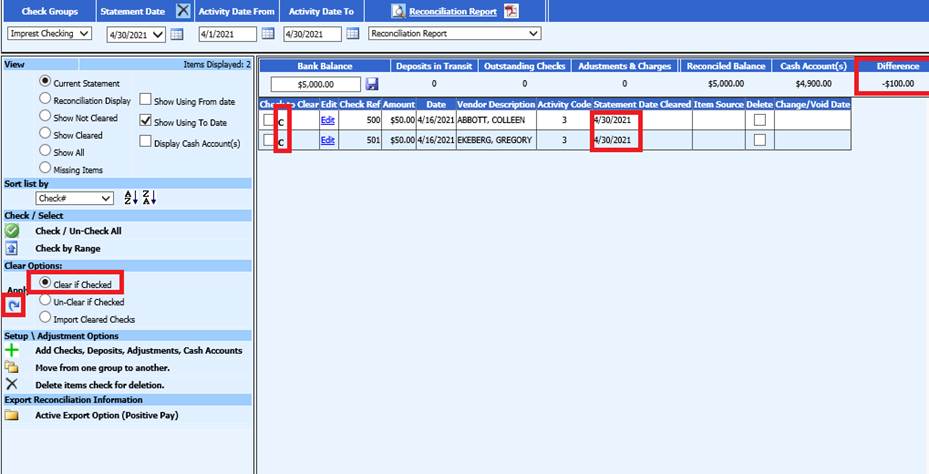
9. Check to clear items from the bank statement
10. Select Clear if Checked

See below link for additional information using Clearing, Un-Clearing transaction entries or Importing Cleared Checks:
http://help.schooloffice.com/financehelp/#!Documents/clearingchecksdepositsorjournalentries.htm
11. Once the items have been marked cleared, this will place a “C” for cleared next to the marked items. The system will also complete the “Statement Date Cleared” column with the date of the statement reconciling.
Before Imprest check was posted to Imprest Checking Group:
12. After all of the items have been cleared for the statement date, you are ready to verify the information. The first way to verify the information is on the display screen. The second option is to print reports.
13. The “Bank Balance” was entered in the display screen for the check group and statement date at the start of the process. After the deposits, checks and journal entries have been cleared the system gives you a total of the “Deposits in Transit”, “Outstanding Checks” and “Adjustments & Charges”.
a. The “Reconciled Balance” is the calculation from the “Bank Balance” + “Deposits in Transit” – “Outstanding Checks” + or – “Adjustments & Charges”
b. The “Cash Account(s) is the total of the General Ledger Cash Accounts that were setup for the check reconciliation group.
c. The “Difference” column is the difference between the “Reconciled Balance” and the “Cash Account(s)”. This amount should be zero once the reconciliation is completed for each group. If this is not zero, see Check Reconciliation tips & tricks.
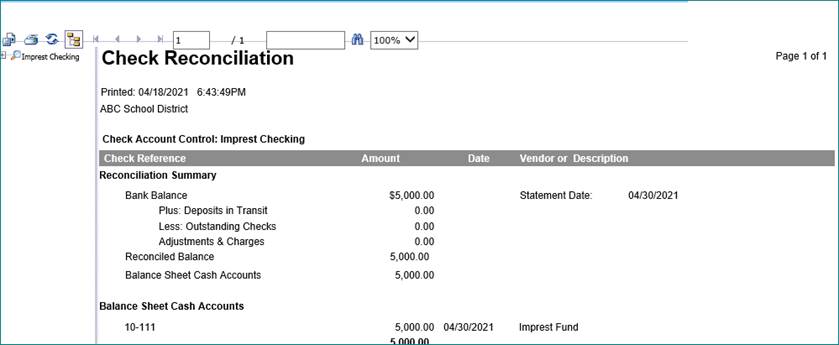
14. Print Cleared Check Report for balancing with bank statement cleared checks

15. Print Reconciliation Report
a. Under Views: To view Cash Accounts on report, Check “Display Cash Account(s)”:

b. View the Check Reconciliation Report:
See below link for additional information on Check Reconciliation tips and tricks: http://help.schooloffice.com/FinanceHelp/#!Documents/checkreconciliationtips.htm
|
§ |
§ |
Verification of Imprest reimbursement
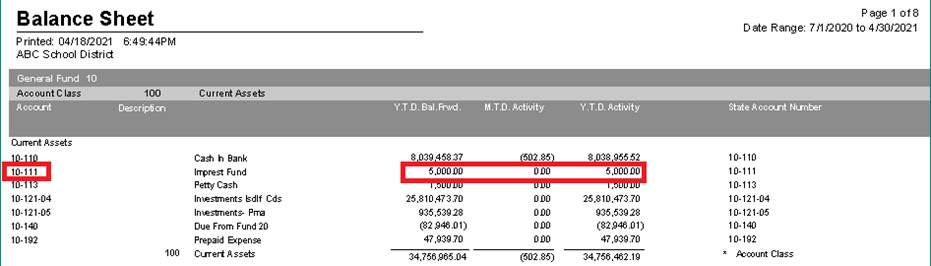
Print Balance Sheet
1. Select Reports
2. Select Financial Reports
3. Print Balance Sheet