Revised: Prior to FY19
PAYROLL
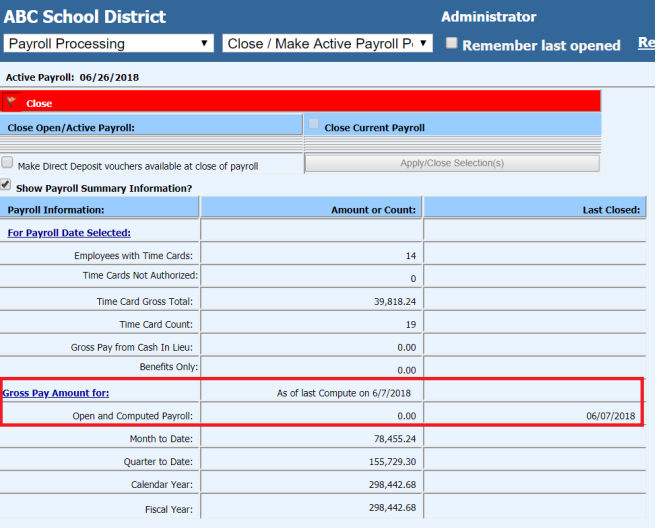
1. Complete and Close June Payrolls. Complete your last June 2018 payroll. After the payroll has been completed make sure to close the payroll. Select “Payroll Processing” and then select “Close / Make Active Payroll Permanent”. This screen will show the last payroll that was closed.
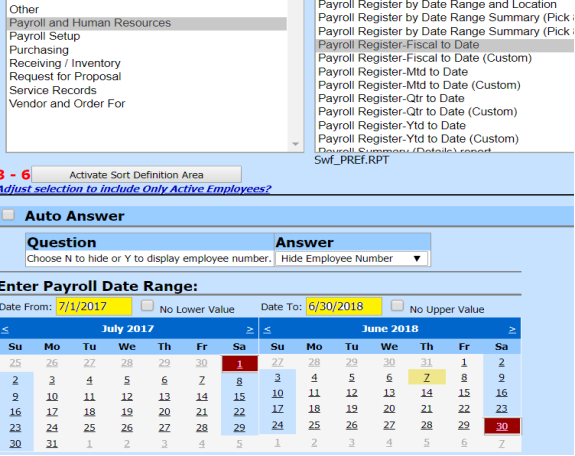
2. Run Fiscal year end reports. After running the last payroll for the fiscal year, the next step would be to run various payroll reports to check the accuracy of your data. Some of the reports that can be used to check the data are shown below, with a screen print of each. The first two reports are located under the menu option “Reports” and then “General Accounting Reports.” The report group is “Payroll and Human Resources.”
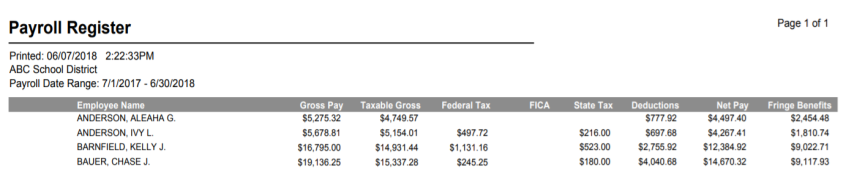
a. Payroll Register Fiscal to Date – Make sure to change the calendar to display fiscal year dates. Preview the report.
b. Employee Open Contract Report. This report is in the “Employee Master and Attendance” report group. This report will show you the amount of the open contracts for each employee. From this report, you will be able to determine the contracts you want to include in the payroll accrual process.

c. Customized Payroll Reports. The Customized Payroll Reports options can be found by selecting the menu option of “Payroll Processing” and then “Customizable Reports.” In this report area, you can design a large variety of reports that can be saved and used again each year or during the year.
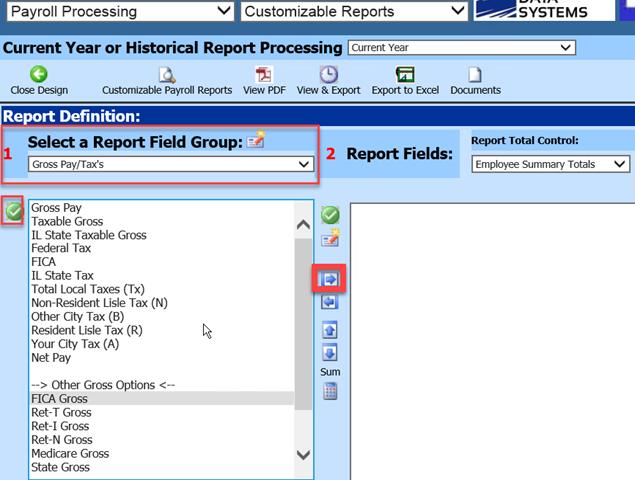
An example of a report would be to look at all the gross codes for the fiscal year. To do this, move all the gross codes from the first selection area over to the second area on this view. Do this by selecting the green check button and then using the arrow button to move them across the screen.
Screen 1: Select the items you want to move
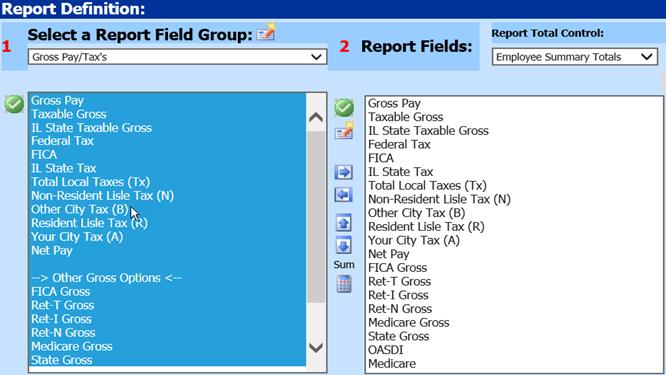
Screen 2: Items that are in the second area are now available to be viewed.
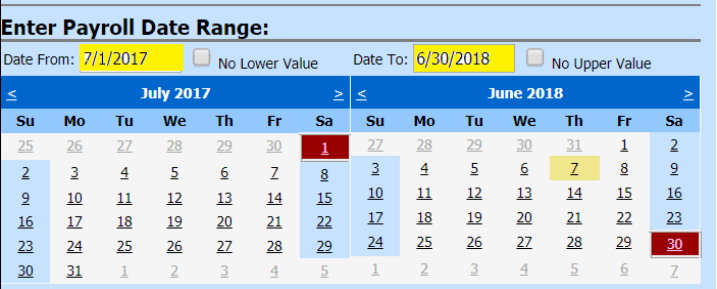
Screen 3: Select the dates needed for this report. For the example, I have selected the dates for the fiscal year. Preview the report.
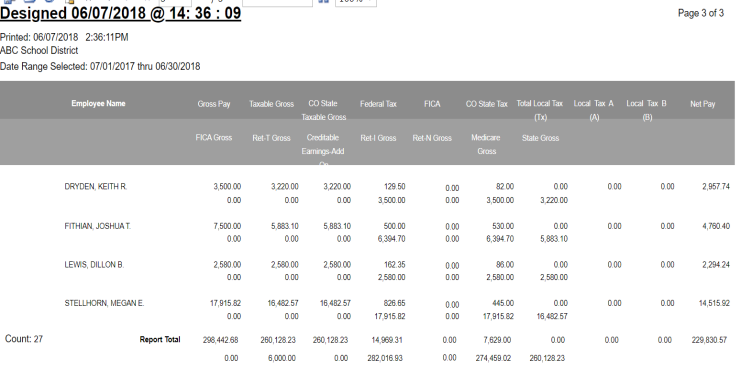
Screen 4: Report preview
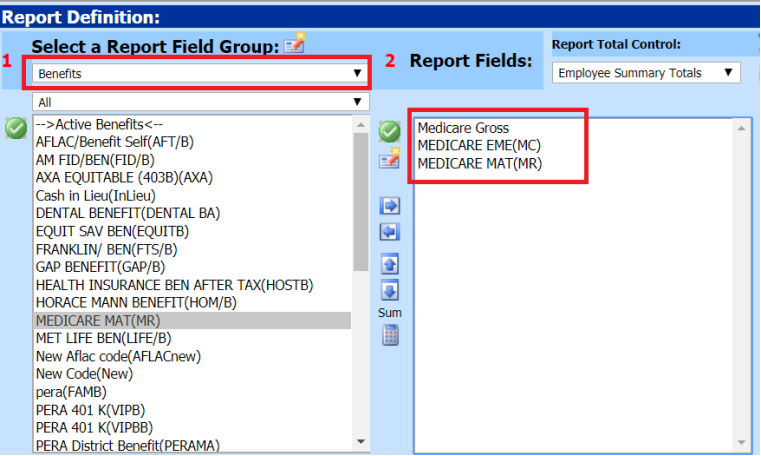
A second example of a report would be to select one of the gross codes and then the benefits and deductions that are calculated from that gross code. For this example, I will be using the Medicare gross and select the codes that are used in this calculation process. From this example, you will be able to see you can do the same thing with any of the other gross codes and the deduction and benefits that are calculated from that gross code.
Screen 1: To obtain the needed codes in the screen under the number 1 selection option, I used the selections of “Gross Pay/Tax’s” , “Benefits”, and “Deductions.”
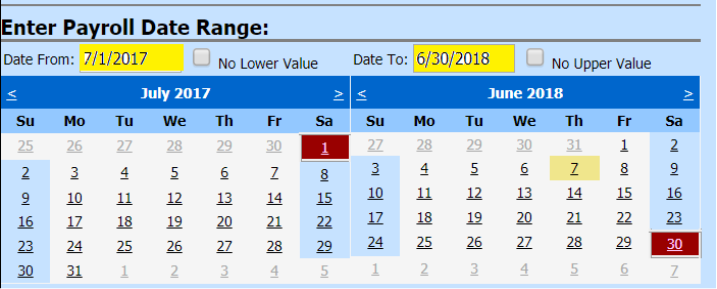
Screen 2: Select the dates on the calendar that are needed for the report. For the example I selected the Payroll fiscal year.
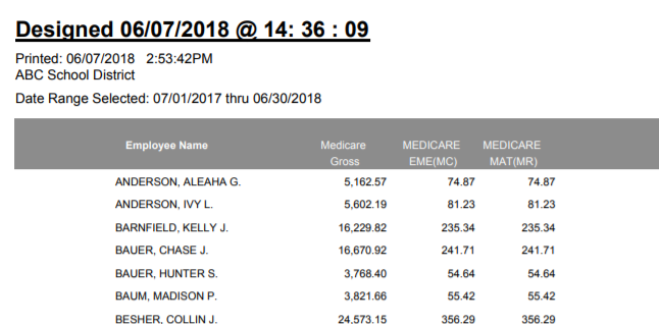
Screen 3: Preview of the report
The report from the “Payroll Processing” – “Customizable Reports” can be saved and viewed again with different dates and can also be viewed in Excel. To learn more ways about using the Customizable Reports you can select the link below.
http://help.schooloffice.com/financehelp/#!Documents/customizablereports.htm
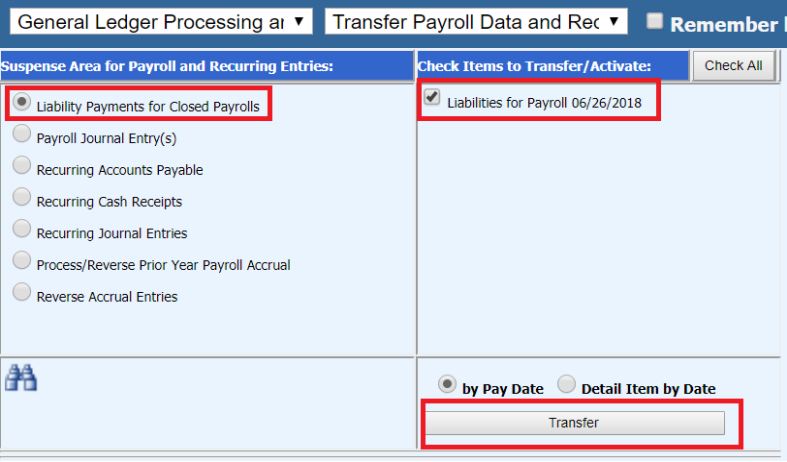
3. Transfer All Closed June Payroll Dates to the Accounts Payable. To make sure the last payroll has been posted to the accounts payable area, go to “General Ledger Processing and Entry Options” and then “Transfer Payroll Data and Recurring Entries.” Select the bullet “Liability Payments for Closed Payrolls” and select the liabilities to transfer. Then select the “Transfer” button.
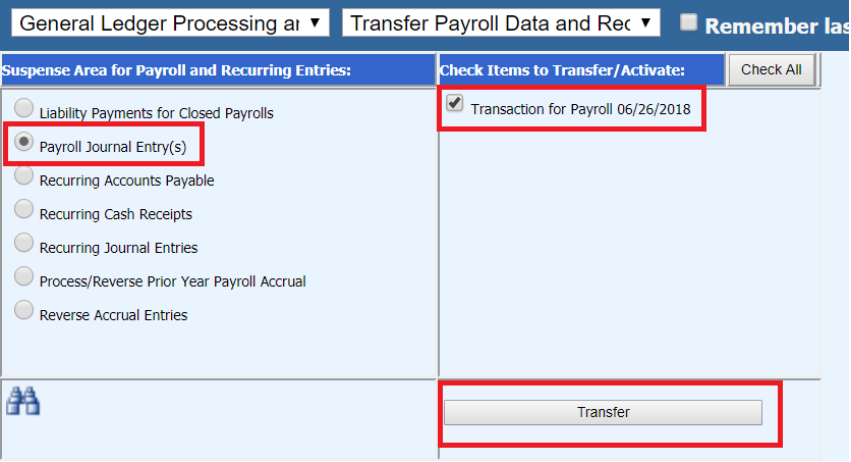
4. Transfer All Closed June Payroll Dates to the General Ledger. To make sure the last payroll has been posted to the general ledger, go to “General Ledger Processing and Entry Options” and then “Transfer Payroll Data and Recurring Entries.” Select the “Payroll Journal Entry(s)” bullet. Then select the Transactions that have not been posted and select “Transfer.”
PAYROLL ACCRUAL
1. If you are going to run the Payroll Accrual process, it must be run it after all the other June payrolls are completed.
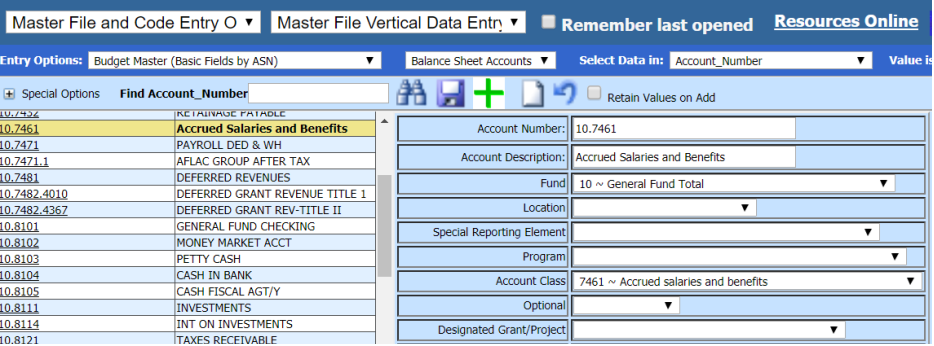
2. Create a Balance Sheet Account for Accrual Use. The first item of the payroll accrual process is to setup a Balance Sheet Account for each fund that payroll is processed for. This account should be added to the Budget Master.
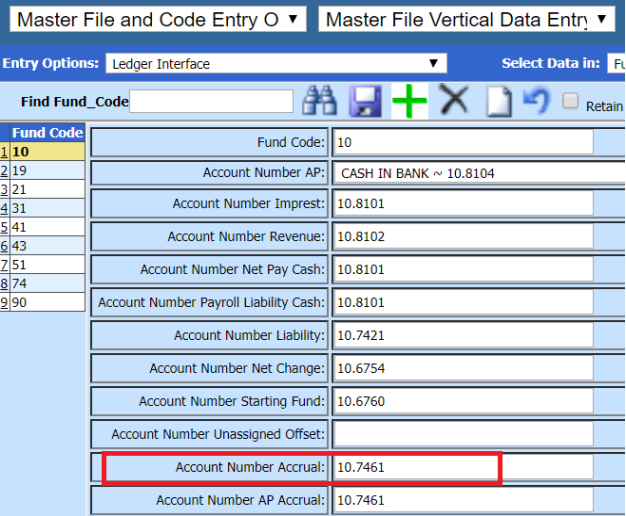
3. Add Accrual Account to the Ledger Interface. After creating the balance sheet account, add the accounts to the corresponding fund(s) record in the Ledger Interface.
4. Adjust/Add Multi Payout Times Overrides. The next step is to set the number of times a benefit is to be calculated if it is different than the numbers of payrolls the payroll accrual process is set for. The system will automatically accrue the benefits as well as the salary for the employees. The system will take the number of times left to pay on the contract and multiply that amount for each of the benefits. An example would be if there are 2 payrolls in the accrual process and the benefit is only to be calculated 1 time. The payroll accrual process takes the number of pays remaining on the contract and multiplies the benefits by the same number of pays. Therefore, if a benefit needs to be calculated on a different number of pays, an override option needs to be setup.
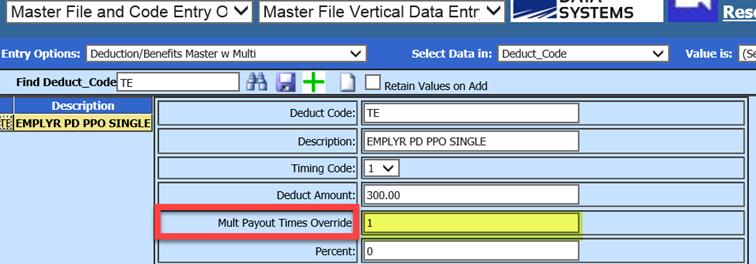
a. The field that is used to override the amount of times a benefit is taken is the “Multi Payout Times Override.” This field may need to be added to your “Deductions/Benefits Master” view. To add a field or fields to a view, please review the following link. http://help.schooloffice.com/financehelp/#!Documents/dataviewdefinition.htm
b. For this example, I have changed the code “TE” “Emplyr PD PPO single” to a 1. We will be able to follow this code through the payroll accrual process.
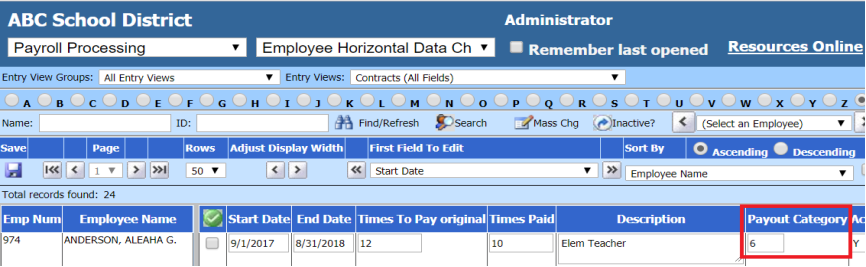
5. Review Payout Categories for Contracts to be accrued. To determine the employees that will be processed in the payroll accrual payroll, the payout category field will be used in the employee’s contract view. This field is found by going to “Payroll Processing” and “Employee Horizontal Data Changes”. Select the entry view of “Contracts (All Fields)”. In the “Payout Category” field, you can either leave the numbers that are in this field, if they are to be in the accrued payroll, or a new number can be assigned to the contracts that will be included in the accrual. For this example, I have chosen the number “6”.
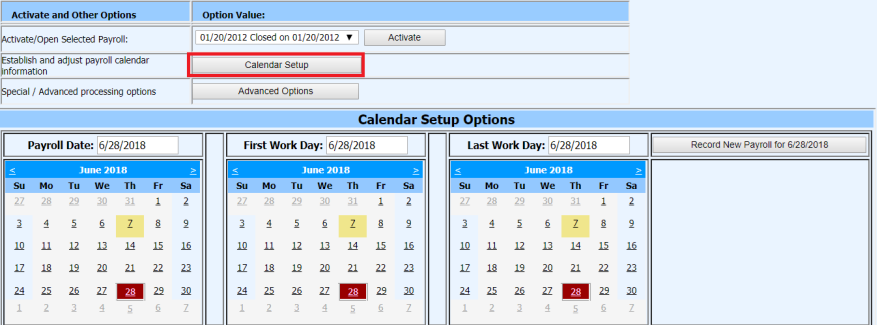
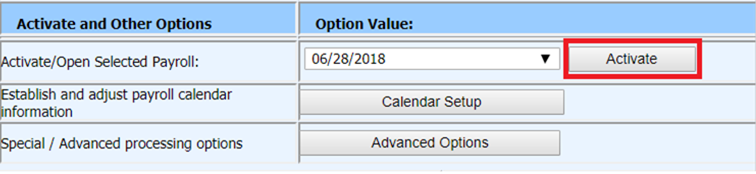
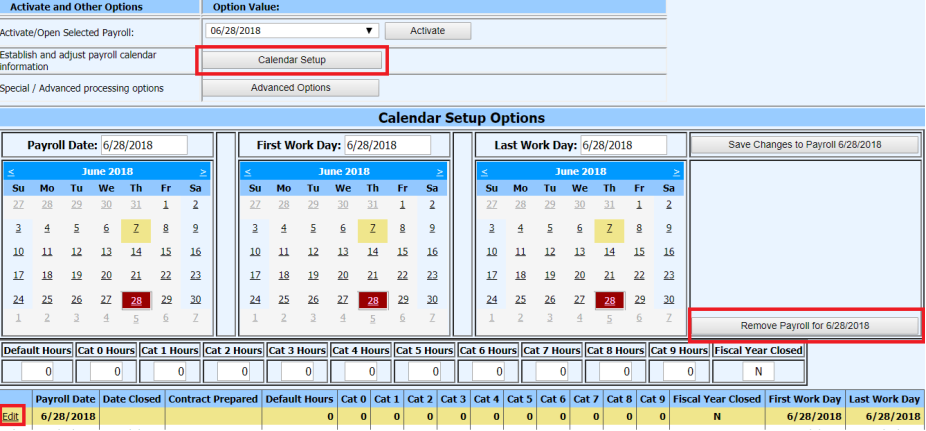
6. Add a June Payroll Date for the Accrual Payroll. To continue with the Payroll Accrual Process, add a new June payroll date. Under the menu option of “Payroll Processing”, select “Activate/ Open a Payroll.” Then select the “Calendar Setup” button. Select a June date for this payroll. It does not have to be June 30th. Then select to “Record New Payroll for 6/xx/2018.
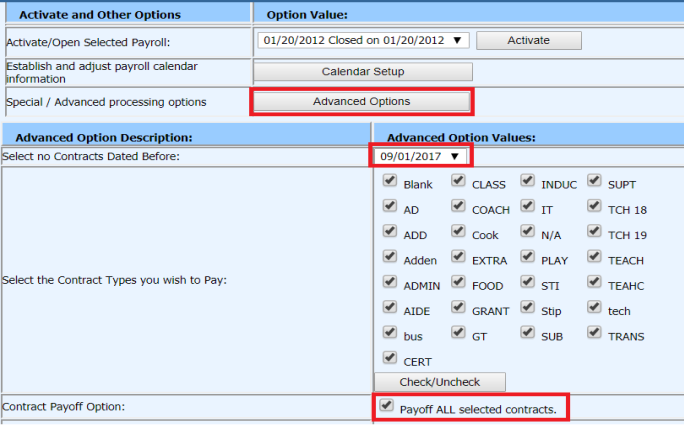
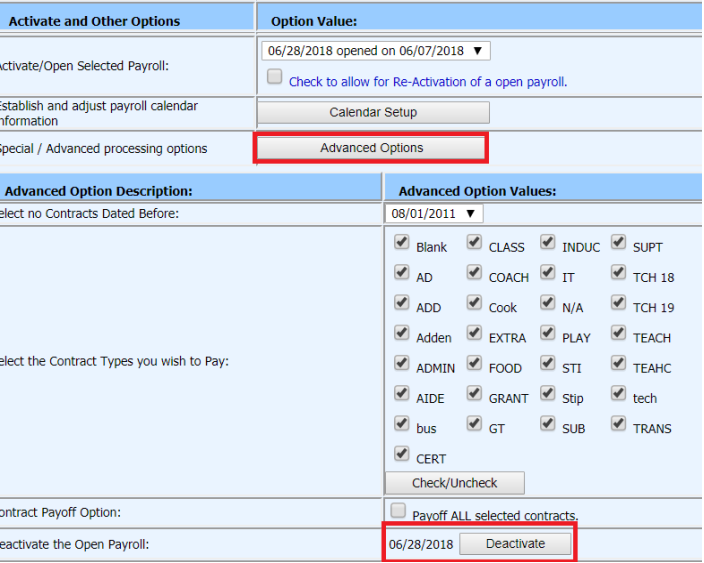
7. Determine Advanced Options Settings for Contract Payout. Select “Advanced Options.”
a. Select no Contracts Dated Before: This date needs to be set so the system does not look back at contracts prior to the fiscal year you are processing the payroll accrual payroll for.
b. Select the Contract Types you wish to Pay: In this area only select the type of contracts you want to be paid in the accrual payroll.
c. Contract Payoff Option: This option needs to be selected so the system knows to calculate the remaining amount of the contract(s) in the accrual payroll. This will allow the system to pull in the remaining amount of the contract, no matter if there is just one payroll or more payrolls remaining on the contract.
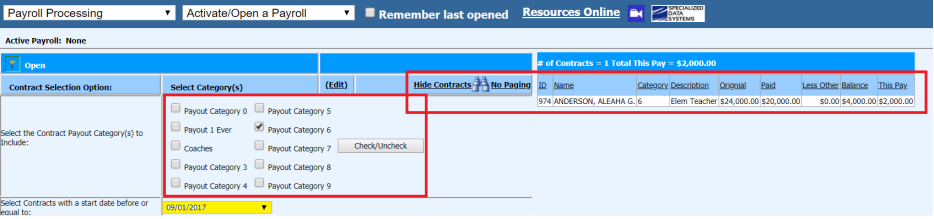
8. Select the Contract Payout Category(s) to Include: Select the desired payout categories that you need for this payroll. For this example, I am using just the payout category of “6”. For the date that is next to “Select Contract with a start date before or equal to” use the most recent date of your contracts starting date. Select the option to “Show Contracts.” A list of the contracts in payout category 6 will view on your screen.
9. Open Accrual Payroll: Once all the items on the “Activate/Open a Payroll” screen have been set up, select the “Activate” button.
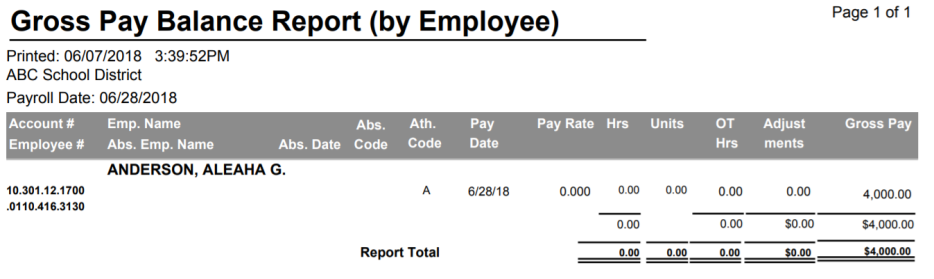
10. Verify Accrual Information on “Gross Pay Report”. Select “Payday Reports” under the “Payroll Processing” menu option. Then select one of the “Gross Pay” reports. Verify the information for the employees.
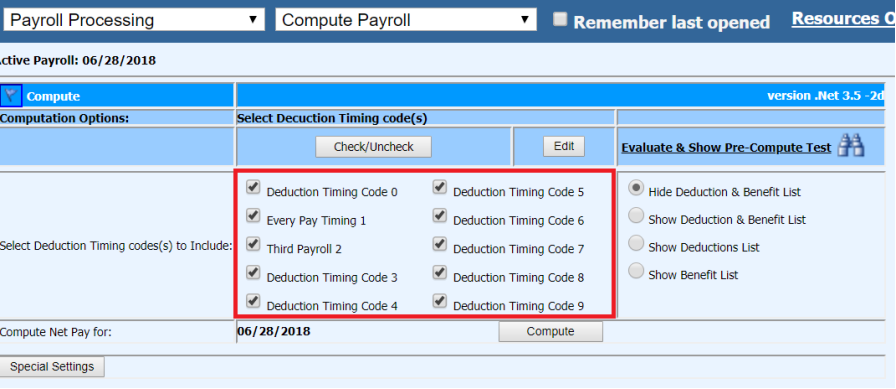
11. Select Timing Codes in “Compute Payroll”. Select the appropriate timing codes for this payroll.
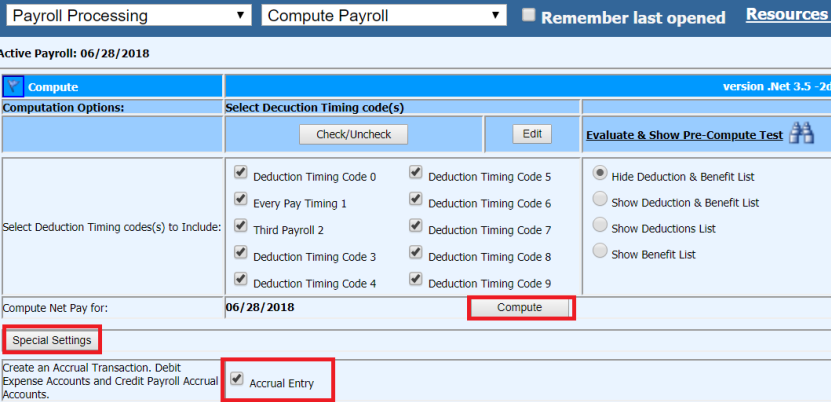
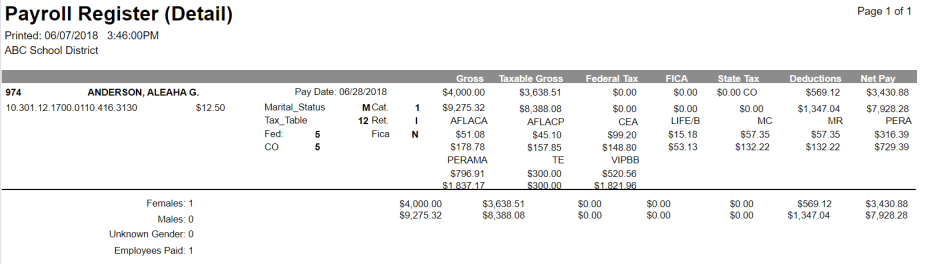
12. Select “Accrual Entry” under “Special Settings” in “Compute Payroll”. Select the option of “Accrual Entry” after opening the “Special Settings.” After this option has been selected, you need to select the “Compute” button. Once the system is finished computing the payroll, the “Payroll Register (Detail) report will populate.
13. Verify “Payroll Transaction” report and other reports in “Payday Reports”. Below are some examples of reports that may be used for verification of the accrual information. If you find anything that needs to be corrected, make those corrections and compute again. These reports need to be verified for accuracy. The reports, once correct, need to be printed out and saved and/or saved to your desktop. Since this payroll will be removed from the system in a later step, you will not be able to obtain these reports once that process has been done so saving the reports is very important!
Screen 1: Payroll Register (Detail):
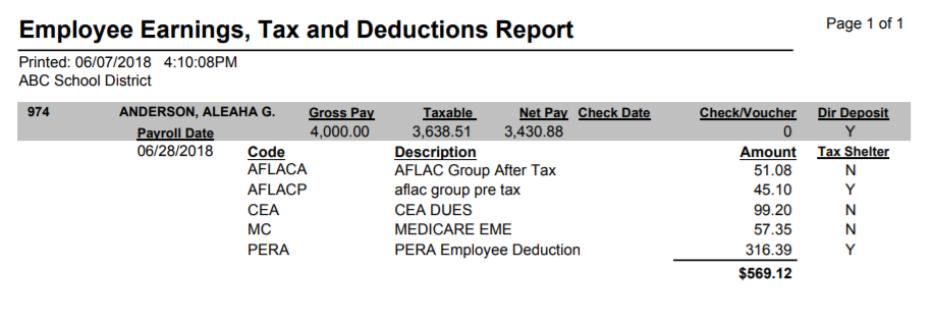
Screen 2: Payroll Employee Earnings, Tax and Deductions: This report will show the deductions for the payroll for each employee.
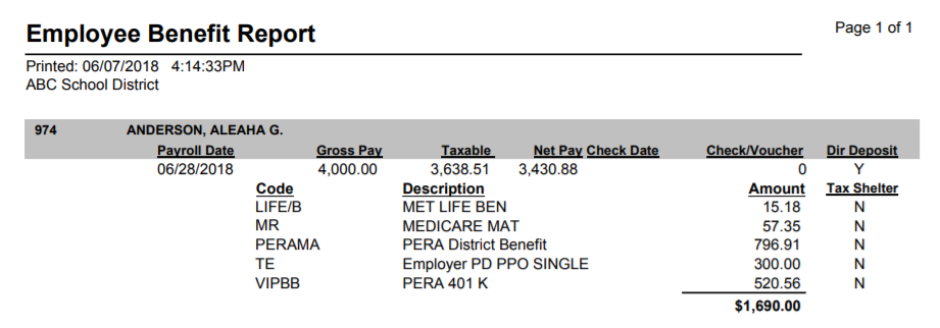
Screen 3: Payroll Employee Benefit Report: This report will show the benefits for the payroll for each employee.
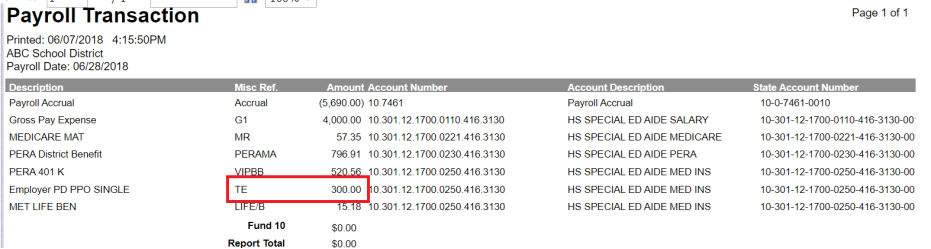
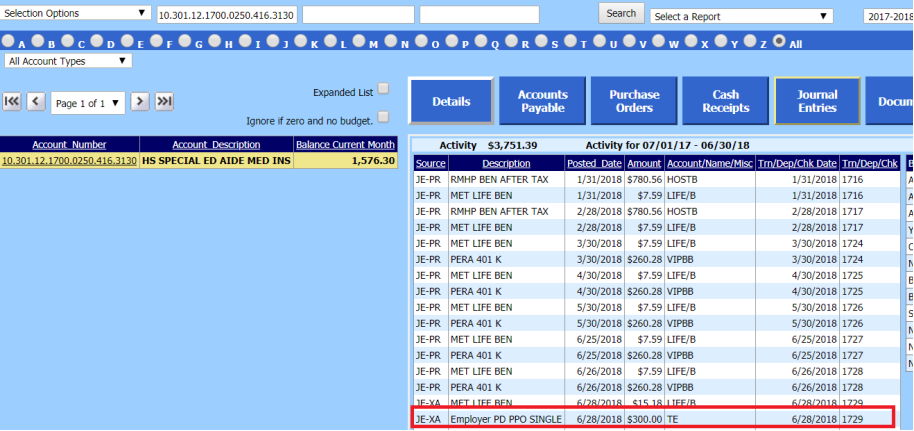
Screen 4: Payroll Transaction Report: Notice that the TE code which was setup for $300 per pay, it was only taken one time as per the setup in the “Multi Payout Times Override. The Multi Payout Times Override field instructed the system to only calculate this benefit one time instead of two times, which was the number of payrolls remaining on the contract.
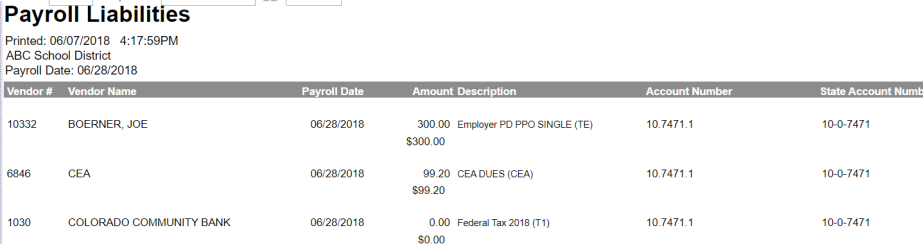
Screen 5: Payroll Liabilities Report
14. After the Payroll Accrual Reports have been verified, the next two steps of the Accrual Process need to be noted:
a. DO NOT PRINT CHECKS
b. DO NOT CLOSE THE PAYROLL
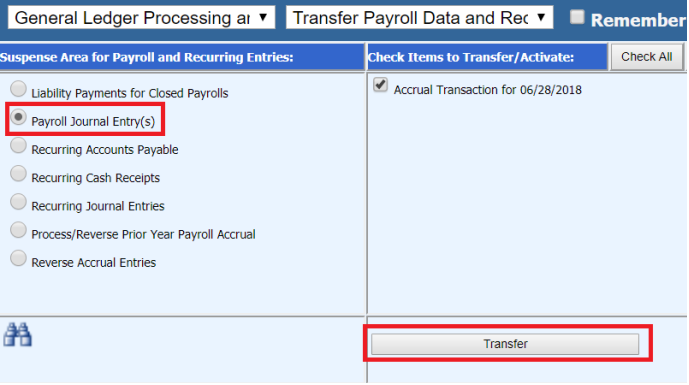
15. Transfer the “Payroll Journal Entry” in the “Transfer Payroll Data and Recurring Entries”. After all reports have been verified, the next step is to post the transactions. Proceed to “General Ledger Processing and Entry Options” and select “Transfer Payroll Data and Recurring Entries.” Select the bullet “Payroll Journal Entry(s).” Select the Accrual Transaction and then select the “Transfer” button. This will transfer the Payroll Accrual Transaction to the General Ledger.
a. DO NOT TRANSFER THE LIABILITIES
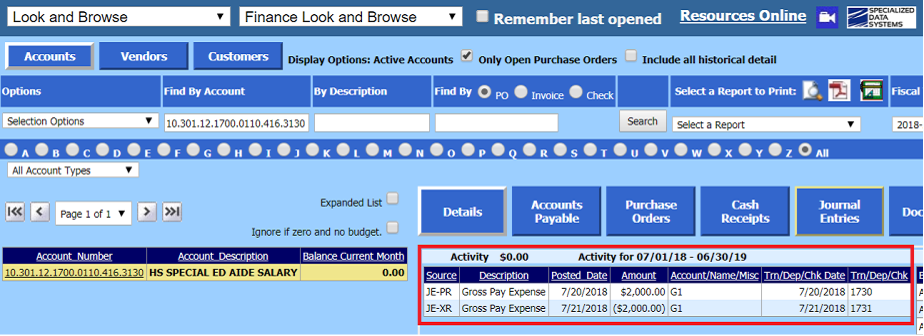
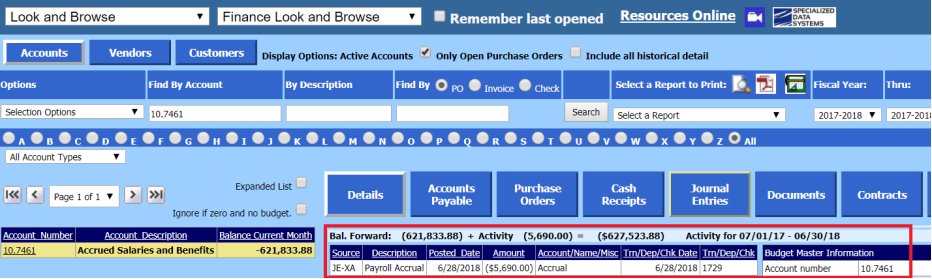
16. Reviewing how the Payroll Accrual Transactions posts to the General Ledger. Once the payroll accrual has been posted, you can view it in the Look and Browse area. Go to the menu option of “Look and Browse” and select “Finance Look and Browse.” This transaction will post with an “XA” journal source for the Accrual journal entry.
Screen 1: The Payroll Accrual Account
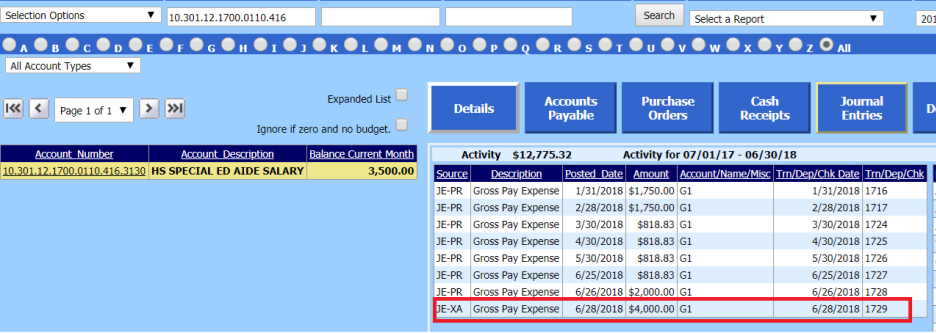
Screen 2: The Gross Pay Expense Account. Notice in the prior payrolls for this account, the amount of the calculation was $2,000. Since there were two payrolls left on this contract, the amount computed for the accrual was $4,000.
Screen 3: The Health Insurance account. This is the account the “TE” benefit code is posted to. Notice that the amount is just $300. This is the benefit that we did the override of “1” in the “Multi Payout Times Overrides” field.
17. Deactivate the Accrual Payroll Date. To finish the payroll accrual process, the date for this payroll must be deactivated. To deactivate the date, go to “Payroll Processing” and then “Activate/Open a Payroll.” Select the “Advanced Options” button. Once the screen opens for you, select the “Deactivate” button for the Payroll Accrual Payroll date.
18. Delete the Payroll Date. To delete the payroll date, select the “Calendar Setup.” Then select the “Edit” option next to the payroll date. Once the “Edit” has been selected for the Payroll Accrual date, the option to remove the payroll will appear. The final step is to select the “Remove Payroll for 6/xx/2018.” Once this option is selected, the payroll date will be removed.
ATTENDANCE
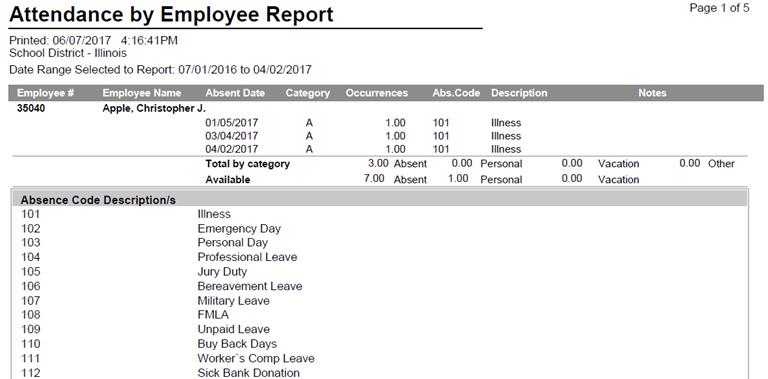
1. Run Year End Attendance Reports. There are several reports that can be run to verify the attendance that was taken during the year. To start reviewing attendance reports, go to “Reports” and “General Accounting Reports.” Select the Report Group “Employee Master and Attendance.” Below are a few examples, of reports that can be processed to verify the attendance.
a. Attendance Report by Employee. This report shows each day the employee was absent during the time frame that is selected on the calendar’s for each of the attendance codes.
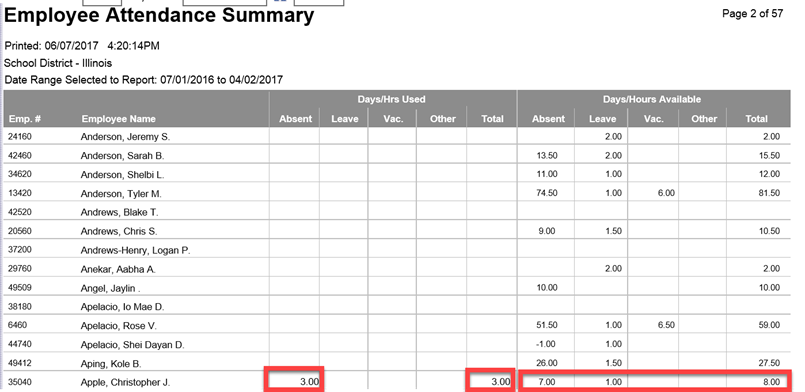
b. Employee Attendance Summary. This report shows, based on the date range selected on the calendar, how many days were used in each category of absent days and the amount of days that are remaining.
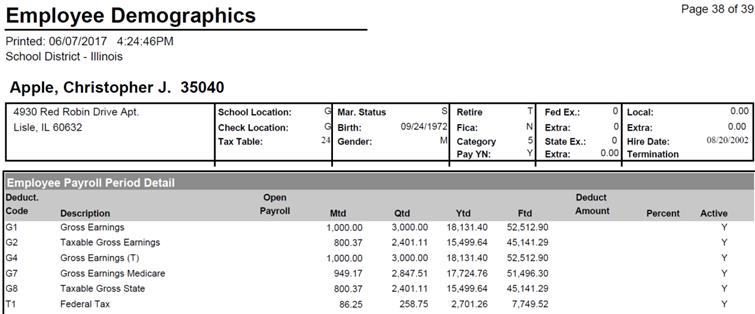
c. Employee Demographic Report. This report gives an overview of information on an employee. From the gross pay amounts, to the amounts for deductions and benefits, as well as all the individual payrolls based on the calendar date range that was used to produce the report. It also shows the contract amounts and the direct deposit information for the employee.
2. Setup Attendance Groups
a. Groups are used in the attendance area to allow you to sort the employees based on the way you need to add new days in to the attendance area. For example: 10 month employees may get 10 new days each year and 12 month employees may get 12 days.
b. Select Human Resource or Payroll Processing.
c. Select the Entry View: “Employee Demographics Basic Fields.”
d. A field needs to be selected that can be used to sort employees. For this example the field “Category” is going to be used. NOTE: Any field in the Employee Demographics All Fields view can be used to setup a sort. The field you select depends on what you are using them for so select one that will work for you.
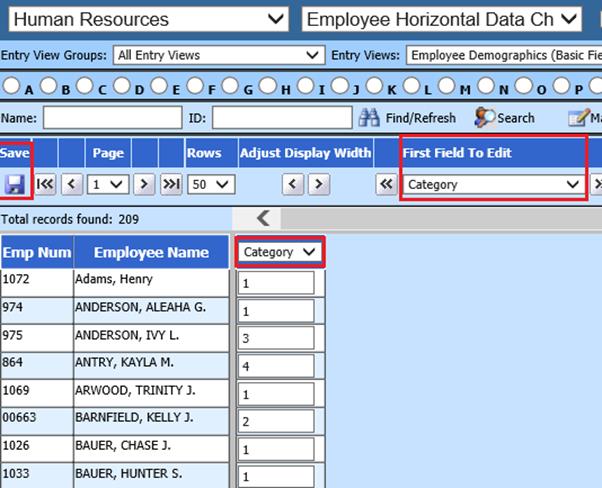
e. From the drop down “First Field to Edit” select the “Category” field.
f. Update the “Category” field for the employees. For this example the following have been used to setup the various groups.
a. The number 1 represents Teachers
b. The number 2 represents Secretaries
c. The number 3 represents Custodians
d. The number 4 represents Food Service
3. Awarding Days by Award Name and Group Selection, awarding days for the new fiscal year and moving the available days to the Balance Forward field.
a. To start the awarding process, once the groups are established, proceed to “Human Resources” and “Human Resource Control Center.”
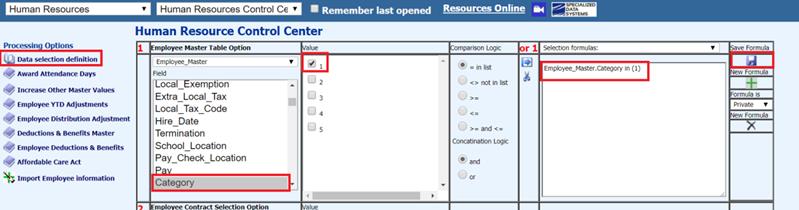
b. Under “Processing Options”, select the “Data Selection definition” option.
c. Select the field that was used to setup the specific sort. For this example, the “Category” field was used.
d. Under the “Value”, select the group that you want to work with. In the example, I am selecting the “1”. This represents the teaching group.
e. Select the arrow button to move this selection over to the next area. A formula will automatically be created for you. Then save.
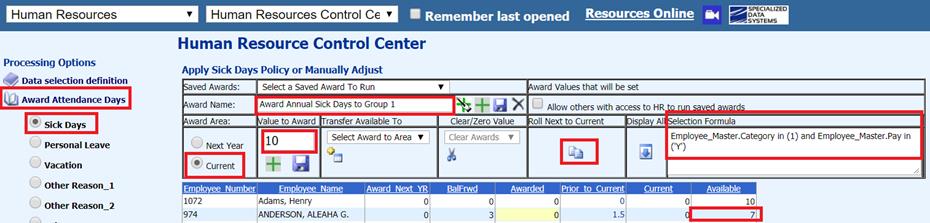
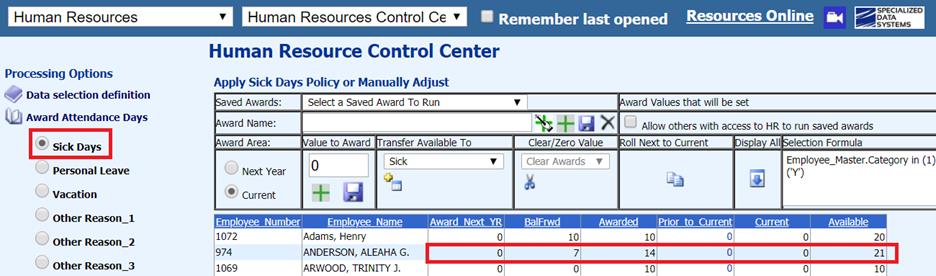
f. Now that we have a group selected, let’s setup the award name for the group and award the new attendance days. Select the “Award Attendance Days” option. Select the type of days you want to award new days to. For this example, I am picking “Sick Days”. Notice on the first screen print the formula shows that I select group “1” for teachers. Since I am ready for this to transfer into the New Year, I have selected the bullet “Current” under the “Award Area.”
Screen 1: Note that the available Days are 7. These days need to move to Balance Forward as we award 10 new days for the new payroll fiscal year. We can also setup an “Awarding Name”. This award name can be used the next year for this group to assign the new days. I put “Award Annual Sick Day to Group 1” as the name for this group of employees. To move these days, select the option to “Roll Next to Current”. This option will move the days from Available to Balance Forward and award the 10 new days.
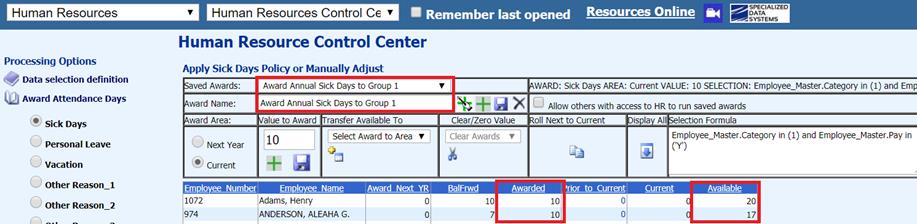
Screen 2: Here we see that the Balance Forward days are 7, which was what the available days were for the end of the year. I awarded 10 days to this group, so for this person, their available days are now 17. As the days were awarded the system created the award name of “Award Annual Sick Days to Group 1.” This can be used next year when this process needs to be done again.
g. The following link goes through this process in more detail.
4. Transferring Days between Attendance Groups
a. This process is designed to allow you to move days from the “Available field’ to the “Award Value” field, from one type of attendance to another.
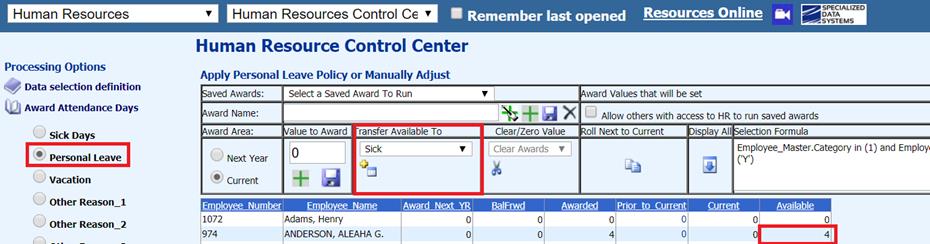
Screen 1:
Note that the “Available” days in the “Personal Leave” attendance days will be
transferred to the “Sick Days” by using the drop down menu for “Transfer
Available to”. To finish the transfer, select the button in the “Transfer
Available To.”  .
.
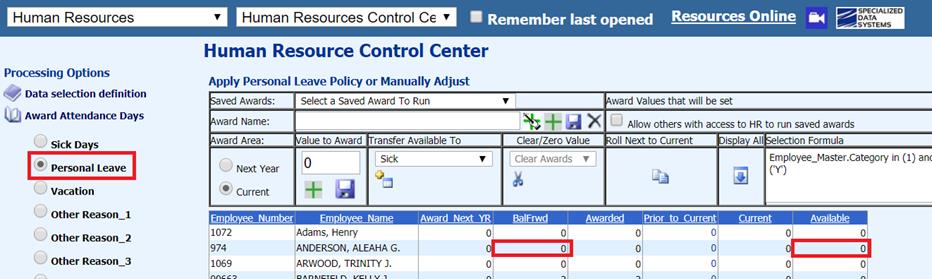
Screen 2: After selecting the transfer button, the available days remaining for personal leave is now set to zero.
Screen 3: In the sick leave day’s attendance category, the awarded days went from 10 days, which was what were originally awarded in the above example, to 14 and the available days went from 17 to 21.
b. The following link goes through this in more detail. http://help.schooloffice.com/financehelp/#!Documents/howtotransfersdaysfromoneattendancegrouptoanotherattendancegroup.htm
5. Changing individual employees
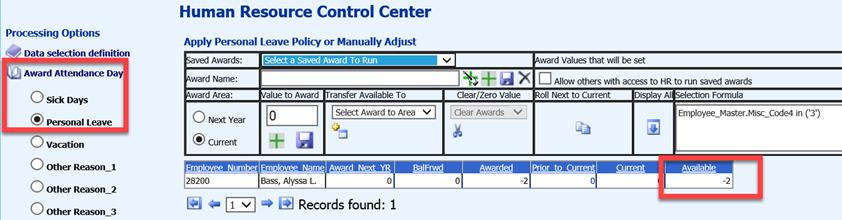
a. If you need to change the amount on an individual that has a negative amount in the available days at the end of the payroll fiscal year, you can use a sort to get just that individual using the “Data selection definition” area.
Screen 1: In this screen the employee has a negative amount in the “Personal Leave Available days.
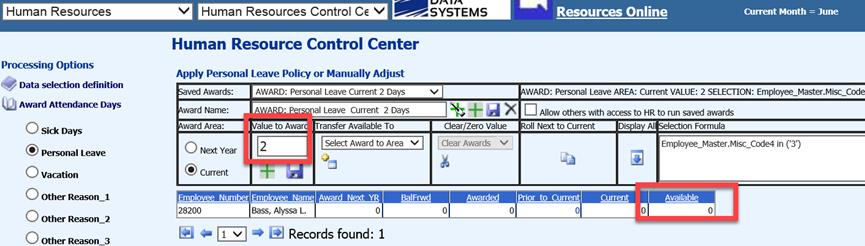
Screen 2: To remove those days, put “2” in the “Value to Award” area and select the + button. This will add “2” days to the awarded area and remove the days from the “available”. Now the employee will be starting out with “0” available days.
b. To review more detail on this option the link below will give you that detail.
http://help.schooloffice.com/financehelp/#!Documents/howtochangetheamountofdaysforoneemployee.htm
JULY 2019 FIRST STEPS FOR PAYROLL
1. Run the first July Payroll – Complete all Steps. The first payroll that is processed for July can include both contracts and manual time cards. This payroll is no different than any other payroll that is processed during the year.
2. Reverse Prior Year Payroll (PR) Accrual Transaction. To reverse the payroll accrual transaction, select “General Ledger Processing and Entry Options” and then select “Transfer Payroll Data and Recurring Entries.” Select the bullet “Process/Reverse Prior Year Payroll Accrual.”
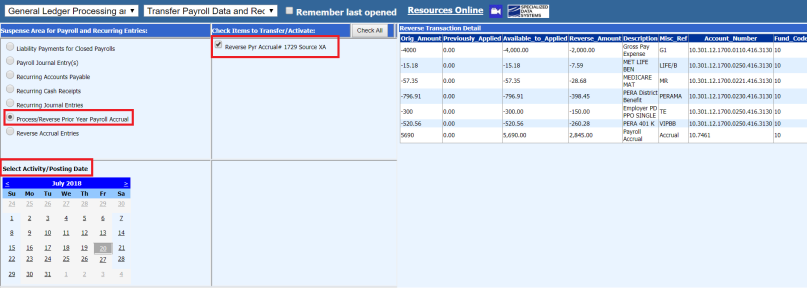
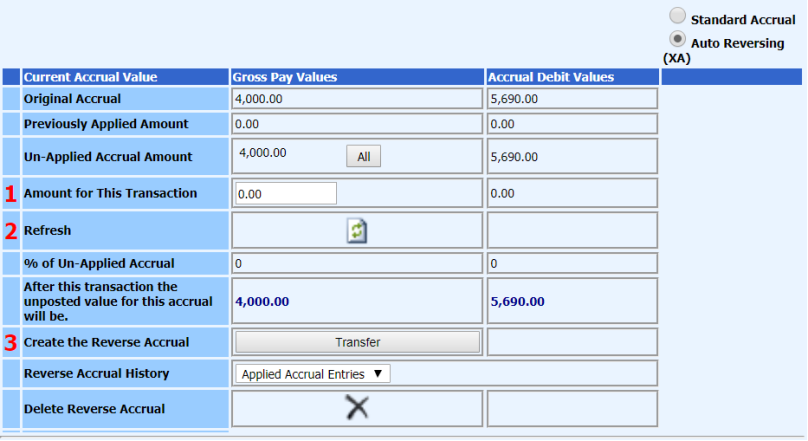
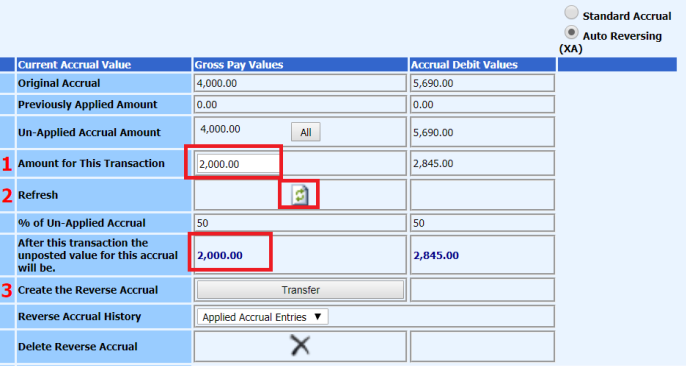
3. Determine the amount of the accrual to reverse. The total amount of the accrual can be posted at one time or based on the number of payrolls the accrual was calculated for. You can divide the amount in the “Un-Applied Accrual Amount” by that number. In this example, I had “2” payrolls in the accrual payroll calculation. Therefore, I will reverse out $2,000. Enter in the amount of the reversal in the “Amount for This Transaction” field. Select “refresh.” Select “Transfer” after the system has refreshed.
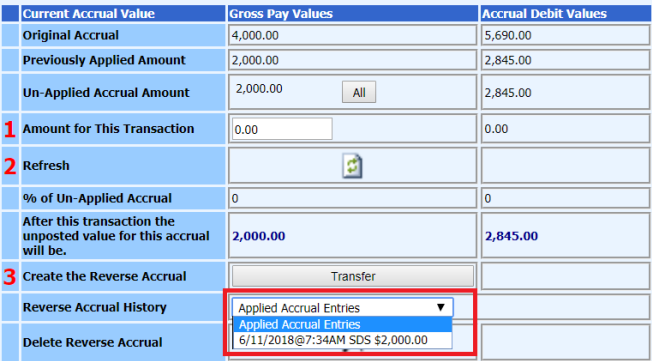
4. What happens during the “Transfer” option? The system will reverse out the portion of the original accrual that was entered into the number 1 “Amount for This Transaction. It will then keep track of the amount that is remaining to reverse. Therefore, if only a portion of the accrual was reversed you must come back to this area after each payroll and reverse the remaining amount of the accrual. If for some reason, you need to delete the reversed accrual entry, you will be able to select the entry date in the Reverse Accrual History and select the delete option.
5. What do the Salary Accounts and/or Benefit Accounts look like after the first payroll and reversal of the payroll accrual? Below is an example of what the salary account postings will be like after the first payroll is processed and the reversal has been posted. For the account below, the payroll for the first payroll was $2000 and the reversal was $2000. This nets this account to zero as the expense for this payroll was posted into the prior fiscal year.