sign to add a new name
 Revised: 6/2021
To begin using Purchase Order processing in the system, verify the settings in the Order for Master and Vendor (Basic Fields) records.
Order for Master
The Order for Master is
used to set up and maintain the ordering detail, as it relates to processing
requisitions and purchase orders.
1. Select Master File and Code Entry Options
2. Select Master File Vertical Data Entry and Changes
3. Entry Options: Order For Master
4. Select the
sign to add a new name
5. Enter in the information needed for the person or department placing the order; i.e. order for teacher
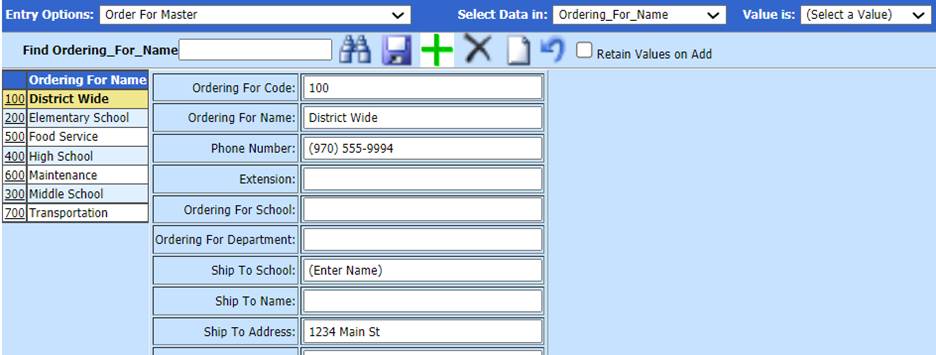
See below link for more information on Order for Master:
http://help.schooloffice.com/FinanceHelp/#!Documents/orderformaster1.htm
Entering Vendor E-mail Addresses
If emailing Vendor(s) their
Purchase Order(s), verify their email is set up.
1. Select Master File Horizontal Data Changes
2. Select Entry Options: Vendor (Basic Fields)
3. First Field to Edit: Select Vendor Email
4. Vendor eMail: Enter the vendor’s email address, for all vendors who are to receive purchase orders by email.
5. Select Save
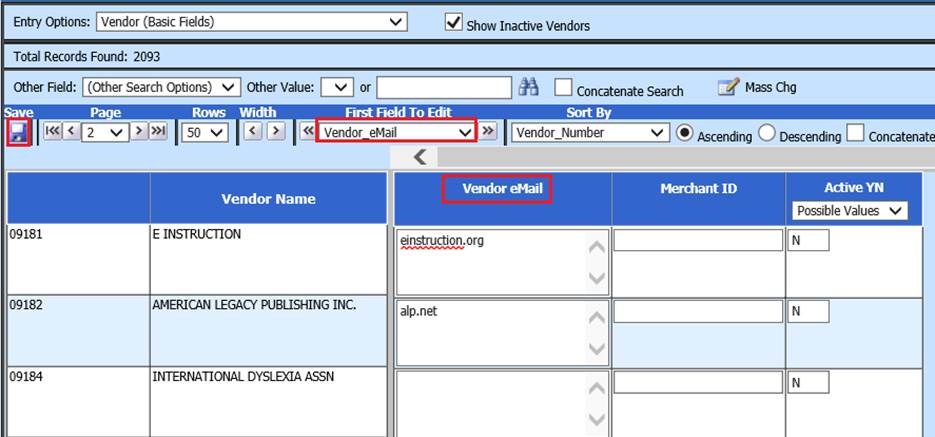
See below link for more information on Vendor Master:
http://help.schooloffice.com/FinanceHelp/#!Documents/vendorbasicfields1.htm
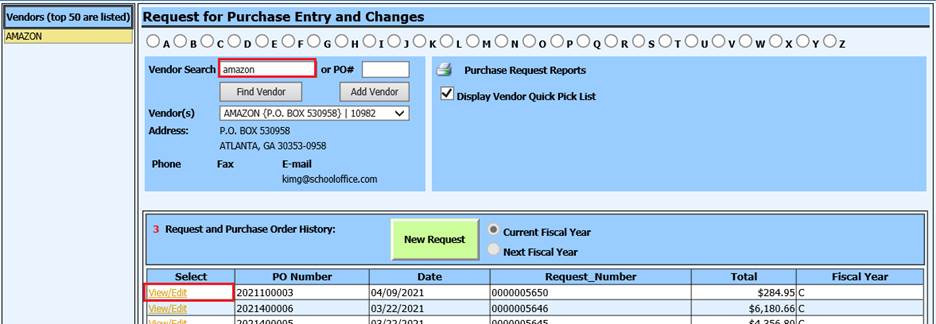
Entering a Requisition
1. Select Purchasing
2. Select Request for Purchase Entry and Changes
3. Vendor Search: You can use either the bullets or enter vendor name in the Vendor search field
4. Select “Find Vendor”
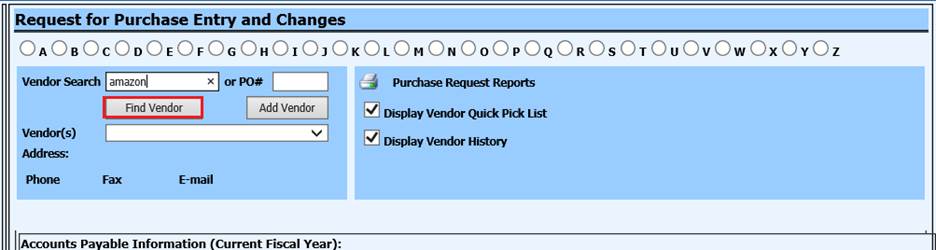
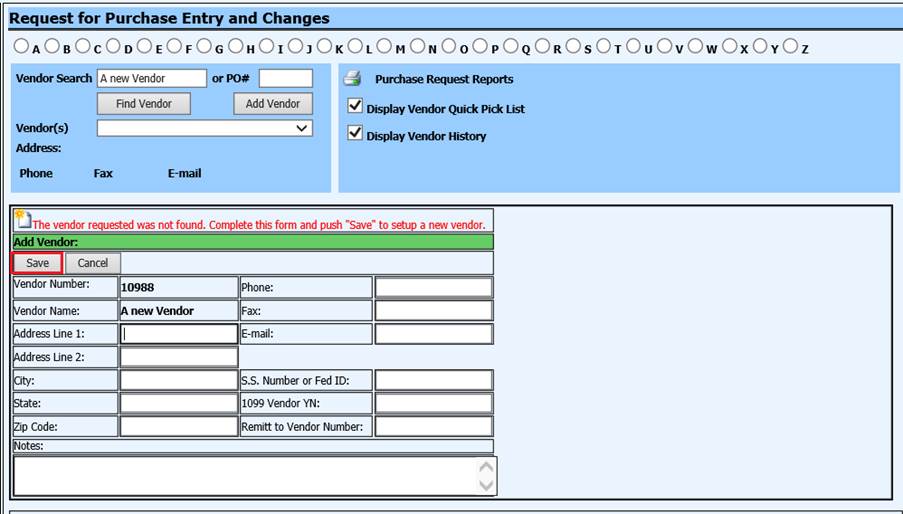
•If you need to add a new vendor, enter in the Vendor name in Vendor Search and select “Add Vendor”.
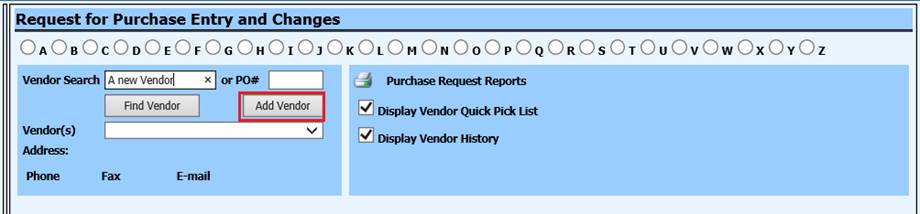
•Enter required information for the new Vendor (address, phone, email, etc.)
•Select Save
5. If applicable; select Current or Next Fiscal Year
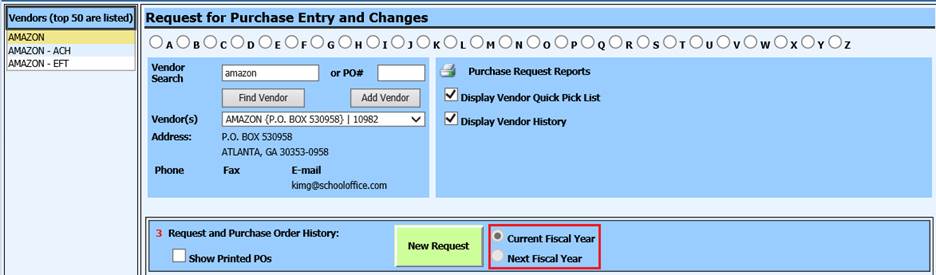
6. Select “New Request”
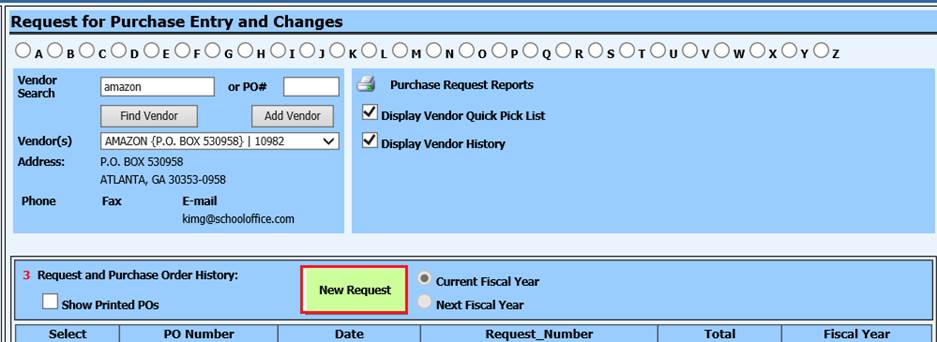
•If using email notifications for approval processing, an email will be sent to the authorizer upon selection of “New Request”
7. 1. Order For: Select the person or group placing the order (fields completed under Ship to Information will autofill from Order For Master)

8. Order From: Vendor information
9. PO# (Optional) and PO Date (optional): These fields are optional. Normal processing will assign a PO number and PO date when the request is authorized.
10. Request Number: Requisition number assigned
11. Dated: Date Requisition was entered
12. Group: Authorization group required to approve Requistion

13. 2 Ship to Information: Verify the ship to information and make changes, if needed.

Detail Area Entry Options:
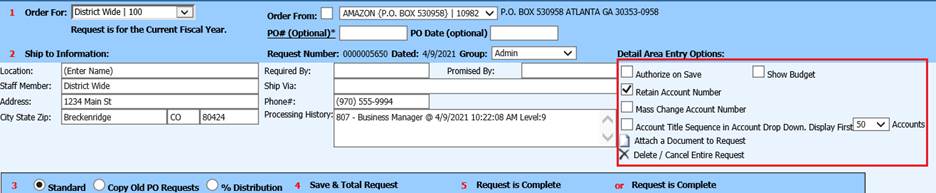
•Authorize on Save: To be used with supervisor status only; for the ability to override ALL other approvers upon Save
•Show Budget: To display Budget for line item, upon data entry of requisition
•Retain Account Number: Select to repeat Account Number for all line entries
•Mass Change Account Number: Select to mass change multiple line entries with incorrect Account Numbers
•Accout Title Sequence in Account Drop Down. Diplay First “20 Accounts: Determine the amount of accounts to select from, upon data entry
•Attach a Document to Request: Select if you have a quote or other document to attach to the Requisition
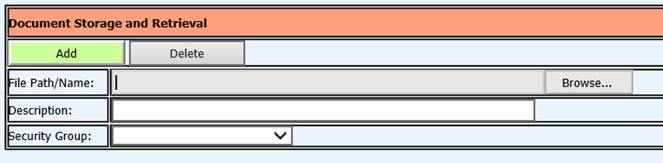
i. Click Browse to locate the document on your computer
ii. Enter a Description such as “Quote for Instruments 3/17/2021”
iii. Select a Security Group (optional)
iv. Select Add
•Delete/Cancel Entire Request: Select If you do not need the Requesition started
14. 3 Select Requisition Entry option:
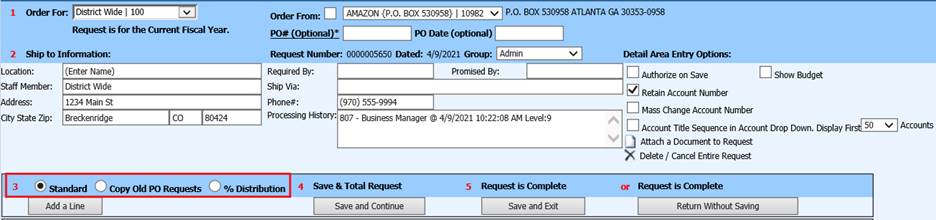
•Standard: New request entry
•Copy Old PO Requests: Prior POs entered you can choose to copy from
•% Distribution: allows you to setup request by percentage. After you select how many lines you wish to use then follow the instructions in red. You can then enter the account numbers, Save and Exit
15. Enter details for the order:

•Quantity, Price
•U of M (Unit of Measurement)
•Item
•Item Description
•Account Number. The Account Number can be added in using the Account Number or Account Description
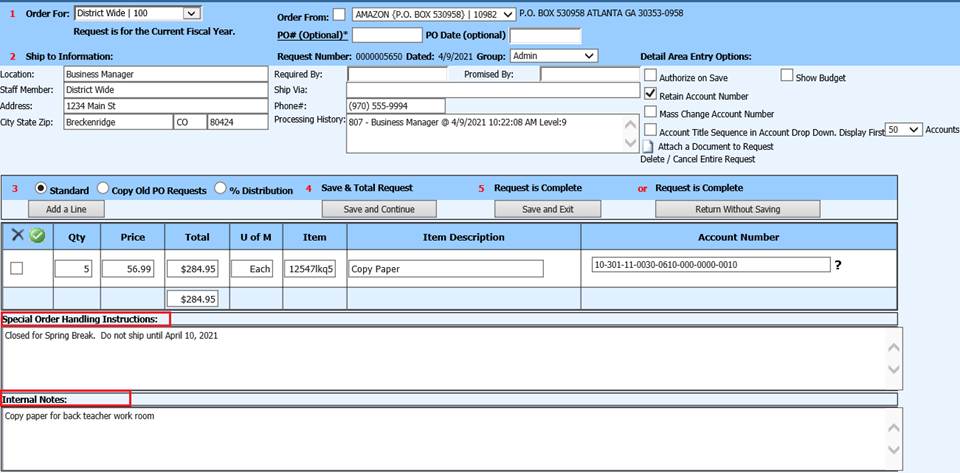
•Special Order Handling Instruction: Information to be relayed to Vendor
•Internal Notes: Information to be relayed between users, related to the requisition
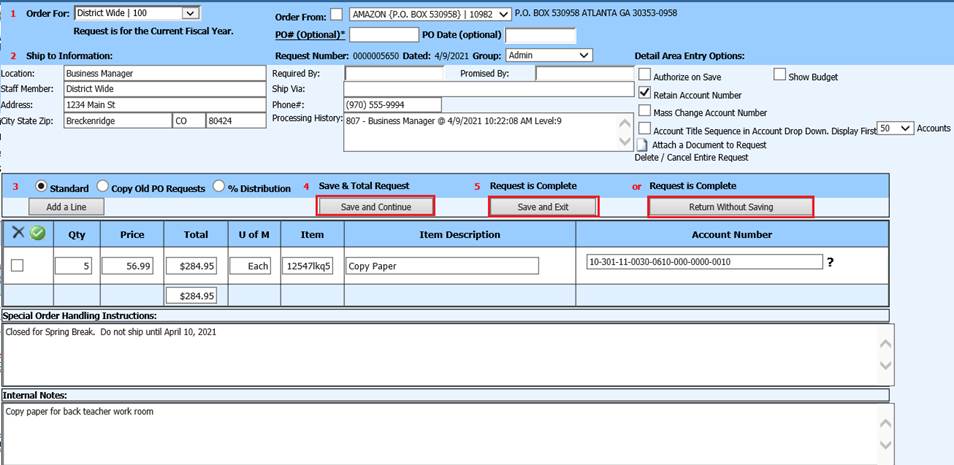
16. 4 “Save and Continue” to enter in additional entries for this request or any delivery or internal notes.
17. 5 “Save and Exit” once the request has been completed
18. or “Return without Saving” use this option if you are an approver viewing the request without making any changes.
NOTE: Entering Next Year PO’s with a July
date:
After selecting “Order For” click on PO# Optional and the program
will assign a PO number and will fill in the date of entry. Change that date to
a July date and then complete the request, Authorize on Save and then select
Save and Exit. The PO will then print with the July date. The date of the
request goes back to the entry date, but the PO will still have the July
date.
Purchase Request Authorization
Once the request has been
authorized by all approvers a purchase order number will be assigned and it can
be printed.
Please refer to the follow link for more information on setting up security:
http://help.schooloffice.com/FinanceHelp/#!Documents/settinguppurchaseordersecurity.htm
If the User is set up as an
Approver, once a Requisition has been started, the Approvers will receive a
notification bar when they log into the system and select an Application to
view. 
1. Continuing in Purchasing (or select the red notification bar)
2. Select Purchase Request Authorization
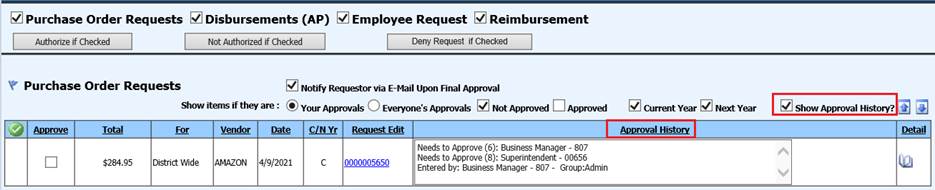
3. Under Purchase Order Requests, you will see the request summaries that are waiting for approval, if “Not Approved” is selected. If you need to see Approved requests, place a check in “Approved”
a. If the User has the “Supervisor” status in their Security setting, they have the “Everyone’s Approvals” selection available. If they use this selection, their approval will override the other Approvers

4. If you
have more than one request to approve, you can use the  to Check All Lines to expedite this
process.
to Check All Lines to expedite this
process.
5. If you
have the  selected upon approval, the requestor
will receive an email notification of the approval status. This is the
only email notification a requestor will receive.
selected upon approval, the requestor
will receive an email notification of the approval status. This is the
only email notification a requestor will receive.
6. When selecting the blue requisition number 0000005650 under Request Edit, this will take you to the request entry screen.
a. A request
number with a red * indicates there is an issue
that needs to be addressed within the request. Select it and make the changes or
delete the request. 
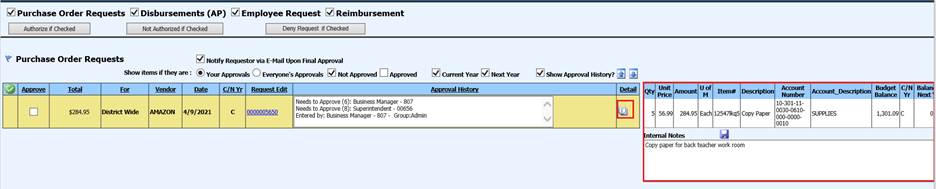
7. When selected, the Show Approval History will display who entered the request and all that have or need to approve.
8. Selecting the book under Detail, will show the details of the request without opening a new screen. Using this view, you can communicate with other staff using Internal Notes and Save.
9. To Approve the request, place a check in the “Approve” column and select "Authorize if Checked"
10. If you have already Authorized the request an need to change this, select the "Not Authorized if Checked"
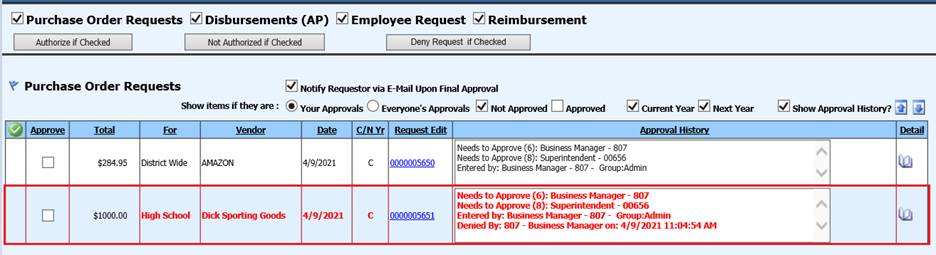
11. If an authorizer decides that this should not be authorized they can type in the reason for denial in the Internal Notes field and select "Deny Request if Checked"

•After a requisition has been created it is ready to be authorized by all of the appropriate users. However, if one of the authorizers decides that this should not be authorized they can deny the requisition. At this point if the system has been setup to send an automatic email to the user that setup the requisition they will receive notification that the requisitions was denied. The email will not tell them why it was denied just that it was denied. The system will also show the approval history in red.
•Upon the denial email notification, the requestor can then access the request to evaluate, change or remove it.
Note: If a change is made to the request (i.e. amount, account number, etc.) before it has been finalized, it will become unauthorized. All of the previous Approvers will need to authorize the item again
Printing a Purchase order
Once the Requisition has been fully Approved, the Requisition is completed and has become a Purchase Order. It has been assigned a Purchase Order number and is ready to print.
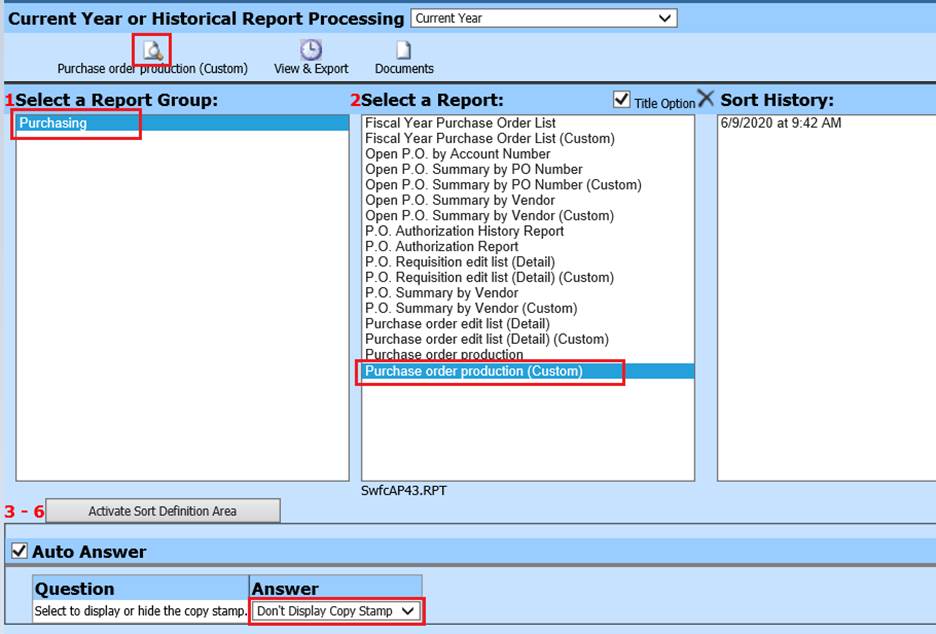
1. From the Purchasing Application, select Purchase Order Production
a. If you have a custom report, the word (custom) will appear after the report name
2. If this is the first time printing, make note of the Auto Answer and select “Don’t Display Copy Stamp”
a. When you have sent out the original PO and need to just print a copy, you can use the “Display Copy Stamp” selection.
b. The purpose of the Duplicate Copy Stamp on the Purchase Order is so that it can’t be used as an original. If you are using Green Accounting, use the Activate Sort Definition to find the PO to reprint. When viewing the PO select the Display Copy Stamp and when you export them to the message center, they will then be available in Look and Browse. If the purchase order is printed from there in the future it will have the Duplicate Copy listed.
3. Display PO’s
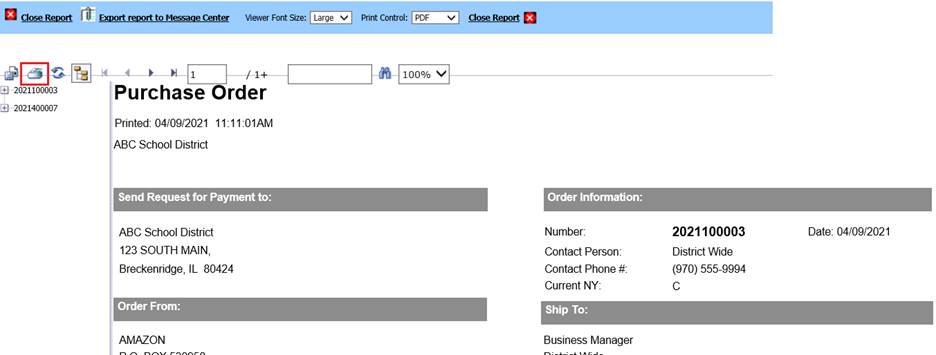
4. Select Export report to Message Center to preview Purchase Order(s) in Look and Browse and for it to be available to be emailed to the Vendor.

5. Print the report as needed.
Purchase Order Production
You can locate Purchase Order
Production from three different sections of the program. Request for Purchase
Entry, Purchasing or General Accounting Reports. Once you have determined which
way to view your Purchase Order, the screen from Purchase Order Production is
the same Purchasing selections from each one.
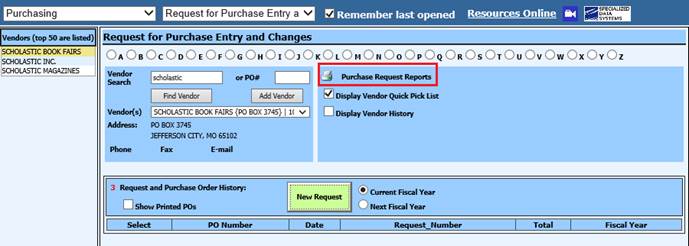
I. From Request for Purchase Entry and Changes View
1. From the Purchasing Application, select Request for Purchase Entry and Changes
2. Select Purchase Request Reports
II. From Purchasing
1. Select Purchasing
2. Select Purchase Order Production
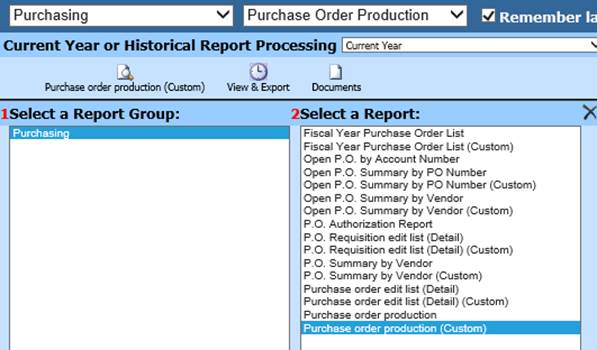
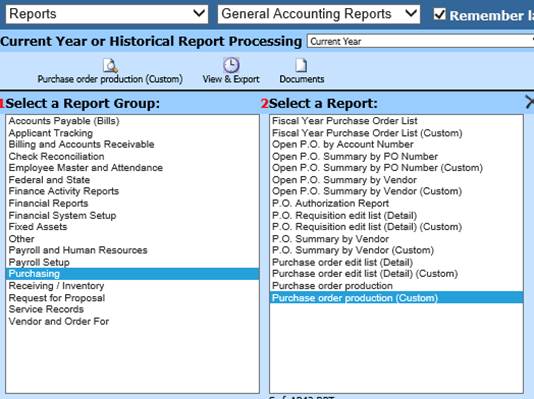
III. From General Accounting Reports
1. Select Reports
2. Select General Accounting Reports
3. 1 Select a Report Group: Purchasing
4. 2 Select a Report: Purchase Order Production
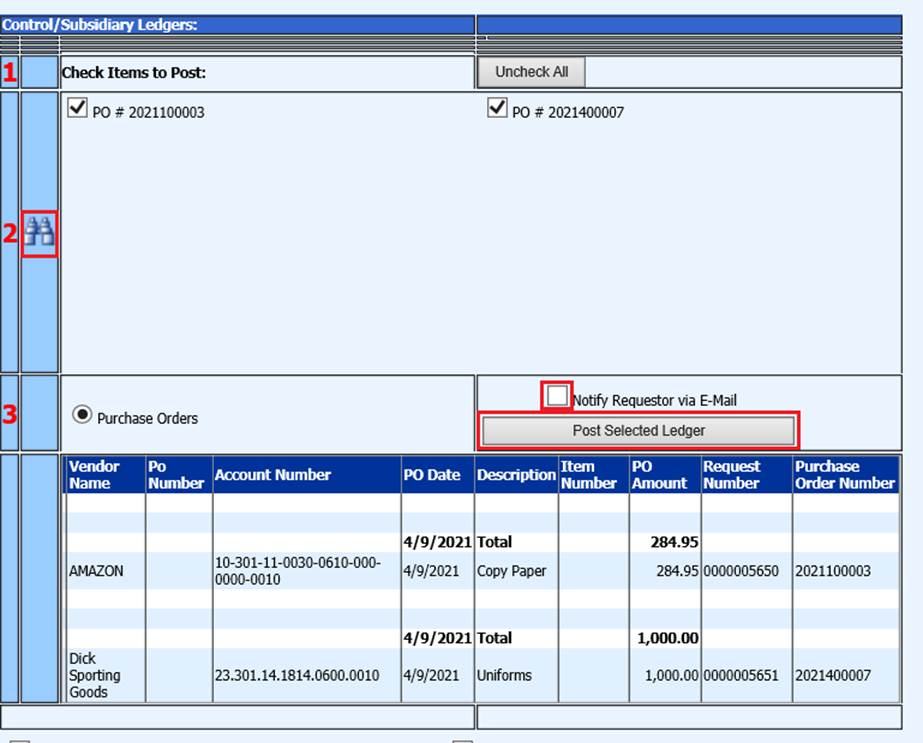
Make Purchase Orders Permanent
Once Purchase Orders have been printed and verified for accuracy, they need to be posted to the system to move them to Accounts Payable for payment.
1. From the Purchasing Application, select Make Purchase Order Permanent
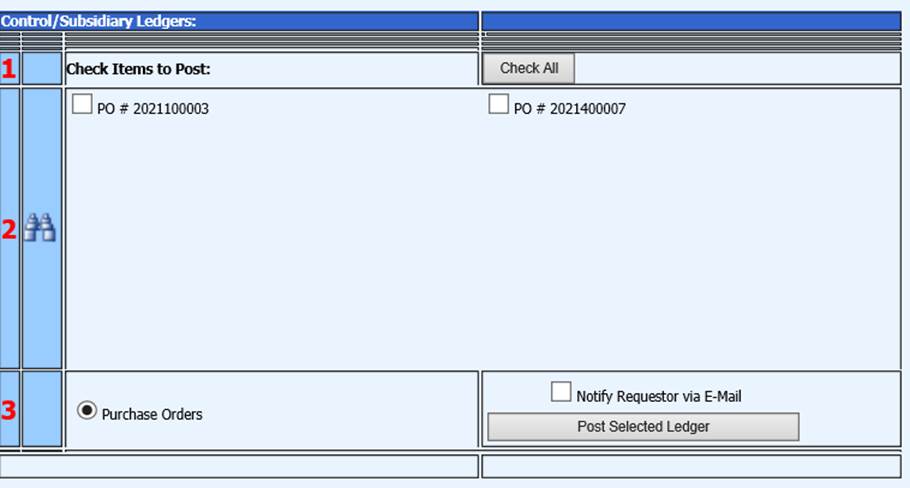
2. 1 Select the Purchase Orders to be Made Permanent
3. 2 Preview Purchase Orders, before posting
4. If you wish the Requestor to be notified of the Purchase Order, select Notify Requestor via E-Mail
5. Select Post Selected Ledger
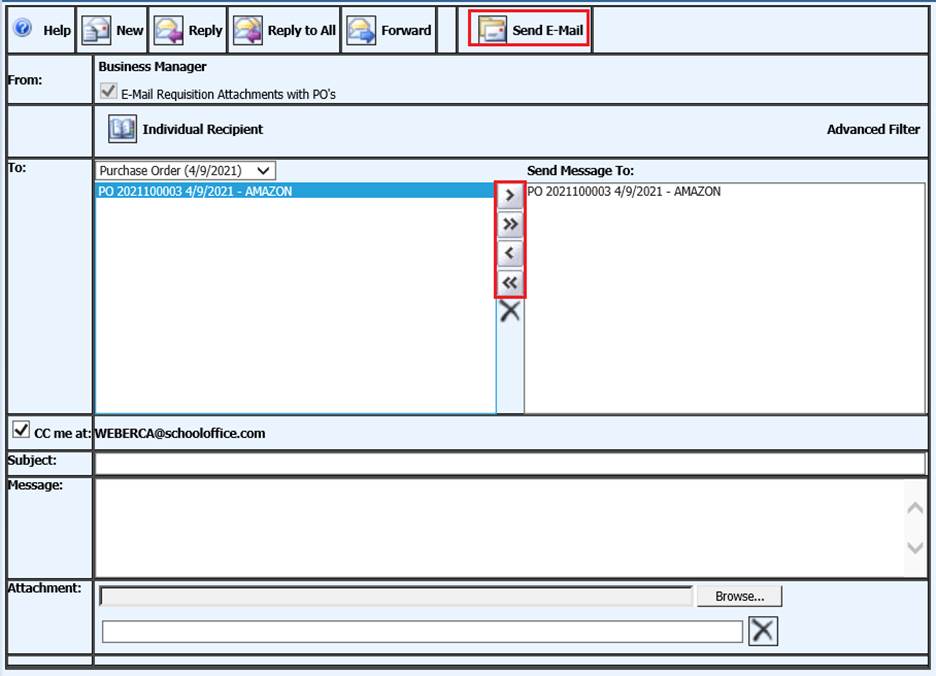
Sending the Purchase Order by Email
1. From the Purchasing Application, select Purchase Order Email (Message Center)
2. From the “To” dropdown, select the purchase order date that you wish to email.
3. Select the vendor(s) that you wish to email a purchase order from the list at the left side of the screen.
4. To select a single vendor, highlight the vendor and select the single arrow key (>) to move that vendor to the Send Message to: box at the right side of the screen.
5. To select all vendors listed, click the double arrow key (>>) to move all vendors to the Send Message to: box at the right side of the screen.
6. Enter a subject and a message for the email.
7. Select Send E-Mail. Each Vendor will receive an email with an attachment containing the purchase order
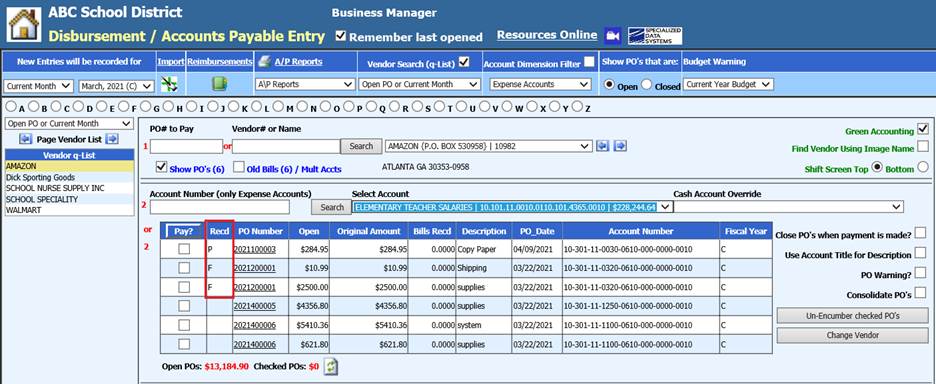
Record Received Merchandise
The Record Received Merchandise section allows the tracking of items that have been received. When an item is received and recorded in this section, it will show as a received item in the Purchase Order section of the Accounts Payable screen indicating that the item is received and is ready for payment.
1. From the Purchasing Application, select Record Received Merchandise
2. 1 Vendor Name Search. You can use either the bullets or search field.
3. 2 Select the Vendor Merchandise was received from
4. 3 Request and Purchase Order History: Select the View/Edit next to the PO Number
Enter Received information
PO Received in Full:
1. Select PO Received in Full for all quantities to be recorded at once. All fields will be completed but received by name.

2. Enter Received By Name
3. Select Save and Return.

PO Partially Received:
1. If an order is incomplete
2. Receoved Qty: Enter quantity received
3. Received Code: Enter “P” for partial
4. Received Date: Enter date received
5. Received By Name: Enter name
6. Select Save and Return

7. These records will be seen on the Accounts Payable Disbursement screen when the Purchase Order is viewed.