
Revised: 4/2021
Once the request has been
authorized by all approvers a purchase order number will be assigned and it can
be printed.
Please refer to the follow link for more information on setting up security:
http://help.schooloffice.com/FinanceHelp/#!Documents/settinguppurchaseordersecurity.htm
If the User is set up as an
Approver, once a Requisition has been started, the Approvers will receive a
notification bar when they log into the system and select an Application to
view.
1. Continuing in Purchasing (or select the red notification bar)
2. Select Purchase Request Authorization
3. Under Purchase Order Requests, you will see the request summaries that are waiting for approval, if “Not Approved” is selected. If you need to see Approved requests, place a check in “Approved”
a. If the User has the “Supervisor” status in their Security setting, they have the “Everyone’s Approvals” selection available. If they use this selection, their approval will override the other Approvers

4. If you
have more than one request to approve, you can use the  to Check All Lines to expedite this
process.
to Check All Lines to expedite this
process.
5. If you
have the  selected upon approval, the requestor
will receive an email notification of the approval status. This is the
only email notification a requestor will receive.
selected upon approval, the requestor
will receive an email notification of the approval status. This is the
only email notification a requestor will receive.
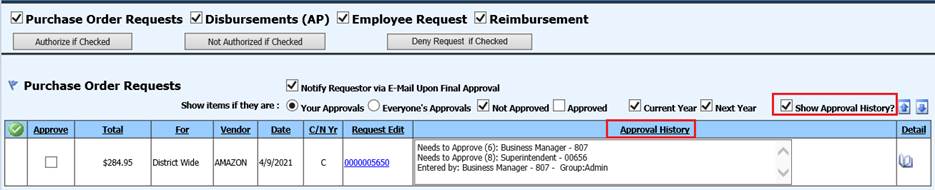
6. When selecting the blue requisition number 0000005650 under Request Edit, this will take you to the request entry screen.
a. A request
number with a red * indicates there is an issue
that needs to be addressed within the request. Select it and make the changes or
delete the request. 
7. When selected, the Show Approval History will display who entered the request and all that have or need to approve.
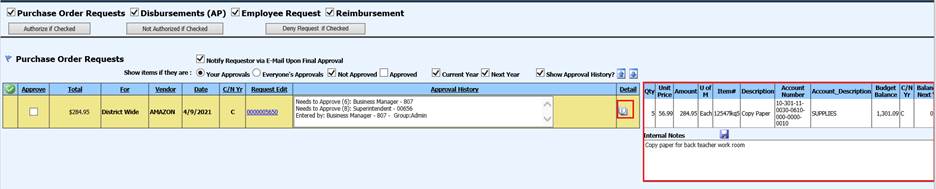
8. Selecting the book under Detail, will show the details of the request without opening a new screen. Using this view, you can communicate with other staff using Internal Notes and Save.
9. To Approve the request, place a check in the “Approve” column and select "Authorize if Checked"
10. If you have already Authorized the request an need to change this, select the "Not Authorized if Checked"
11. If an authorizer decides that this should not be authorized they can type in the reason for denial in the Internal Notes field and select "Deny Request if Checked"

•After a requisition has been created it is ready to be authorized by all of the appropriate users. However, if one of the authorizers decides that this should not be authorized they can deny the requisition. At this point if the system has been setup to send an automatic email to the user that setup the requisition they will receive notification that the requisitions was denied. The email will not tell them why it was denied just that it was denied. The system will also show the approval history in red.
•Upon the denial email notification, the requestor can then access the request to evaluate, change or remove it.

Note: If a change is made to the request (i.e. amount, account number, etc.) before it has been finalized, it will become unauthorized. All of the previous Approvers will need to authorize the item again