
Revised: 12/2018
Entering Recurring Cash Receipts
1. Select Cash Receipts.
2. Then select Cash Receipts.
3. From “New Entries will be recorded for”, select the drop down menu and select “Recurring Receipts”

4. The month selected will not matter for recurring entry items.
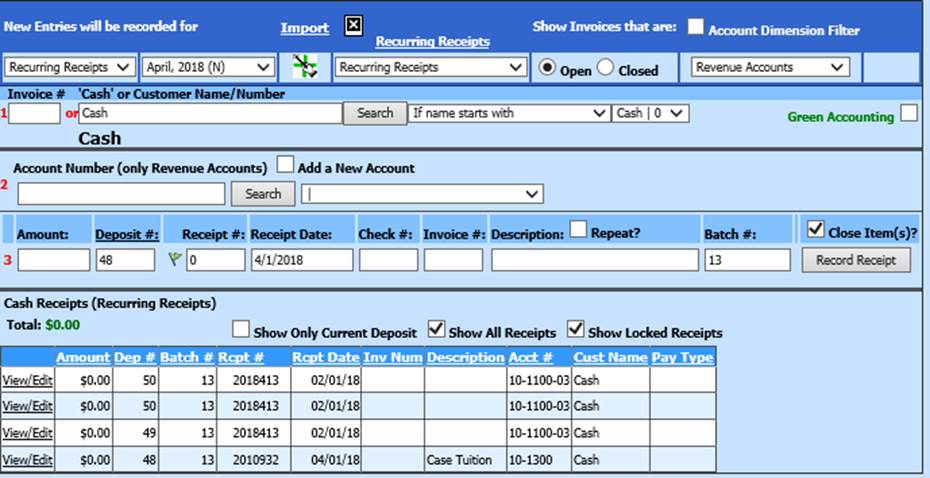
5. After Recurring Receipts has been selected as the type of entry, the Cash Receipts Screen will show that the entries will be recorded in a separate “Cash Receipts (Recurring Receipts) area.
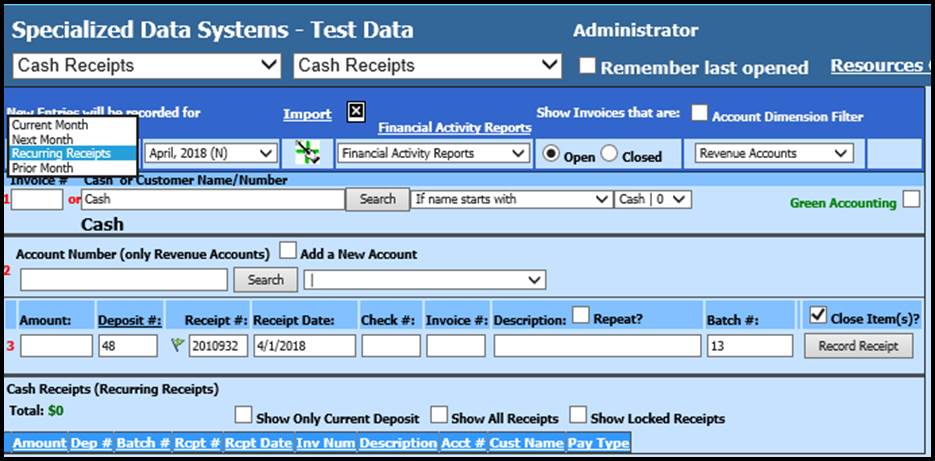
6. 1 Enter an A/R Customer Name or A/R Invoice Number to process, or use the default setting “Cash” if an A/R item is not being processed.
7. 2 Enter the Account Number for the Recurring Entry.
8. 3 Enter the amount for the Recurring Entry, or, if the amounts will change, enter 0.00 for the amount. (The amounts can be edited prior to transferring the Recurring items).
9. The Deposit Number, Receipt Number, Receipt Date, and Batch Number will default to the date the item is entered, if specific entries are not made to these fields. The Check number and Invoice Number items can be entered or can be left blank when entering the initial recurring entries and the specific information can be entered for each record prior to Transferring the Recurring Cash Receipt Batch(s).
10. Select “Record Receipt” to Record the Entry.
11. Continue adding Recurring Cash Receipts until all entries are complete.
To Print a Report to Verify Recurring Entries
1. Select Financial Activity Reports at the top of the Cash Receipts Screen and select “Recurring Receipts” to print a report of Recurring Entries to verify the information.
Tips for Recurring Cash Receipt Entry and Transfer
1. Each time Recurring Date is Transferred into Cash Receipts, there may be a need to edit information.
Data that can be edited each time the Cash Receipt Recurring Entries are Transferred:
•Receipt Date
•Batch Number
•Amount
•Description
•Inv/Ref #
•Deposit Number
•Receipt Number
•Check Number
2. Recurring Entries will display for Transfer by Batch Number. If you have multiple groups of Cash Receipts that you wish to keep separate, each group of entries can be entered with a unique Batch Number. This will allow for separation of these entries upon Transfer.
3. When a Batch of Recurring Cash Receipt Entries is selected for Transfer, specific line items can be omitted from being transferred, as needed. Please see the section below on “Transfer the Recurring Cash Receipt Entries into Cash Receipts”
You can use logical operations: AND, OR, NOT. Examples: football OR hockey, sports AND NOT baseball
Transfer the Recurring Cash Receipt Entries into Cash Receipts
When Recurring Cash Receipt Entries are transferred into Cash Receipts, the entries are then ready for processing through Cash Receipts. The Transfer process saves you the time of having to manually enter each line item each time the entries need to be processed.
The Recurring Entries will always remain in the Recurring Cash Receipt Entry area and can be transferred whenever needed.
To Transfer Recurring Cash Receipts:
1. Select General Ledger Processing and Entry Options.
2. Select Transfer Payroll Data and Recurring Entries.
3. Select Recurring Cash Receipts
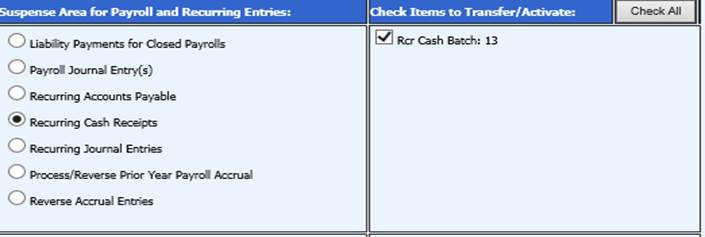
4. From the right side of the screen, select the batch(s) you wish to process.
5. At the bottom left of the screen, select the “Receipt Date” from the calendar. This date will be entered on each of the Recurring Entries that are transferred.
6. If all information is correct and does not need any editing prior to being transferred, select “Transfer”. If any information needs to be edited, select “Edit Amounts Before Transfer”.
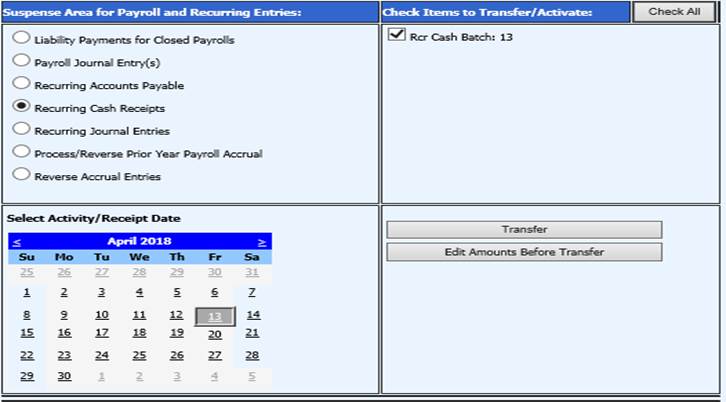
7. If you select “Edit Amounts Before Transfer”, a horizontal grid will appear which will allow you to quickly edit Cash Receipt Invoice Numbers, Deposit Numbers, Descriptions, Amounts, and other information prior to transferring the entries to Cash Receipts.
8. If you wish to change the batch numbers on all entries to a new number, enter the new batch number in the field “Batch Number # Override” and select “Change All Batch #’s” button to apply the change.
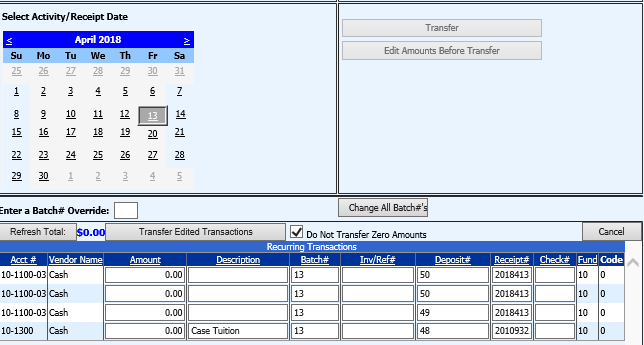
9. If you wish to edit any amounts, make the necessary changes. You may then select “Refresh Total” to display a new/updated Total for all invoices in the Batch. This total can be used to verify the accuracy of the batch entries.
10. If there are any line items that should not be transferred, the amount should be change to Zero and check the box “Do Not Transfer Zero Amounts”.
11. When all edits are complete, select “Transfer Edited Transactions”.
12. The Recurring Cash Receipt entries will now be displayed in the Cash Receipt area. If you need to make further edits on these entries, select Edit on the line item(s) in Cash Receipts and make those edits.