
Revised: 4/2021
Please follow all
instructions, if you are currently using or just beginning to use Authorization
Levels for purchase order processing.
If you are currently using the
purchase order process with authorization levels, authorize them all too
printing status BEFORE changing to the Group Authorization process.
Activate the Group Authorization Option
1. Select Administrative Utilities
2. Select SDS Web Office Settings
3. Under the Finance tab, Activate Group Authorization Option; select “Y”
4. Under the Purchasing heading, Activate PO Percentage Distribution; select “Y”

5. Select Save Changes
6. Log out of the system to activate the new settings
7. Log back into the system
Currently using the Authorizations Levels PO Processing
1. Select Administrative Utilities
2. Select Security – Request and Approve
3. Select Convert Step Approval System

4. Select Load/Create Approvers by Group….”
•Now that you have Loaded / Created Approvers from the SDS Step Approval System, review and adjust the Approvers. Select the option 'Requester and Approver Assignment'. After you have reviewed and adjusted the Approvers proceeding to the next step 'Assign New Authorization Groups and Approvers to POs and Invoices'.”
Have not started using the Group Authorization process
You will need to determine the access and flow needed for the purchase order processing
Example of Groups to use: _Emp_LB group, _PO Entry, _PO Supervisor:
Users in the _Emp_LB group have access to their Employee Portal and enter in a requisition (in the example screen print shown below-each district may set the options each set of users should be able to access)

Users in the _PO Entry group have access to view
Look and Browse; their Employee Portal; enter, print, email and record
merchandise (in the example screen print shown below-each district may set the
options each set of users should be able to access)

Users
in the _PO Supervisors group have access to view Look and Browse; their Employee
Portal; enter, approve and print PO’s; Reports (in this example screen print
shown below-each district may set the options each set of users should be able
to access)
Setting up a new Group
1. Select Security – Application Access
2. Select Options
3. Select Add New User or Group
4. Enter User ID: _New Group (The underscore in the first character designates it as a Group)
5. Enter User Name: New Group Name
6. Select a Group: Choose No Group
7. Adjust the Security access for your new group
8. Select Create. When the process is complete, you will receive a message the Group has been created
9. Select Close
Changing Users to a New Group
1. Select the User to be moved to a new group
2. Under Change User’s Group, select the Group to move the User into
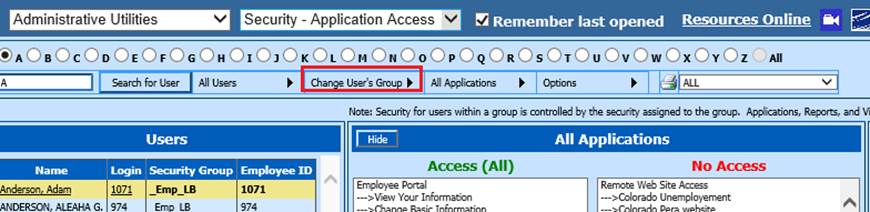
3. When the process is complete, you will receive a message the User has been changed
Setting up the Authorization User Assignment
1. Select Security – Request and Approve
2. Select Purchase Order Request
3. Under Administrative Group, Select your Group or enter in your new Group name: i.e. Elementary
4. To assign
Requesters: Under Staff Not Assigned to a Group, choose the Users for this group
and use the Add  to move them into Elementary Requesters.
Note: If they should be restricted to only see their PO requests, when selecting their name make sure you have the “* Restricted” selected, then select Add. You will then see the * after their name in the Requesters section.
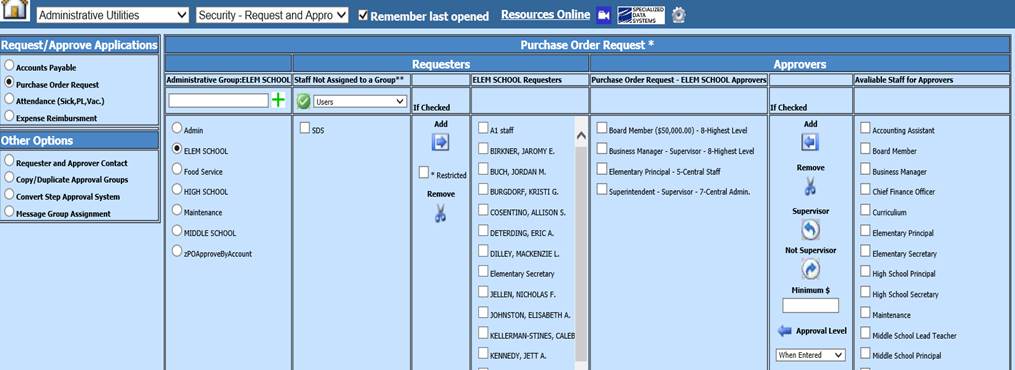
5. To assign
the Approvers: Under Available for Staff for Approvers, select the Users and use
the Add 
6. A
Supervisor Approver will override any other Approver. They may approve or deny
any request available to them. To assign a Supervisor Approver to your selected
“Elementary Approvers”, check the box next to the users name and select the 
7. If you
wish to have an Approver set up with requests with a minimum amount, you will
select the User, enter in the amount in the Minimum $ then Add. i.e. Board Member (150,000.00)
8. You can set up approvers to only see their requests once the prior approvers have authorized them. Assigning the Approval Levels, they will then only be notified there is something to be approved, when their level for approval is needed

Setting up the Data Restrictions for the User
Determine what security
data restrictions are needed. Then follow the below:
1. Select Security – Data Access Control
2. Select the User
3. Under the section Accounts/Budget Restrictions for Data entry, Select “Purchasing”

4. Add the Account Filter Options. Select the type of file: Expenditures, Revenues, Balance Sheet.
5. Select the
“From/To” for a range of accounts to add or “Single” for individual account
selection. Click on  to refresh your accounts
6. After you
have refreshed and verified your accounts, Select Add to move the formula into the Restriction
area

7. Once you
have completed your account restrictions, verify the accounts the user has
access to under “Access to 26 Accounts”, select 

8. If you need to set up any Master Data Restrictions, select the “Accounts” selection and add the restrictions needed following the same steps as “Purchasing”
Setting up the User Group Restriction
1. Under Security – Data Access Control
2. Select User
3. Under Detail Data Entry/View Restrictions, select “User will see”

4. Under the Filter Options, under Value: select the Group for the User to see then select Add.

5. Select
 close
close
Setting up the Authorization by Account
If you need to set up an
approver with the ability to approve by a specific account or group of accounts
1. Under Security – Data Access Control, select the User
2. Under the section Accounts/Budget Restrictions for Data entry, Select “Restriction for PO Approval by Account”

3. Once you
have completed your approval by account restrictions, verify the accounts the
user will be approving under “Access to 219 Accounts”, then select 
Setting up the e-mail Addresses for Users
If you wish for the Users to receive e-mail notifications; i.e. there is something to approve, the PO has been approved, etc. To activate this option:
1. Select Administrative Utilities
2. Select SDS Web Office Settings
3. Under the General tab, Automatic eMail Notification is set at a “Y”

4. Select Save Changes
5. Log out of the system to activate the new settings.
6. Log back into the system.
Your basic Purchase Order Security set up has been completed. To continue following how to enter in a Requisition and Authorize to Purchase Order, please take a look at the Purchase Order Processing HC Document:
http://help.schooloffice.com/FinanceHelp/#!Documents/purchaseorderprocessing.htm
Important Items to Remember about the Purchase Order Authorization Process
•If a user is added to a purchasing group after a requisition has been entered they will not be added to that requisitions approval chain.
•If a user is removed from a purchasing group after a requisition has been entered they will not be removed from the approval chain for that requisition.
•The approval process is not a sequential process as it was before. The steps by level are not used.
•If a change is made to the amount, account, or vendor of an authorized P.O. or requisition it will become unauthorized. All of the previous users will need to authorize the item again.