In Data Entry & Changes|Student Information|Processing Options, View Student Options provides you with other ways to select the students on the screen and provides additional entry options.
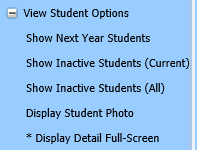
1. Show Next Year Students
Revised: 2/21/18
In Data Entry & Changes|Student
Information|Processing Options, View Student Options provides you with other
ways to select the students on the screen and provides additional entry
options.
1. Show Next Year
Students
•Click on Data Entry and Changes |Student Information |Processing Options |View Student Options |Show Next Year Students.
•Next year students will display.
2. Show Inactive Students (Current)
•Click on Data Entry and Changes |Student Information |Processing Options |View Student Options |Show Inactive Students (Current).
•Inactive students from the current school year will be included in the display.
3. Show Inactive Students (All)
•Click on Data Entry and Changes | Student Information | Processing Options | View Student Options | Show Inactive Students (All).
•All inactive students from current and past years with the same school location as the user’s restriction will be included in the display.
4. Display Student Photo
•Click on Data Entry and Changes |Student Information |Processing Options |View Student Options |Display Student Photo.
•The Student Photo will then display.
5. Display Detail Full-Screen
•Click on Data Entry and Changes |Student Information |Processing Options |View Student Options |Display Detail Full-Screen
•Entry views will be displayed across the full screen.