Using the Activate Sort Definition Area
button allows you to sort your data and then run a standard SDS report
based off your selection.
•Login.
•Select Reports.
•Click on Student Reports.
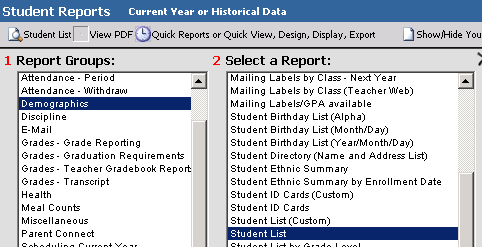
•Click on a Report Group (i.e. Demographics) from the box labeled 1 Report Groups.
•Select a Report (i.e. Student List) from the box labeled 2 Select a Report.

•Select “Adjust student selection to include Only Active Students?” (This will filter current students only.)
o Note: If you want to include all current active students for the year, even ones who have withdrawn, then click this link, then remove the line about the Exit Date field. To remove the line, click Select then click the button “Delete Selected Sort”.
•Click “Activate Sort Definition Area”.
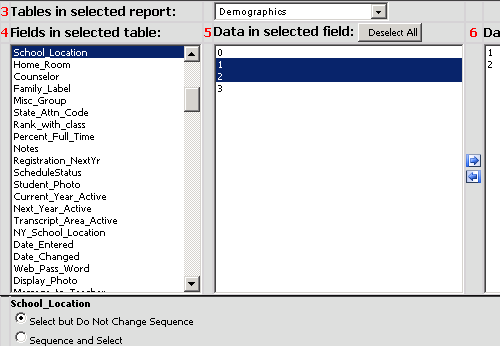
•Select a Table to Sort on (i.e. Demographics) from the box labeled 3 Tables in selected report.
•Select a Field (i.e. School_Location) in the box labeled 4 Fields in selected table.
•Select the Data you would like to sort on. (i.e. 1, 2) in the box labeled 5 Data in selected field.
•Click the arrow to the Right to add the
selected values to box 6 Data used for record Selection.


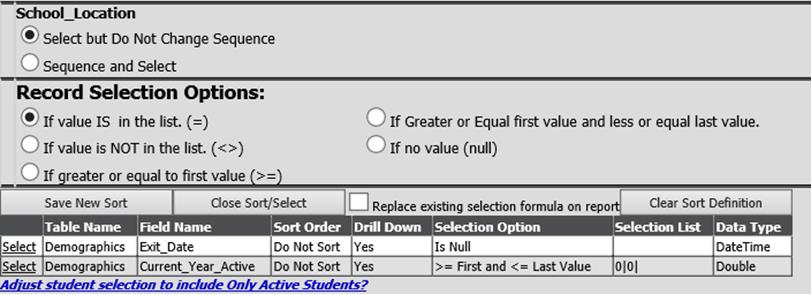
•Select a Record Selection Option (default is “If value is in the list (=)) See definitions of these options at the end of this document.
•Click Save New Sort
•The Sort will then Display near the bottom of the page.
•Note: Your sort history will be saved until you remove them. You can name your sort after running the report once with this sort. (See Save Sort with Name HC article Help Console document “Save Sort with Name”.
•You can add additional lines to your sort/selection by selecting another table and repeating the steps above.
•Click Close sort/Select, Clear Sort Definition and/or Replace existing selection formula on report.
|
Close sort/select |
This button is used to exit this area. If all selection and sorting criteria have been defined, click this button.
|
|
Clear Sort Definition |
This button is used to erase the criteria defined and start over OR define a new sort.
|
|
Replace existing selection formula |
This button is used to overwrite any pre-designed sort and/or selection criteria built into the report naturally.
|
•Click Close Sort/Select if not selected in the previous step.
•You are returned to the Student Reports
page, where you can see the selected report and the selected sort. Click  to preview.
•Select the Printer to Print.
•To Export click  .
.
Description of Record Selection Options:
|
If value IS in the list. (=) |
Use this option the same as you would use “is equal to” or “is one of”; a record will be selected if it meets one or all of the criteria specified using this statement; works best for alphanumeric fields (fields that are numbers and letters but the numbers are not able to used in computations)
|
|
If value is NOT in the list. (<>) |
Use this option the same as you would use “is not equal to” or “is not one of”; a record will be selected if it does NOT meet one or all of the criteria specified using this statement; works best for alphanumeric fields (fields that are numbers and letters but the numbers are not able to be used in computations); sometimes it is easier to NOT search for criteria than to try to specify all of the criteria you want.
|
|
If greater or equal to first value (>=) |
Use this option if you want to specify, for example, all students with the last name greater than (and including) “Smith”. This is very helpful if you were running a large print job and wanted to break it in half – this is the way to conclude the last portion of the batch.
|
|
If Greater or Equal first value and less or equal last value. |
Use this option if you want to specify, for example, all students with the last name greater than (and including) “Haynes” and less than (and including) “Nelson”. This is a way to really “chop” your print job into smaller batches. This is the correct option to use if you must condition that Current Year Active is a zero value.
|
|
If no value (null) |
Use this option to check a field for an “empty” value. Perhaps you want all students who are not marked as, for example, Special Education. This field would most likely be blank/empty. This is the correct option to use if you must condition that the Exit Date is “empty.”
|