Below are basic instructions on
the steps for how to upload student photos for Web School Office if your data is
hosted by SDS. More detailed instructions are listed below them. This is
something to have your tech complete. Note: if you host your data, those
steps are found here.
Basic Instructions for Uploading
Photos
1. Copy photos of students in .bmp or .jpg named with their ID number to your photo directory for Web School Office. The size of each image should be close to 50kb for the web.
2. Upload photos to database through Web School Office.
3. Check to make sure they are installed in Web School Office and Parent Connect.
Detailed Instructions for
Uploading Photos
Step 1 – Copy Photos
File
Naming
•Student photos you receive from the photographer are to be saved as .BMP format or .JPG format with the student ID number as the name of the file.
o Make sure the ID number you give to the photographer is the same as used in Web School Office.
o The size of each image should be close to 50kb for the web.
•Note: If you have any questions about how the photos are saved on the disk/s or CD ROM that you received from the photographer, please call them immediately. Their help will be most valuable in allowing your photographs to be accessible.
•Zip all of the photos into a file
Step 2 – Upload Photos – EASY!
•Go into the System Administrative Folder and then to Control Panel.
•Click on the Toolbox button and enter the password, “mass”. You will get confirmation that toolbox is enabled.
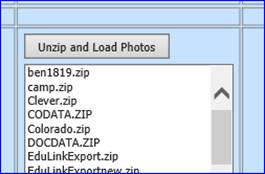
•Next, in that same area go to the System Adjustments button. Look for an area that contains a box with zipped files that has “Unzip and Load Photos” at the top of the box, see screen shot below.. (located under the transcript processing section)
•Locate the zipped file, from the list, that contains your photos. Click on the filename and then on the “unzip and Load Photos” button.
•Finally, it will load the photos and when done, you will get a confirmation message indicating how many photos were loaded. Done!

Step 3 –
Check Photos
On the following business day, check photos to see if
your photos are installed in Web School Office and Parent Connect look ok.
1. Either enter into Look and Browse, search for a student’s ID you would like to view. Then under Processing Options |View Student Options |Display Student Photos.
2. Another option is to enter Reports |Student Reports |Demographics |Student List with Photos to see how they look.
3. Once you have checked out Web School Office, enter Parent Connect as a Parent and view the Student Detail report to verify the student’s photos have loaded properly.