
Revised 10/10/2018
After locker numbers and
combinations have been entered in Data Entry and Changes or has SDS imported
them for you, proceed with the following to assign lockers to students in mass.
•Click on Processing Center |Locker Assignment
•Select the School Location you wish to process in the drop down box at the top of the screen.
•Click on the Locker Assignment tab.
o Open lockers display on the left and students without lockers on the right.
•Check the lockers for assignment and check the students you want to assign.
o Lockers will be assigned in the order the lockers and the students are displayed.
o Note: The Check All and Clear All options will check or uncheck all lockers and students. The Range options will select all items between the first checked item and the next checked item. The range is useful when you wish to assign a large group of students to a specific group of lockers.
§ For example all the incoming students need to be assigned to lockers 1400 to 1699.
§ Sort the students by Grade Year; sort the Lockers by Locker Number.
§ To sort the students by Grade Year, click on the "Grade Year" column heading.
§ To sort the lockers by Locker Number, click on the "Locker Number" column heading.
§ Check locker 1400, check locker 1699, push the Range link.
§ Check the first student in the freshman class, check the last student in the freshman class, push the Range link.
•The number of lockers available and the number of students to be assigned will display. Push the Assign Students Link. Note: This Link is only available if you have enough lockers available for the students being assigned.
•The locker assignment program records student locker assignment information in the Locker Master. If you have locker fields in student Demographics that need to be updated with this information in order to print on customized schedules or other reports, there are two options:
o Modify the report to add the Locker Master table and add the locker number and combination fields from that table to your report. This option requires an advanced knowledge of Crystal Reports. If preferred, SDS can handle this for a minimal customization fee.
o Use the utility available under the “Locker Utilities” tab to synchronize the student demographics area with the locker area. For instructions, click here:
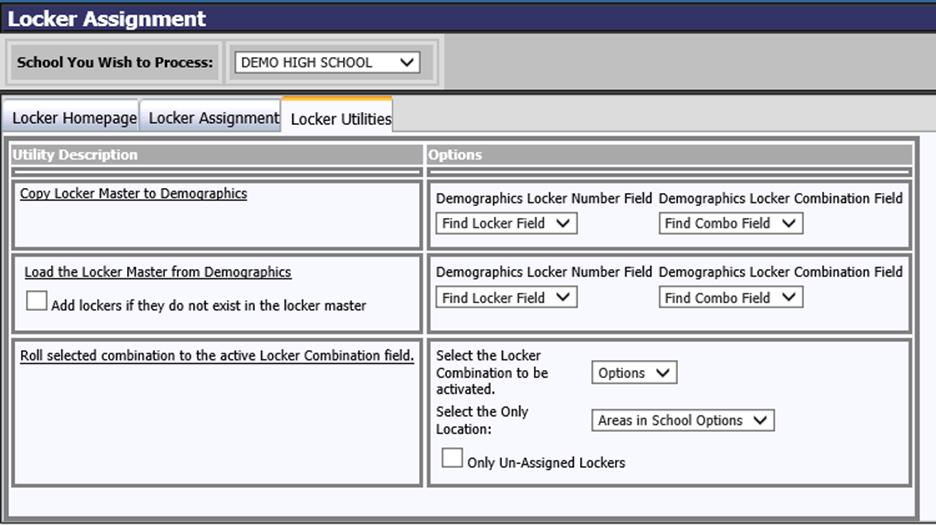
•The second row of boxes is used to copy locker data from the student demographics area to the locker master. Select the locker and combination fields from the dropdowns on the right and then click the "Load the Locker Master From Demographics" link on the left to copy the selected field information into the locker master fields.
•The locker master can have up to 9 different combinations for each locker that can be rotated from year to year. You can accomplish this by using the third row of boxes and using the "Roll selected combination to the active Locker Combination field" link on the left. Set the criteria on the right before proceeding.
o Select the locker combination (1-9) to be activated.
o Select a specific Location area to just update a block of lockers.
o Check "Only Un-Assigned Lockers" to remove the active locker combination for the lockers selected.