Revised 7/27/2018
Create Bell Schedule
1. You must first activate the option to use the Bell Schedule for attendance. Go to Administrative Utilities | SDS Web Office Settings | Attendance section | set the “Use Bell Schedule for Attendance” to Y

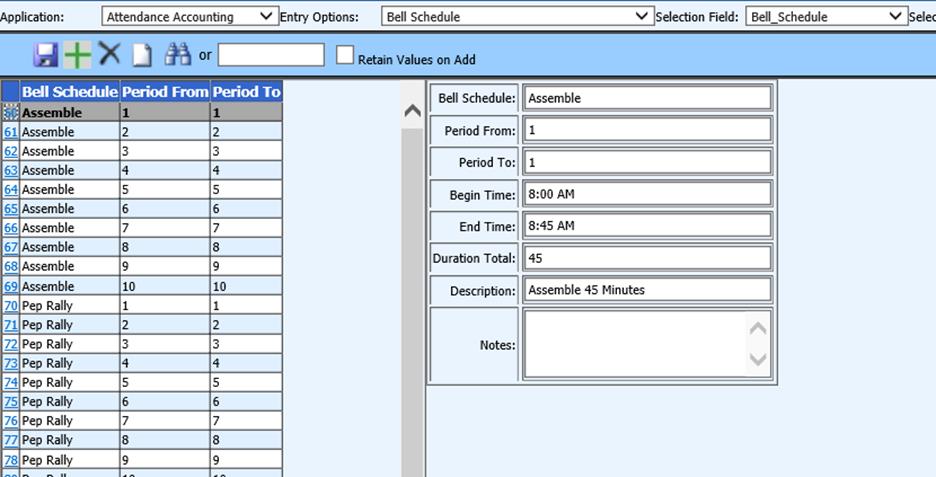
2. To set a Bell Schedule for Attendance, first enter Data Entry and Changes |Master File Entry and Changes |Entry Options |Bell Schedule. Some sample bell schedules for a 10 period day have been set up. Simply modify one of the supplied schedules to meet your district needs (i.e. edit the periods and times for your school).
3. You may click the green plus sign to ADD your own bell schedule from scratch.
4. There will be one row for each period from/to in the day.
1. For example, if you have a class that meets in period 4 only, then create a row for period 4-4.
2. If you have a class that meets periods 4 through 5, you need an additional row for period 4-5.
5. Follow the sample bell schedule listings for guidance on how to complete each of the fields.
6. Once you have modified the schedule to meet your
needs click  to save.

Apply Bell Schedule to
Calendar
Once the bell
schedules are created they must be applied to your school calendar.
1. Go to Attendance |Attendance Entry.
2. Select School Location.
3. Click on Teacher Entry Settings.
4. Scroll
down to the Set or Change the Bell Schedule for Today
section.
Note: Illinois clients will no
longer need to put start and end times in their course master. The attendance
program will mass change it for you.
5. Select the bell schedule in the “Select a Schedule” dropdown list.
6. Enter the day code in the box at the bottom of the page. The selected bell schedule will be applied to all calendar dates with this day code.
7. Click
the “Change Course Master” disk  at the bottom of the page to apply the bell
schedule.
8. Repeat this step for each day code used on your calendar.
Change Bell Schedule for Specific Date
A bell schedule may be
applied to a specific calendar date. This may be necessary due to early release
days, assembly schedule, etc.
1. Select the calendar date and school location in the section “Period / Class Attendance Entry Values”.
2. Select the bell schedule in the “Select a Schedule” dropdown list.
3. Click the
“Change Course Master” disk  to apply the
selected bell schedule to the selected calendar date.
