
This section explains how to
create Tuition & Fees charges that will be assigned to student accounts
(statements). Charges are based on either specific fields in the
student demographics, specific courses or student activities.
While
charges will mostly be mass assigned to the student accounts, even
miscellaneous charges that would be entered manually need to be defined in this
area. For fees that might be assessed individually to students, the dollar
amount may be left at zero, and there does not have to be a tie to demographics,
course codes or activities. Some examples of this type of charge are: a parking
permit, yearbook purchase, or property damage.
How to Add a Fee
Code
1. Go to Tuition/Fee Processing | Charge Definition
2. To add a new code, click  .
.
3. Fill in the following fields:
o Fee code: Each fee must have a unique code. This code is user defined. The size limit is 10 characters.
o Amount: An amount that is charged to the student; set it to zero if the amount will vary throughout the school year or if the amount will vary between students (i.e. lost book charge).
o Refund: Used only for fees based on courses. Enter the amount available for refund.
§ Example: a book fee of $20.00 (Amount) that would yield $5.00 (Refund) if the student dropped the course.
o Description: Enter a description for the charge. The description prints on various reports.
o Add Course OR Demographics OR Activities: Fees can only be tied to one of these categories.
§ COURSE.
§ Select a course in the drop down box next to the “Add Course” box.
§ Click the  button.
§ Repeat if multiple courses qualify for this same charge. For example, a lab fee could apply not only to Calculus, but all other math courses as well. Those courses may be added in this same manner by clicking on the additional math courses in the same drop down area. The word “or” is added between each course automatically. Be sure to keep the charge description generic enough to avoid confusion. Perhaps “Math lab fee” would be appropriate in this example.
§ To remove a course from a charge that has multiple course numbers, highlight the text in the formula containing the course (i.e. “course_number=’####’ or), and press the delete key. Be sure the word “OR” is not at the end of the last line of the formula.
§ When all course codes have been selected for this fee, move
to the next field.
Note: When using fees based on course numbers,
dropped classes must be inactivated, not deleted. Be sure the
operator responsible for student schedules is aware of this requirement for the
fee process to operate correctly for refunding purposes.
§ DEMOGRAPHICS
§ When a charge is associated with a field in Student Demographics, a “selection” statement needs to be created much the same as it is in a query/sort in a report.
§ Click the  button.
§ The following screen will display.
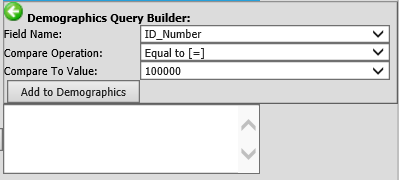
§ Choose a demographics field name in the first drop down box.
§ Choose the compare operation.
§ Choose the desired value.
§ Click the button 
§ If another field is involved in the selection process, repeat the 4 steps above.
§ The white area next to the Demographics button will contain a selection statement in the proper syntax for the system to read. Example:
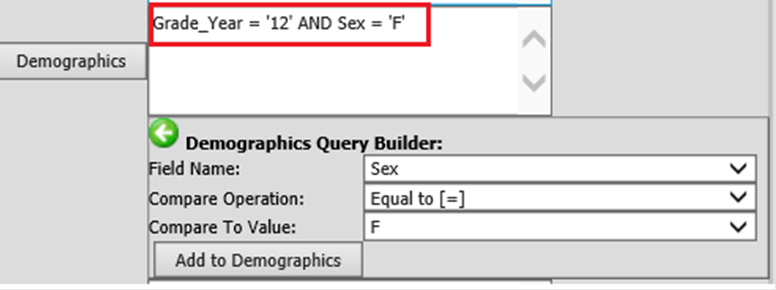
§ All demographic selection criteria will be connected by the word “AND”. Therefore a student must meet ALL of the criteria in order to be charged for this item. If one thing is false, then the student will not be charged for the item. You may manually change the "AND" to "OR" if you desire.
§ NOTE: You should be sure to add the criteria Current_Year_Active=0 and Exit_Date=Null to avoid charging any withdrawn students for the Demographic related fees.
§ To close the demographics selection builder, click  .
.
§ ACTIVITIES
§ Click the  button.
§ The following screen will display.
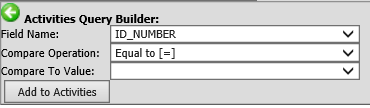
§ Choose the activity type field in the first drop down box.
§ Choose the compare operation (equal to).
§ Choose the desired value.
§ Click the button  .
.
§ If other fields are involved, repeat the above 4 steps.
§ The white area next to the activities button will contain a selection statement in the proper syntax for the system to read. Example:
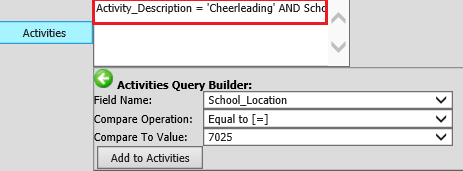
§ All activity selection criteria will be connected by the word “AND.” Therefore a student must meet ALL of the criteria in order to be charged for this item. You may manually change the "AND" to "OR" if you desire.
§ NOTE: You might have to use parentheses (just like you did in Algebra) to force the computer to evaluate a criteria first. Example: (Activity_Code=’VBB’ or Activity_Code=’VFB’) and Activity_Notes=’Captain’. In this situation it evaluates the Activity code first and then looks at the Activity notes field.
§ To close the activities selection builder, click .
o Assign: This is a toggle field with the choices of ‘YES” or “NO”. A ‘YES’ will cause this charge code to be considered when Assign/Charge Fees is selected. A ‘NO” will prohibit the charge.
o Fee Type: A dropdown box will provide Charge Type Codes that were entered into the system. Select the appropriate code.
o Department: A dropdown box will provide Department Codes that were entered into the system. Select the appropriate code.
o Location: Set this equal to the appropriate school location.
o Acct AR, Acct Cash, and Acct Inc: These fields should only be completed if the SDS finance package is being utilized.
§ Enter the receivable account to be debited by this fee.
§ Enter the cash account to be debited by this fee. DO NOT USE AN INCOME ACCOUNT IF THIS IS USED.
§ Enter the income (revenue) account to be credited by this fee. DO NOT USE A CASH ACCOUNT IF THIS IS USED.
o Fee timing: This is a user-defined field that helps the user to keep track of when fees should be charged. (ex. 12 = monthly, 4 = quarterly, 9 = school year monthly, etc.) It is used in conjunction with tuition-based charges.
4. Click  to save.
NSF Check: Charge Definition
If a payment was made by check
and the check is returned for insufficient funds, this section will assist you
with how to reverse the amounts paid by the check.
The first step is to
create a Fee Code to record the insufficient funds transaction.
Add Fee
Code
Go to Tuition/Fee Processing |Charge Definition
1. To add a new code, click  .
.
2. Fill in the fields as listed below.
o Fee Code: Enter an appropriate code, i.e. NSF.
o Amount: 0.
o Refund: 0.
o Description: Enter a description, i.e. NSF Check.
o Assign: Enter NO.
o Fee Type: A dropdown box will provide Charge Type Codes that were entered into the system. Select the appropriate code. .
o Department: A dropdown box will provide Department Codes that were entered into the system. Select the appropriate code.
o Location: Enter ALL.
o Acct AR, Acct Cash, and Acct Inc: These fields should only be completed if the SDS finance package is being utilized.
§ Enter the receivable account to be debited by this fee.
§ Enter the cash account to be credited by this fee. DO NOT USE AN INCOME ACCOUNT IF THIS IS USED.
3. Click to save.
The next step is to add the charge to the student.
Add Charge to Student
Go to Tuition/Fee Processing |Adjustments and Payments
1. Locate the student (enter either id number, name or find the student in the list).
2. Click  to add a new charge.
o Batch Number: Leave it as it is.
o Date: Enter the date.
o Fee Code: Select the NSF fee code from the dropdown.
o Amount: Enter the amount of the check.
o Description: Enter a description of what the NSF charge is about. For example: NSF returned check #12345.
o Fee Type: Will auto-fill based on the fee code as set above.
o Department: Will auto-fill based on the fee code as set above.
o Acct AR, Acct Cash, and Acct Inc: Will auto-fill based on the fee code as set above.
3. Click to save.