End of Year Adjustments
Report: EOY Adjustment
(Student Interchange)
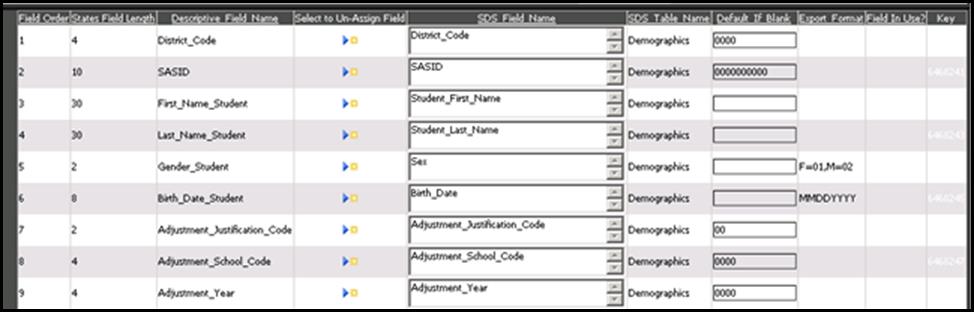
Description of Report Fields
School District/BOCES Code – A unique code assigned to a
district by CDE.
Student's State ID (SASID) – A unique ten digit
number must be assigned to each student by CDE.
School Code – A
unique code assigned by CDE to a school building.
Student’s First
Name – A name given to an individual at birth, baptism, or during another
naming ceremony, or through legal change.
Student’s Last Name –
The name borne in common by members of a family.
Student’s Gender
- An individual's sex.
Student’s Date of Birth – The month,
day, and year on which an individual was born (i.e. 09151989).
Adjustment Justification Codes
•
00 - Not Applicable – No adjustment
•
41 – Dropouts. Request for transcripts received.
•
42 – Dropouts. Student received GED from an educational program
not administered by reporting
•
51 – Expulsions. Student received GED from an educational program
not administered by reporting
•
52 – Expulsions. Student received GED from an educational program
not administered by reporting district.
•
71 – External GED Programs. Student received GED from an
educational program not administered by reporting
•
72 – External GED Programs. Student received GED from an
educational program not administered by reporting district.
Adjustment School Code – The four-digit code for the
school the student was attending when s/he dropped out, was expelled, or
transferred to an external GED program.
Adjustment School Year –
The 4-digit school year in which the student was reported as a dropout or
expulsion (example: School year 2007-2008 would be entered as 2008). Adjustment
school year cannot be equal to the currently reported school year.
To create your report for the state.
•
Complete the Basic Report Information
o Click the Basic Report
Information button to open the basic information area.
o Complete all the boxes with
the appropriate information
o Click the Save Report Changes
button to save changes made to the report setup.
•
Select the records you wish to include in your report.
•
Click the Data Selections Option (A to Z) button at the top of the
screen.
o To setup a selection for
current seniors records:
§ Choose the Demgraphics table
§ Choose the Grade_Yearfield
§ Highlight the correct grade_year (i.e.
12)
§ Click the right pointing arrow button to
move the value to box #4
§ Choose a Record Selection Option “is in
list”)
§ Click the Add to Sort Definition button
to save your sort.
o Setup and save additional
selections as desired.
o To include only current
students, click the blue link “Adjust Selection to Include Only Active Students”
•
Create your export file.
o Click the Create Export File
button at the top of the screen.
o Read the message and write
down the name of the file it tells you to rename the exported file to.
o Click OK on the message and
save the file to your desired folder.