 button to let the system find sections to schedule the student
into.
button to let the system find sections to schedule the student
into.Revised 4/10/2018
1. Enter WSO |Click on Scheduling |Schedule Changes (Current Year).
2. Select a Student.
o You can search by student’s name/id number or by clicking on the first letter of the student’s last name.
o Once you click on the student’s name, that student’s schedule will appear on the right.
3. Add a Course to Student Schedule.
o Courses can be added to a student schedule via 2 methods.
1. Add Course Codes and use
the
button to let the system find sections to schedule the student
into.
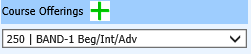
•Find the desired course code in
the Course Offerings dropdown and click  to add.
OR
•Type the desired course code in
the Course box. Press the Enter key on your keyboard and then
the beside
Course Offerings or your keyboard’s space bar to add the selected course
code.
•After adding all desired course codes,
click the  button
to let the system find sections to schedule the student into.
button
to let the system find sections to schedule the student into.
2. Force specific sections of courses onto the student schedule.
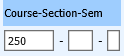
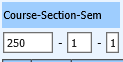
•Find the desired course section in the
Class Section Offerings dropdown and click to add. NOTE: The Course-Sec-Sem, Periods, &
Teachers boxes in the Course Search area may be used to narrow the focus of
selections in the Class Section Offerings dropdown. For information on use of
these options,

OR
•Type the course/section/semester of the desired class section into the Course-Section-Sem boxes. Press the Enter Key followed by the Space Bar to add the class to the schedule.
4. Unlock Courses for Rescheduling.
o If you want to “unlock” courses for rescheduling (you want the same courses but want the student run through the entire scheduling process again).
1. Click the check box beside each of the courses you wish to unlock.
2. Click  in
Processing Options.
in
Processing Options.
•This will unlock the courses. Then you
can click  to reschedule the courses.
5. Inactivate Course
o To inactivate a course (or courses) click in the check
box beside the course(s) that you want to inactivate and click  in
Processing Options.
in
Processing Options.
6. Reactivate Course
o If a course has been inactivated but should be reactivated (i.e. a student withdrew and the system inactivated all their classes but now the student has returned)
1. Click the check box/es beside the classes to be reactivated.
2.
Click  in Processing Options. This will reactivate all
classes that are checked.
in Processing Options. This will reactivate all
classes that are checked.
7. Delete Course
o To delete a class from the schedule, put a check in
the box beside the course and click . This will permanently remove the course from
the student’s schedule.
. This will permanently remove the course from
the student’s schedule.
•Note: If a student has been issued a grade in that
class, the system will inactive the course instead of deleting the course.
Selecting the  check
box will override this and delete the class even if grades are found. Keep
in mind the grades will be deleted with the class.
check
box will override this and delete the class even if grades are found. Keep
in mind the grades will be deleted with the class.
8. Print Schedule
o Click the  button to print a copy of the student’s
schedule.
button to print a copy of the student’s
schedule.