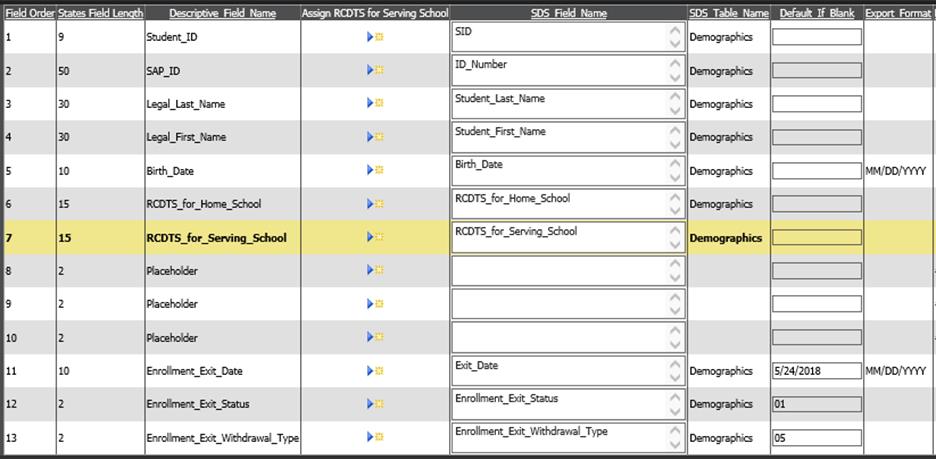
Report Layout and Field Match

Revised: 11/21/18
This file format pertains to the data submitted to ISBE SIS
to exit an existing student enrollment. Only the Home or Serving School District
may submit data to exit an active enrollment. When a school district requests an
“enrollment exit,” ISBE SIS will exit the student only from that serving school,
leaving all other current existing enrollments active.
If this is the
first time you are running a state report, review the general information
provided in the document review the general information provided in the document
http://help.schooloffice.com/StudentHelp/#!Documents/gettingstarted.htm
Special Notes for this Report
• Do not put the last day of school in the Exit Date column in Demographic on all your active students at the end of the year. Enter the last day of school in the Default if Blank Value in Data Exchange, State & Federal Reporting on the grid for Exit Student Enrollment.
• After you upload the file to ISBE, you will get a file back that all your students are exited. You can import the Result Code and Result Message Code data into demographics if needed.
• You MUST create and upload this report before you "Prepare to Open School" to begin a new school year.
Report Layout and Field Match
Steps for Report Creation
1. Match
fields in the report with fields in the database.
• Click on the Export Design Options button.
• Select the appropriate table from the drop box in area #2: Select a table to store data.
• Select the appropriate data field from the dropdown box in area #3: Fields in selected Table.

• Click  next to
the field in the report layout to complete the matching process.
• The field from SDS will be listed in the column “SDS field name” and the source table will be listed in the column “SDS table name”.
• In the column “Default if Blank”, optionally enter a value to be exported for any students who have no data in the selected field.

2. If data field(s) are not
available in the database for this report, create a new field(s) in your
database to enter required data and match those fields in the
report.
Follow this link for instructions: http://help.schooloffice.com/StudentHelp/#!Documents/creatingnewfieldsforstatereporting.htm
3. Match a field to a default value text box on the screen.
Follow this link for instructions:
4. Create and Save the report for upload to State/Agency.
Follow these links for instructions:
http://help.schooloffice.com/StudentHelp/#!Documents/createthereport.htm
http://help.schooloffice.com/StudentHelp/#!Documents/savethereport.htm