
Revised 1/2/2019
In
Administrative Utilities|Control Center, the File Transfer area allows you to
send your database/file to SDS, save a file to your workstation and send a SQL
database to an Access download.
Send Database to SDS
To send your database to SDS follow the below
instructions:
1. Select Administrative Utilities |Control Center |File Transfer.
2. Click on Send Database to SDS.
3. Select Send .MDB (Microsoft Database) or Send .BAK (Your backup of your SDS database) or Historical (Select the file from the dropdown).
4. Write down the assigned filename or create your own.
5. Enter a Password.
6. Click Send Database to SDS button.
7. Once the file is sent, make sure to notify the individual you are working with at SDS of the file name and password.
Send File to Server
This option allows you to send a file to your web server into your SDS directory.
•For example, if you created a custom report you would like to run in SDS, use this option to upload it to your Student Directory on your web server.
•If you wanted to import a file into SDS, you can upload a file to the Student Directory and then import your data.
Follow the instructions below on how to send a file to the server:
1. Select Administrative Utilities |Control Center |File Transfer.
2. Click on Send File to Server.
3. Click on the Browse button and browse to locate the file.
4. Click Upload File.
5. You will get a message that your file was sent. Click OK.

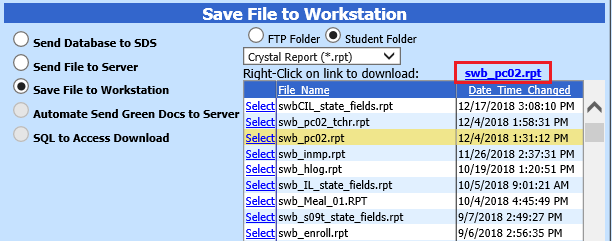
Send File to Workstation
This option allows you to get a file from your SDS directory or FTP site and transfer it to your workstation. This could be used if you want to customize an SDS report and test it on your own workstation.
1. Click in the radio button next to Save File to Workstation.
2. Select to look for the file in either the FTP Folder or Student Folder.
3. Select the type of report you wish to download from the dropdown box.
4. Click the blue Select on the file you wish to download.
5. Right click on the link to download (outlined in red in the screen shot below) and save the file to your desktop.
How to download a backup of your database to your
workstation
1. Select Administrative Utilities |Control Center |File Transfer.
2. Click on Send Database to SDS radio button.
3. Select Send .bak.
4. Place a check in the box next to Create zip file only.
5. Enter a “File Name” and “Password”.
o Make sure you write this down for your reference.
6. Click Send Database to SDS.
7. You will receive a message “A file called ToSdsFile.zip is available to download to your workstation.” Click OK after reading.
8. Select Save File to Workstation.
9. Click on the dropdown on the right under FTP folder and Student Folder.
10. Select Zip File (*.zip).
11. Click on Select next to the file “ToSDSFile.zip”.
12. The row will highlight in yellow and the file name will appear above the table.
13. Right click on the link (outlined in red in the screen shot below) to download ToSDSFile.zip
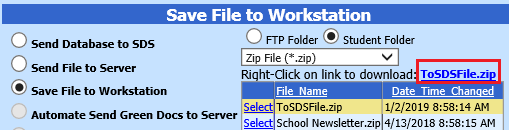
14. When you right click on ToSDSFile.zip select “Save Target As” or “Save Link As” (depending on your browser.
15. Browse to where you would like to save the file and change the file name to something you remember.
16. Once you have downloaded the zip to your workstation, unzip it to get your .bak.
o If you are using the .bak for testing purposes or to use it to work on reports on your workstation you will want to rename the file extension from .bak to .mdb.
o Remember your backup file is a copy of your database from when you last performed a backup, not of your live database.
SQL to Access Download
This option is intended for use by users who have their
data stored in a SQL server. It can, however, be used by those who use Access as
the database which stores their SDS administrative data.
The reason for
this process is to assist with moving data from one SQL server to another, which
usually requires some technical intervention. The portability of an access
database is without question much easier than that of SQL server. It requires
little or no technical knowledge to be moved from one machine to another. The
downloaded database can be used for report customizations with Crystal Reports
and as a data repository for legacy systems that had been designed to work with
an access database on a local machine.
What does the process do?
•The program opens the database that houses the SDS administrative data and transfers the data and database structure to a blank master Access database.
•To create a blank Master database (ModelPl22.mdb) a new database is being distributed with our updates. During the process these blank databases are copied to MastPl22.mdb. The data is then placed in the respective master database.
•After the master database is loaded, it is copied to a new name SdsxPlanBaK.mdb.
•A zip file (SDSbak.zip) is created with the new database.
•Custom reports and the SDS control database (sdscplan.mdb) are added to the new zip file.
o The zip file is then copied to the FTP site on the server which contains the client’s custom reports and control database. The process assumed that the FTP site is a directory called FTP and is one level below the directory which contains the client’s control database. This directory could be something like C:\SdsAdmin\student\FTP.
The process will take approximately 10 to 20 minutes and the
status bar at the bottom of the web page may not last as long as the process.
Once the button is pushed to start the process the user must leave the web
browser open and may not start another operation. At the end of the process a
message will display along with a technical informational screen. At this point,
the client can continue with other work including the download of the new zip
file.
Note: If there is a recent (30 minutes) time-stamp on
mastpl22 the button will be disabled. 
To use the database with the
SDS system on a local machine the user should do the following:
•Download the file SDSbak.zip to a temporary directory on their system.
•Unzip the file.
•The file SdsXPlanBak.mdb is the student database. If that is then renamed to SdsXPlan.mdb and copied to the directory with the SDS system, it will be recognized by our programs. It is recommended that you also copy the other files that are in the zip file to update the SDS system on your local machine.
•As with any operation, backup any file that will be replaced during the process, i.e. custom reports, control database and database in the SDS system before beginning the process.