
Revised 10/5/2018
Students may be re-enrolled in either the Student Maintenance or Student Information screens. Below are instructions for re-enrolling students in either area.
How to Re-enroll a Student in Student Maintenance
1. Click on Data Entry and Changes.
2. Click on Student Maintenance.
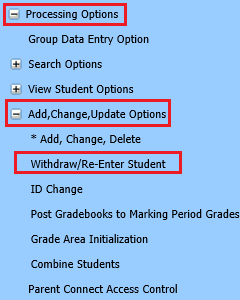
3. Click on Processing Options|View Student Options
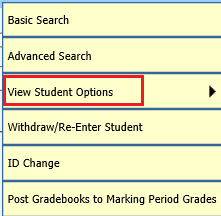
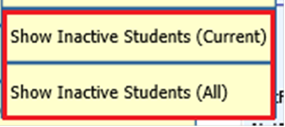
4. If the re-enroll student withdrew during the current school year, select Show Inactive Students (Current). If the re-enroll student withdrew during a prior school year, select Show Inactive Students (All).
5. Select the re-enroll student.
6. Click on Processing Options|Withdraw/Re-Enter Student
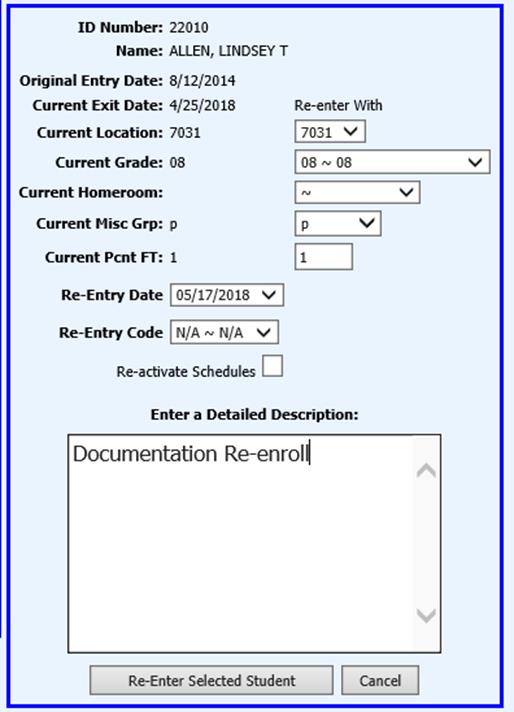
7. The re-enter screen will display.
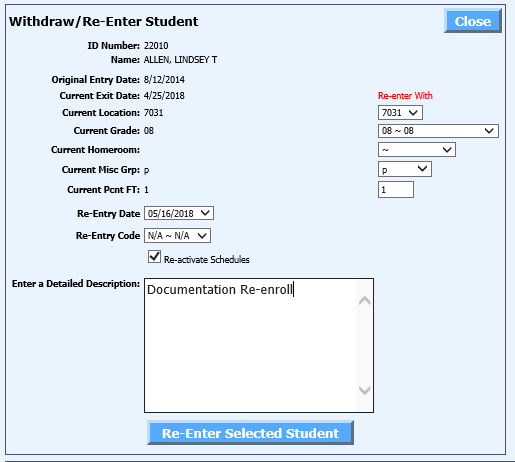
8. Confirm the name shown on the re-enter screen is the student you wish to re-enroll.
9. If the re-enroll values for School Location, Grade Year, Homeroom, Misc Group, or Percent Full-time fields are different than the current values shown on the left, update the values for those fields on the right. It is important that correct values are entered for these fields before clicking the ‘Re-enter Selected Student’ button so that re-enroll and enrollment records post with correct values for Attendance Analysis calculation.
10. Select the Re-entry Date in the Re-entry Date box. This date should be the first day the student is returning to class.
11. Select a Re-entry Code.
12. If you wish to Re-activate Schedules, checkmark the box. This is used to re-activate all the courses on the student schedule with the Re-entry Date as the current Entry Date on the courses. This only applies to students who withdrew and are being re-enrolled in the same school year.
13. Type a note in the Detailed Description box. This information can be accessed in Daily Attendance in the Note field.
14. Click the Re-Enter Selected Student button. This will:
o Create a Demographics History record.
o Create an Attendance R record.
o Post the Re-entry Date to Entry Date on the student’s Demographic record.
o Remove the Exit Date on the student’s Demographic record.
o Change Current Year Active to 0 on the student’s Demographic record if the student was withdrawn in a prior school year.
o Change Next Year Active to 0 on the student’s Demographic record.
o Adjust the Student Enrollment records for the student.
o If the Re-activate Schedule check box was checked, schedule records will be re-activated, as well.
THE ATTENDANCE ANALYSIS MUST BE REFRESHED BEFORE AN ACCURATE REPORT WILL PRINT AFTER COMPLETING ANY OF THE ABOVE PROCESSES.
How to Re-enroll a Student in Student Information
1. Click on Data Entry and Changes.
2. Click on Student Information.
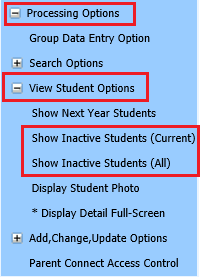
3. Click on Processing Options|View Student Options
4. If the re-enroll student withdrew during the current school year, select Show Inactive Students (Current). If the re-enroll student withdrew during a prior school year, select Show Inactive Students (All).
5. Click on Processing Options|Add, Change, Update Options|Withdraw/Re-Enter Student
6. Click on the student you wish to re-enroll.
7. Click
 for the re-enter screen to
appear.
for the re-enter screen to
appear.
8. Confirm the name shown on the re-enter screen is the student you wish to re-enroll.
9. If the re-enroll values for School Location, Grade Year, Homeroom, Misc Group, or Percent Full-time fields are different than the current values shown on the left, update the values for those fields on the right. It is important that correct values are entered for these fields before clicking the ‘Re-enter Selected Student’ button so that re-enroll and enrollment records post with correct values for Attendance Analysis calculation.
10. Select the Re-entry Date in the Re-entry Date box. This date should be the first day the student is returning to class.
11. Select a Re-entry Code.
12. If you wish to Re-activate Schedules, checkmark the box. This is used to re-activate all the courses on the student schedule with the Re-entry Date as the current Entry Date on the courses. This only applies to students who withdrew and are being re-enrolled in the same school year.
13. Type a note in the Detailed Description box. This information can be accessed in Daily Attendance in the Note field.
14. Click the Re-Enter Selected Student button. This will:
o Create a Demographics History record.
o Create an Attendance R record.
o Post the Re-entry Date to Entry Date on the student’s Demographic record.
o Remove the Exit Date on the student’s Demographic record.
o Change Current Year Active to 0 on the student’s Demographic record if the student was withdrawn in a prior school year.
o Change Next Year Active to 0 on the student’s Demographic record.
o Adjust the Student Enrollment records for the student.
o If the Re-activate Schedule check box was checked, schedule records will be re-activated, as well.
THE ATTENDANCE ANALYSIS MUST BE REFRESHED BEFORE AN ACCURATE REPORT WILL PRINT AFTER COMPLETING ANY OF THE BELOW PROCESSES.