Revised 4/10/2018
There is a technique for adding courses to a student’s schedule that can save you time because it mainly uses the keyboard. You will not need to use the drop down boxes.
1. Go into the Scheduling|Schedule Changes (Current Year) area.
2. Select the appropriate student.
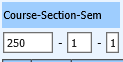
3. Click in the Course-Section-Sem box.
o If you know the full course-sec sem, enter it.
o
o If you only know the course number but would like the program to find a section to schedule, enter the course number.
o 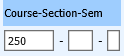
4. Press the Enter Key and then press the Space Bar. That course has now been added.
5. Notice that the cursor is positioned in the “course” box waiting for the next number to be added.
6. Add the next course-sec-sem or course number, press the enter key and then press the space bar. That course is now added to the schedule.
7. Do this until all desired courses have been added.
8. If the full course-sec-sem was added, you are done.
9. If only the course # was added, click on the
 button
to have the program create a schedule.
button
to have the program create a schedule.