
Revised 7/27/2018
Students may be withdrawn in either the Student Maintenance or Student Information screens. Below are instructions for withdrawing students in either area.
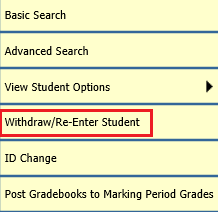
How to Withdraw a Student in Student Maintenance
1. Click on Data Entry and Changes.
2. Click on Student Maintenance.
3. Click on Processing Options|Withdraw/Re-Enter Student
4. The withdrawal screen will display.
5. Click on the student you wish to withdraw.
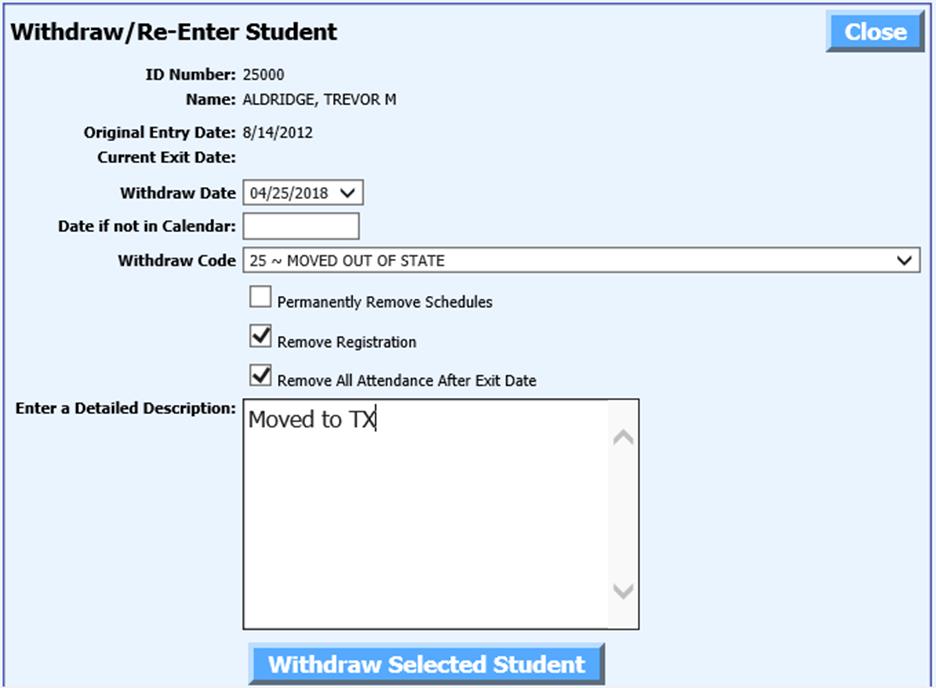
6. Select the Withdrawal Date in the Withdraw Date box. This date will be counted as the last day of attendance. If the student withdrew over the summer, enter a date prior to the first day of school in the Date if not in Calendar box.
7. Select a Withdraw Code.
8. If you wish to Permanently Remove Schedules, checkmark the box. This is usually only selected when withdrawing a student who has left over the summer and is being withdrawn after the database has been rolled over for the new school year.
9. If you wish to Remove Registration, checkmark the box. This is done on students being withdrawn after they have been registered for next year classes.
10. Checkmark the Remove All Attendance After Exit Date box to delete any attendance that has been entered for dates that are after the date being used to withdraw the student.
11. Type a note in the Detailed Description box. This information can be accessed in Daily Attendance in the Note field.
12. Click the Withdraw Selected Student button. This will:
o Create a Demographics History record.
o Create an Attendance W record.
o Post the Exit Date to the student’s Demographic record.
o Change Next Year Active to 1 on the student’s Demographic record.
o Inactivate the student’s schedule records.
o Adjust the Student Enrollment records for the student.
o If any of the check boxes were
checked, those operations will be performed, as well.
THE ATTENDANCE ANALYSIS MUST BE REFRESHED BEFORE AN ACCURATE REPORT WILL PRINT AFTER COMPLETING ANY OF THE ABOVE PROCESSES.
How to Withdraw a Student in Student Information
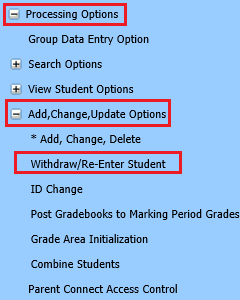
1. Click on Data Entry and Changes.
2. Click on Student Information.
3. Click on Processing Options|Add, Change, Update Options|Withdraw/Re-Enter Student
4. Click on the student you wish to withdraw.
5. Click
 for the withdraw screen to
appear.
for the withdraw screen to
appear.
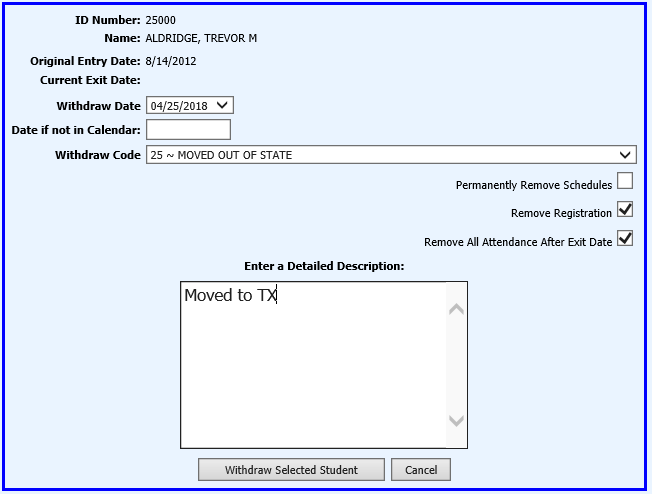
6. Select the Withdrawal Date in the Withdraw Date box. This date will be counted as the last day of attendance. If the student withdrew over the summer, enter a date prior to the first day of school in the Date if not in Calendar box.
7. Select a Withdraw Code.
8. If you wish to Permanently Remove Schedules, checkmark the box. This is usually only selected when withdrawing a student who has left over the summer and is being withdrawn after the database has been rolled over for the new school year.
9. If you wish to Remove Registration, checkmark the box. This is done on students being withdrawn after they have been registered for next year classes.
10. Checkmark the Remove All Attendance After Exit Date box to delete any attendance that has been entered for dates that are after the date being used to withdraw the student.
11. Type a note in the Detailed Description box. This information can be accessed in Daily Attendance in the Note field.
o Click the Withdraw Selected Student button. This will:
o Create a Demographics History record.
o Create an Attendance W record.
o Post the Exit Date to the student’s Demographic record.
o Change Next Year Active to 1 on the student’s Demographic record.
o Inactivate the student’s schedule records.
o Adjust the Student Enrollment records for the student.
o If any of the check boxes were
checked, those operations will be performed, as well.
THE ATTENDANCE ANALYSIS MUST BE REFRESHED
BEFORE AN ACCURATE REPORT WILL PRINT AFTER COMPLETING ANY OF THE ABOVE
PROCESSES.