
Revised 6/12/2020
If this is the first time you are running a state report, review the general information provided in the document http://help.schooloffice.com/StudentHelp/#!Documents/gettingstarted.htm before proceeding with the reporting process.
Illinois state course codes must be in place before
these reports can be run. Verify that your system is up to date and
state course codes are imported. Follow this link for further instructions
on loading these codes.
In this next section we will review the different data
entry views that provide quick and easy entry of the data required for the
Teacher Course Assignment Entry and Teacher Course Assignment Exit
reports. NOTE: For courses that are NOT to be reported in this report, leave
the coursemaster’s Term_SR field blank.
Data Entry
Views
There are four data entry views to provide easy entry
for the Teacher Course Assignment reports. These entry views are found under the
main menu item Data Entry and Changes | Master File and Code File Entry and
Changes.
1. Course Master - IL - Tchr Crs Assign Entry
2. Course Master - IL - Tchr Crs Assign Exit
3. School Location - IL - RCDTS
4. Teachers - IL - Tchr Crs Assign
View 1: Course Master–IL–Tchr Crs Assign
•Enter Data Entry and Changes | Master File and Code File Entry and Changes
•Select Scheduling (Current Year) from the Application dropdown
•Select Course Master – IL – Tchr Crs Assign Entry from the Entry Options dropdown

•Then enter the data required. Data required is listed below the screen print.
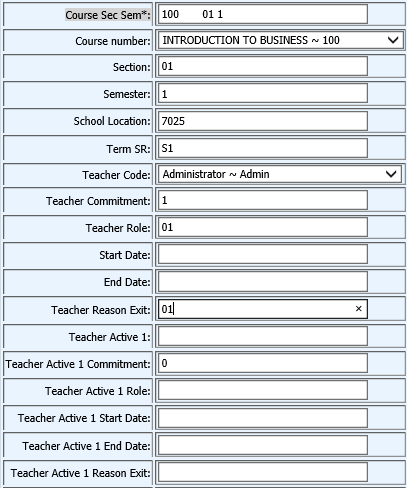
•Start Date: Enter the first date for the primary teacher of the class.
o Note: The Start Date only needs to be entered if the class starts on a different date than the rest of your classes or if there is a teacher change.
•End Date: Enter the last date the class meets. If the primary teacher leaves the class before the last date the class meets, you must use the EXIT screen shown below to enter the start and end dates for this teacher. This allows for the assignment of a new primary teacher to the class.
o Note: The End Date only needs to be entered if the class ends on a different date than the rest of your classes or if there is a teacher change.
•Teacher Reason Exit: Enter the reason the primary teacher is no longer assigned to this course. Since this is the primary teacher, the only valid code for this field is:
o 01 -- Course Ended
•Teacher Commitment: The percent commitment for the primary teacher of the class. This field defaults to 1 which is 100%. If the teacher’s commitment is not 100% then enter another value (i.e. .5 for 50%).
•Term SR: Enter the state term code (Note: For courses
that are NOT to be reported in this report, leave the coursemaster’s Term_SR
field blank.
Grades K-8
o Y1 Year Long classes
o Y2 Year Long Summer classes
o S1 Semester 1 classes
o S2 Semester 2 classes
o S3 Semester Summer classes
o T1 Trimester 1 classes
o T2 Trimester 2 classes
o T3 Trimester 3 classes
o T4 Trimester Summer Classes
o Q1 Quarter 1
o Q2 Quarter 2
o Q3 Quarter 3
o Q4 Quarter 4
o Q5 Quarter Summer
Grades 9-12
o S1 Semester 1 classes
o S2 Semester 2 classes
o S3 Semester Summer classes
o T1 Trimester 1 classes
o T2 Trimester 2 classes
o T3 Trimester 3 classes
o T4 Trimester Summer Classes
o Q1 Quarter 1
o Q2 Quarter 2
o Q3 Quarter 3
o Q4 Quarter 4
o Q5 Quarter Summer
•Teacher Role: Enter the appropriate state EIS Position Code.
o 200-Teacher
o 201-Rdg Teacher
o 202-Bilingual Ed
o 203-Eng as 2nd Lang
o 204-Visiting Internat'l Tchr
o 207-Speech/Lang Pathology
o 208-Career & Tech Educator
o 250-Special Ed
o 251-Bilingual Sp. Ed.
Resource Teachers
o 601-Arts
o 602-History
o 603-Govt/Civics Pol. Sci.
o 604-Eng/Lang Arts
o 605-Reading
o 606-Math
o 607-Science
o 608-Foreign Lang.
o 609-Economics
o 610-Elementary
o 611-Other
o 699-Citywide
•Teacher_Active_ X: If additional teacher(s) are assigned to a course, add the teacher code to one of the 4 additional fields provided, starting with Teacher_Active_1.
•Teacher_Active_X_Commitment: Enter the commitment percent for the teacher code entered in Teacher_Active_X.
•Teacher_Active_X_Role: Enter the teacher role for the teacher code entered in Teacher_Active_X. See valid codes listed above.
•Teacher_Active_X_Start_Date: Enter the teacher start date for the teacher code entered in Teacher_Active_X.
•Teacher_Active_X_End_Date: Enter the teacher end date for the teacher code entered in Teacher_Active_X.
•Teacher_Active_X_Reason_Exit: Enter the exit reason code for exit of the teacher code entered in Teacher_Active_X. Valid codes are:
o 01 -- Course Ended
o 02 -- Teacher Resigned
o 03 -- Leave of Absence
o 04 -- Death
o 05 – Teacher Expulsion
o 06 – District Reassigned
o 99 -- Erroneous
View 2: Course Master-IL-Tchr Crs Assign
Exit
Use this view ONLY to withdraw a primary teacher who exits
before the last meeting date of the course.
•Enter Data Entry and Changes | Master File and Code File Entry and Changes
•Select Scheduling (Current Year) from the Application dropdown
•Select Course Master – IL – Tchr Crs Assign Exit from the Entry Options dropdown

•Enter the data required. Data required is listed below the screen print.
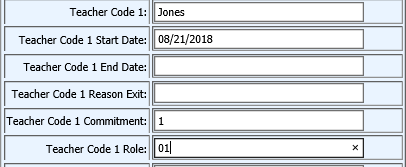
•Teacher Code X: If the primary teacher has left this class before the last date the class meets, enter the teacher code for that teacher.
•Teacher Code X Start Date: Enter the first date that the teacher taught this class.
•Teacher Code X End Date: Enter the last date that the teacher taught this class.
•Teacher Code X Reason Exit: Codes to be used are:
o 01 -- Course Ended
o 02 -- Teacher Resigned
o 03 -- Leave of Absence
o 04 -- Death
View 3: School Location - IL - RCDTS
•Enter Data Entry and Changes | Master File and Code File Entry and Changes
•Select General Information from the Application dropdown
•Select School Location–IL-RCDTS from the Entry Options dropdown
•Enter required data RCDTS: If you have school locations in your
database with a different RCDTS then each school must have the code entered
here.
View 4: Teacher- IL - Tchr Crs Assign
•Enter Data Entry and Changes | Master File and Code File Entry and Changes
•Select General Information from the Application dropdown
•Select Teachers – IL – Tchr Crs Assign from the Entry Options dropdown

•Then enter the data required. Data required is listed below the screen
print.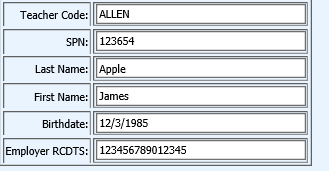
•SPN: Enter the teacher’s IEIN number in this field.
•Employer RCDTS: This must be entered if the teacher is employed outside of your school district. You do not have to enter this if the teacher is employed inside your school district as long as you enter the RCDTS in the “Default if Blank” column when running the report.
•
Report Layout and Field
Match
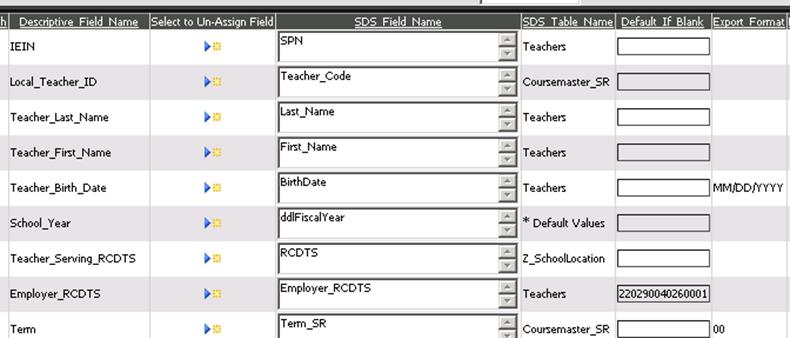
Below is the layout and brief explanation for each
field to be reported. Please note that the fields matched to the table
Coursemaster_SR must not be changed. It is advised not to change any of
the matches.
TEACHER COURSE ASSIGNMENT ENTRY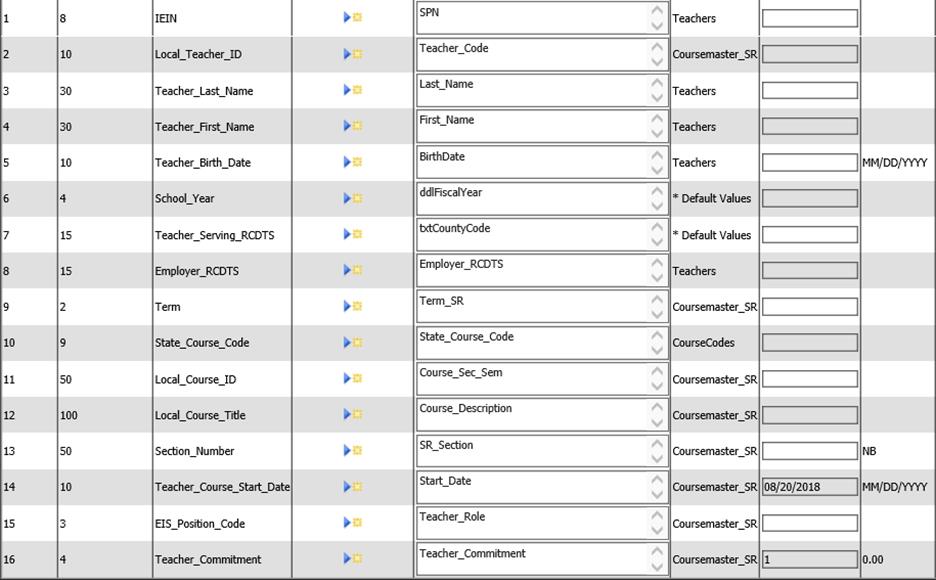
|
State Field |
SDS Table |
SDS Field |
Mandatory |
|
1. IEIN |
Teacher |
SPN |
Yes |
|
2. Local_Teacher_ID |
Teachers |
Teacher_Code |
No |
|
3. Teacher_Last_Name |
Teachers |
Last_Name |
Yes |
|
4. Teacher_First_Name |
Teachers |
First_Name |
Yes |
|
5. Teacher_Birth_Date |
Teachers |
Birthdate |
Yes |
|
6. School_Year |
Default |
School_Year |
Yes |
|
7. Teacher_Serving_RCDTS |
Z_SchoolLocation |
RCDTS |
Yes |
|
8. Employer_RCDTS |
Teachers |
Employer_RCDTS |
Yes |
|
9. Term* |
Coursemaster_SR |
Term_SR |
Yes |
|
10. State_Course_Code |
CourseCodes |
State_Course_Code |
Yes |
|
11. Local_Course_ID |
Coursemaster |
Course_Sec_Sem |
No |
|
12. Local_Course_Title |
Coursemaster |
Course_Description |
No |
|
13. Section_Number |
Coursemaster_SR |
SR_ Section |
Yes |
|
14. Teacher_Course_Start_Date |
Coursemaster_SR |
Start_Date ** |
Yes |
|
15. EIS_Position_Code |
Coursemaster_SR |
Teacher_Role |
Yes |
|
16. Teacher_Commitment |
Coursemaster_SR |
Teacher_Commitment |
Yes |
* For courses that are NOT to be reported in this report,
leave the coursemaster’s Term_SR field blank.
** If a default value is used for the Start Date, this date will be used for all records that do not have a start date entered in the Course Master. If you use this feature, make sure that your selection criteria for the report includes only those classes that start on the same date OR that you have entered a Start Date in the Course Master for courses that do not start on the default date. This screen print shows a default date of 08/20/2018 entered for the start date.
TEACHER COURSE ASSIGNMENT
EXIT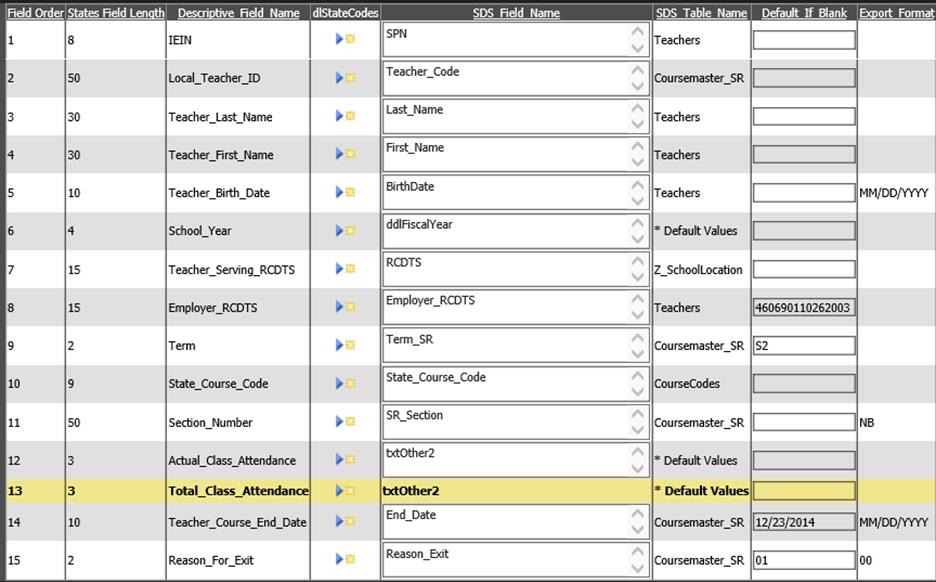
|
State Field |
SDS Table |
SDS Field |
Mandatory |
|
1. IEIN |
Teacher |
SPN |
Yes |
|
2. Local_Teacher_ID |
Teachers |
Teacher_Code |
No |
|
3. Teacher_Last_Name |
Teachers |
Last_Name |
Yes |
|
4. Teacher_First_Name |
Teachers |
First_Name |
Yes |
|
5. Teacher_Birth_Date |
Teachers |
Birthdate |
Yes |
|
6. School_Year |
Default |
School_Year |
Yes |
|
7. Teacher_Serving_RCDTS |
Z_SchoolLocation |
RCDTS |
Yes |
|
8. Employer_RCDTS |
Teachers |
Employer_RCDTS |
Yes |
|
9. Term* |
Coursemaster_SR |
Term_SR |
Yes |
|
10. State_Course_Code |
CourseCodes |
State_Course_Code |
Yes |
|
11. Section_Number |
Coursemaster_SR |
Section |
Yes |
|
12. Actual_Class_Attendance |
Default Values |
Other Value 1-6 |
No |
|
13. Total_Class_Attendance |
Default Values |
Other Value 1-6 |
No |
|
14. Teacher_Course_End_Date |
Coursemaster_SR |
End_Date ** |
Yes |
|
15. Reason_For_Exit |
Coursemaster_SR |
Reason_Exit |
Yes |
* For courses that are NOT to be reported in this report, leave the coursemaster’s Term_SR field blank.
** If a default value is used for the End
Date, this date will be used for all records that do not have an end date
entered in the Course Master. If you use this feature, make sure that your
selection criteria for the report includes only those classes that end on the
same date OR that you have entered an End Date in the Course Master for courses
that do not end on the default date. This screen print shows a default end
date of 12/23/2014 for the end date.
Steps for Report Creation
1. Match
fields in the report with fields in the database.
•Click on the Export Design Options button.
•Select the appropriate table from the drop box in area #2: Select a table to store data.
•Select the appropriate data field from the dropdown box in area #3: Fields in selected Table.

•Click  next to the field in the report layout
to complete the matching process.
•The field from SDS will be listed in the column “SDS field name” and the source table will be listed in the column “SDS table name”.
•In the column “Default if Blank”, optionally enter a value to be exported for any students who have no data in the selected field.

2. Create a new
field(s) in your database to enter required data and match those fields in the
report.
Follow this link for instructions:
http://help.schooloffice.com/StudentHelp/#!Documents/creatingnewfieldsforstatereporting.htm
3. Match a field to a default value text box on the screen.
Follow this link for instructions:
4. Create and Save the report for upload to State/Agency.
Follow these links for instructions:
http://help.schooloffice.com/StudentHelp/#!Documents/createthereport.htm
http://help.schooloffice.com/StudentHelp/#!Documents/savethereport.htm