
Revised 1/21/2019
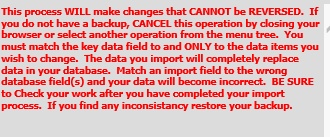
The Web School Office program provides a utility to easily import data from a CSV or TXT file into your database. Prior to using this area, it is very important to confirm you have a current database backup.
To import information into SDS Web Office:
•Select Administrative Utilities|Import Data from CSV or TXT files.
•You will receive a warning. Please read it carefully and select OK.
•You can import CSV, TXT, Excel XLSX and XLSM files. XLSX & XLSM is a preferred format since it doesn't cause leading zeroes to be dropped in the fields.
Follow the red numbers on the screen:
1. #1 Select: Demographics Information
2. #2 Select: Basic Demographics or any Demographics view you have available.
o It is recommended that a view containing ONLY the fields you will be importing be set up in Administrative Utilities |Data View Definition. For Data View Definition instructions,
3. #3 Browse for the CSV file you wish to import.
o Description: Enter your file name (i.e. Demographic Information) and select the Add button. You will see your file below in the document import area.
4. Click on the blue word Select next to the file to import.
5. A new
screen will appear with an important message in red. Read it carefully before
continuing.
Follow the red numbers on the screen:
(1 and 2 will remain selected Proceed to
step 5)
1. #1 Select: Demographics Information.
2. #2 Select: Basic Demographics or any Demographics view you have available.
3. Following #2, select the dot, Match Import Data to Output Format.

4. #5 Select the field in dropdowns on the left you
want to import into each of the corresponding SDS data fields. If you wish
to import a specific value into an SDS data field on all records instead of
importing from the data file, enter the value in the Text box to the right of
the dropdown for that field and checkmark this box in the upper right corner of
the screen. 
5. #6 Select one of the options:
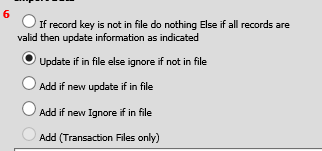
If record key is not in file do nothing. Else if all records are valid then update information as indicated: if record key is not in file do nothing, one wrong ID and the entire import will be aborted. Update if in file else ignore if not in file: If wrong ID numbers are found, they will be ignored and the data for correct ID numbers will import.
Add if new update if in file: If the record key is not found, a new record will be added for it. If the record key is found, it will be updated with the import data.
Add if new Ignore if in file: Only records where the record key is not found, will be imported. If the record key already exists, data will not be imported.
6. #7 Select: 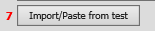
7. Read the confirmation message and click OK to continue.
8. You will receive a message telling you the import process is complete.
Importing Data Using the AutoUpload
Folder
The AutoUpload folder is an area where an import file
can be copied and will be available in the CSV import area without having to
browse for it. This is particularly useful for schools that import data on a
regular basis such as daily, weekly, etc.
1. You will need to create a folder called AutoUpload right below the folder where your programs and data reside. You will put the files that you want to upload in this new folder. As example: if your programs and data are in f:\sds\student then the AutoUpload folder should be f:\sds\student\AutoUpload.
2. The very first time that you import a file, you will need to manually browse for the import file and then click the “Add” button. This will establish a relationship between the #2 “Data import for” view and the file being imported. Subsequent imports however can be streamlined a bit by eliminating the need to browse for the file as described in the following steps.
3. Each time that an import file gets copied into the AutoUpload folder, it will be available when you choose the proper data view from the #2 “Data import for” area. The file’s date and time reflected under the heading of “Upload” will be the date and time that the file was changed. It will also include “(AutoUpload)” in the description of the file.
4. If the file includes a header record, make sure to check the box “First record in the import file has field names”(headers). By checking that box, it will skip that first line during import and just import actual data.
5. Click on “Select” and Match fields. Once you match the fields the first time, they stay matched for the next import.
6. Choose the import action in #6.
7. Click on the “Import/Paste from (AutoUpload)” button and the import will begin.