
Revised 9/18/2018
"Assignment Activities" Descriptions
1. Select All and Deselect = this option is a quick way to check all or uncheck all of the charges to be assigned in this session.
2. Assign/Charge Fees and Unassigned Unlocked Fees = these buttons do the actual assigning of fees to the students or removal of charges from the students if a mistake is found.
3. Lock Batches and Unlock Batches = these buttons post or un-post the charges to the students’ accounts on a more permanent basis.
4. Assign Bal Fwd by Date = this option takes all charges/payments/credits between the user-defined date range and rolls them into a balance forward line to print on statement format 4 only.
Mass Assignment of Charges and Fees Steps
1. Click Tuition/Fee Processing |Mass Assignment of Charges and Fees.
•Next to the "1", click the “Select All” button to check all fees.
•Do NOT check a fee that does NOT have a selection criteria associated with it.
•Next to the "2", click on Assign/Charge Fees to get to this screen.
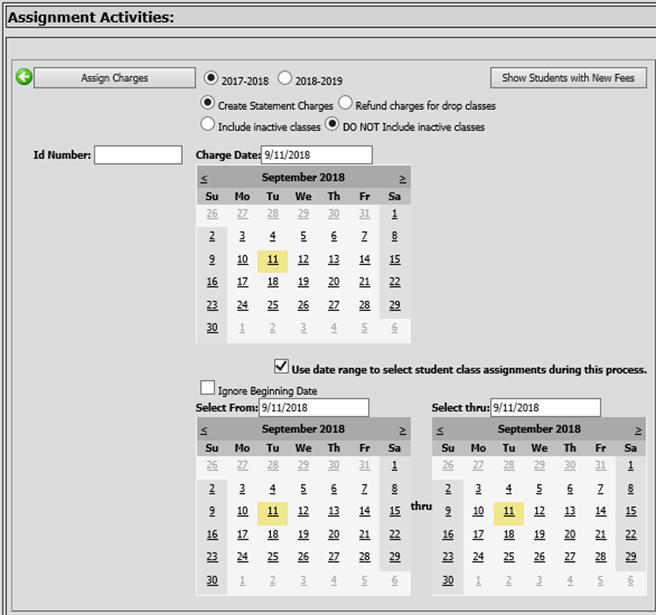
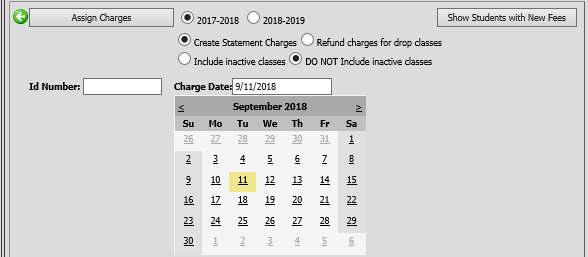
2. Select the correct school year.
3. Blacken the option “Create Statement Charges”.
4. Blacken the dot “DO NOT Include inactive classes”.
5. Select a Charge Date – This is the date that will be used to “date” the charges; so it may be July on the calendar, but this option allows the charges to be dated in August.
6.
Select a Date Range to choose the student
class assignments during this process. 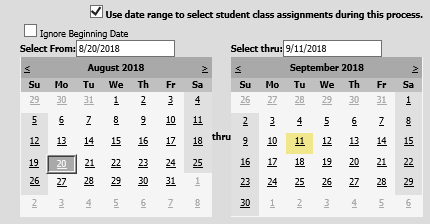
o Note: The first time charges are being assigned for ALL students for ALL charges based on courses, uncheck the option “Use date range to select student class assignments during the process.” This will charge the students for all of their classes regardless of the date they signed up to take them. Otherwise no charges may be assigned to the students.
7. Click  – When
the process is finished, a message will appear to indicate the process is
complete and displays the total amount charged for all students. Click OK and
then click
– When
the process is finished, a message will appear to indicate the process is
complete and displays the total amount charged for all students. Click OK and
then click  to return to the previous screen.
o Note: Select Un-assign Unlocked Fees if you would like to un-assign any of the fees you just assigned.
8. Verify the accuracy of the charges by running and examining reports. Since all new charge reports contain only unlocked items, be sure to run all charge reports needed before locking. The locking process will be explained after the section on verification of the charges. Reports relating to charges include:
o Daily Charge List
o Charge Summary by Type
o Charge Summary by Student
o Student Summary by Charge Type
o Charge Analysis Report
9. Click “Lock/Unlock Batches” or click to cancel.
10. Select the batches you would like to lock/unlock.
o Note: Changes to locked charges are restricted. Locked Charges may be Unlocked as needed. When financial accounting is active, the finance office has the option to transfer a general ledger transaction for “Locked Batches”. If the Finance office creates/transfers activity to the accounting system the charges included will become permanent entries. You will not be able to unlock those entries.
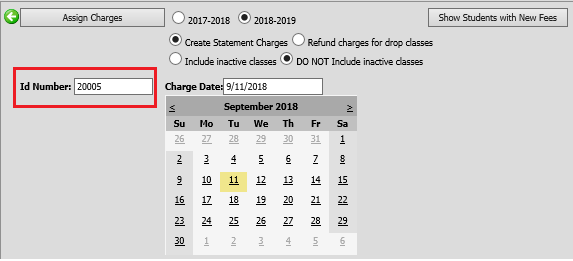
Assigning Charges to One Student ID Number
The Mass Assignment of Charges and Fees area can also be used to assign charges to a specific student. Follow the steps above to select the charges to apply, school year and dates. Enter the ID number of the student you wish to assign the charges to in the ID Number box:
Click on button at the top of the screen. The program will
assign charges to just that student.
Assigning Fees to New Students
If you have already mass assigned your student fees and you
get a new student, don’t forget that in the Web School Office program you have
the ability to mass assign fees to a single student.
•Make sure you have the student(s) ID number(s) written down then click on Tuition / Fee Processing then Mass Assignment of Charges.
•Click the Assign/Charge Fees button at the middle top of the screen.
•On the next screen click in the ID Number cell under the Assign Charges button and type in the new student ID.
•Take the check mark out of Use date range to select student class assignments during this process (in case the student was actually scheduled prior to today).
•Now click the Assign Charges button. The program will assign appropriate charges for just that student.
•When this student is completed, simply put in the next student ID and assign the charges again.
Show Students with New Fees
If you use this option to assign fees for a new student, when you enter the ID number of the student, click the button “Show Students with New Fees”. It will display the name of the student on the right side of the screen. This helps verify that you have the correct student. If it is correct, place a check mark in front of the student’s name. Click the “Assign New Fees to Selected Students” button to actually assign the fees.
