
Revised 1/17/2019
Mass Data Changes gives you several options: Replace All
Data in Column, Format Data, Replace Characters, Move/Combine Data and Trim All
Text Fields (All Tables).
How to Access Mass Data Changes
1. Select Administrative Utilities |Control Center |Toolbox.
2. Login with the word MASS.
3. Click on Mass Data Changes.
4. Click on the button at the top of the screen to Lock Users out of SDS before you start a task. Remember to Unlock Users when you are done with your tasks.
5. Click in the box I have a working backup of my database. (Enable Mass Change). ONLY click this if you DO have a working backup. If you aren’t sure you have a backup, unlock users and come back to the mass change area once you have confirmed you have a backup. There is no “undo” option for mass changes so it is very important to have a current backup before making mass changes.
6. Then select one of the listed options. Each option is described in detail below.
Replace All Data in Column
This option will replace all data in a column for selected students in the selected field with the value you enter.
1. “Select a Table” dropdown: Select the table to edit from the drop down.
2. Optional: Click the “Open Selection Definition Area” button to choose only certain students (i.e. students in a specific school location or specific grade year). Follow steps 1 – 6 if using this option. The green arrow will return you to the previous screen. For instructions on using this option, see the Open Selection Definition Area Instructions section at the end of this document.
3. "Field to Change" dropdown: Below the displayed grid, choose the field with the data to be changed.
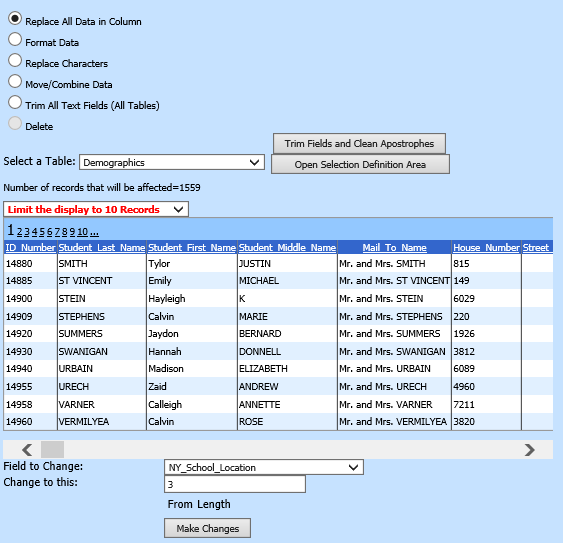
4. "Change to This": Enter the new data to replace the data in the selected field for all displayed students.
5. Click the “Make Changes” button.
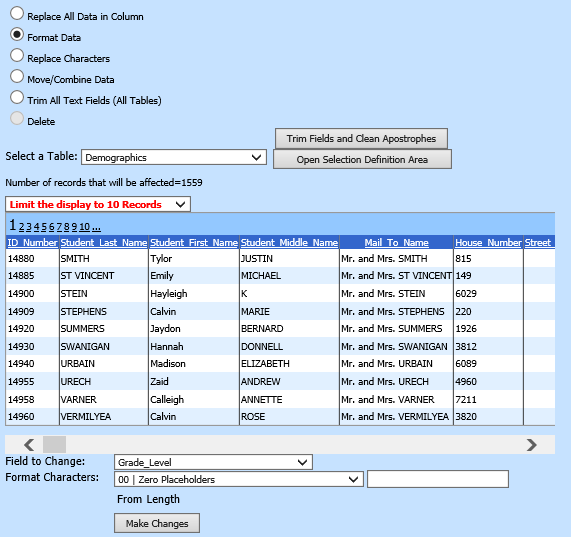
Format Data
All data in a selected field will be formatted using a selected format style.
1. “Select a Table”: Select the table to edit from the drop down.
2. Optional: Click the “Open Selection Definition Area” button to choose only certain students (i.e. students in a specific school location or specific grade year). Follow steps 1 – 6 if using this option. The green arrow will return you to the previous screen. For instructions on using this option, see the Open Selection Definition Area Instructions section at the end of this document.
3. "Field to Change" dropdown: Below the displayed grid, choose the field with the data to be changed (Field to Change dropdown).
4. Choose the type of formatting to be used by selecting an option in the "Format Characters" dropdown.
5. Optional: Put in a value in the right most box if you are adding, subtracting, multiplying, or dividing the data by the same number (i.e. adding 5 to all numbers in a column).
6. Click the “Make changes” button.
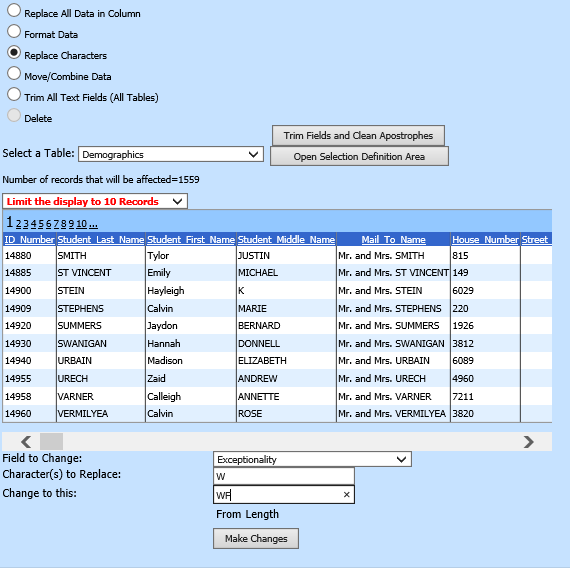
Replace Characters
This option will replace characters for all data for the selected students in the selected field; an example is to find “W” and change to “WF”.
1. “Select a Table”: Select the table to edit from the drop down.
2. Optional: Click the “Open Selection Definition Area” button to choose only certain students (i.e. students in a specific school location or specific grade year). Follow steps 1 – 6 if using this option. The green arrow will return you to the previous screen. For instructions on using this option, see the Open Selection Definition Area Instructions section at the end of this document.
3. "Field to Change" dropdown: Below the displayed grid, choose the field with the data to be changed (Field to Change dropdown).
4. "Characters to be Replaced": Enter the character(s) to be changed (i.e. "W").
5. “Change to this”: Enter the new value (i.e. “WF”).
6. Click the “Make changes” button.
Move/Combine Column Data
This option will move/combine all column data for the selected students in the selected field with the data in the second selected field.
1. “Select a Table”: Select the table to edit from the drop down.
2. Optional: Click the “Open Selection Definition Area” button to choose only certain students (i.e. students in a specific school location or specific grade year). Follow steps 1 – 6 if using this option. The green arrow will return you to the previous screen. For instructions on using this option, see the Open Selection Definition Area Instructions section at the end of this document.
3. "Field to Change" dropdown: Choose the field with the data to be changed (Field to Change dropdown).
4. "Source Field" dropdown: Choose the field with the data that needs to be moved.
5. "Receiving field" dropdown: Choose the field that will be receiving the data from the source field.
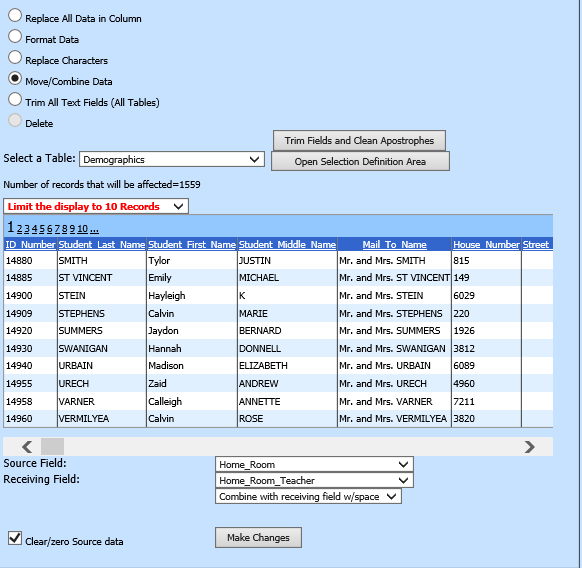
6. In the third drop box, choose the course of action:
o Replace data in receiving field: all data in the receiving field will be overwritten with the data from the source field.
o Combine with receiving field: all data in the receiving field will be combined with the data from the source field.
o Combine with receiving field w/space: all data in the receiving field will be combined with the data from the source field with a space put in between the 2 data elements being combined.
o Add to receiving amount: all data from the source field will be added to the receiving field data for a new total in the receiving field.
o Subtract from receiving amount: all data from the source field will be subtracted from the receiving field data for a new total in the receiving field.
7. "Clear/zero Source data": Optional: Check the box to clear or zero the source data field once the changes are made. Leave unchecked to keep the original data in the source field.
8. Click the “Make Changes” button.
Trim all text fields (all tables)
This feature will trim any excess spaces found in text fields
in all of the tables in the database. This is usually done after a
conversion or import of outside data. Also, users may have entered
values in fields and unintentionally hit the space bar at the end of entry.
For example: entered a course number "101" with a trailing space "101
". In this case, the system will not recognize the course entered with
the trailing space when looking for course "101".
Generally, this
is used at the recommendation of SDS support.
Click the “Make changes” button.

Trim Fields and Clean Apostrophes
This button will trim any excess spaces and clean out any apostrophes found in text fields in all of the tables in the database.
Open Selection Definition Area Instructions
If you wish to use the Open Selection Definition Area button to set up a selection for specific students when using any of the options above, follow these instructions.
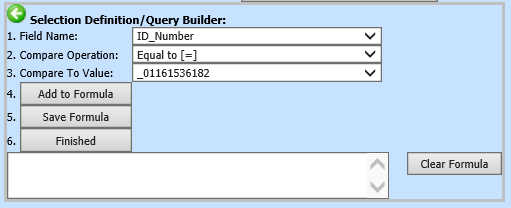
1. Field Name: From the dropdown, select the field you wish to use for selection.
2. Compare Operation: Select the desired compare operation (Equal to, Not equal to, Less than or equal to, Greater than or equal to.
3. Compare to Value: In the dropdown, click the value you wish to use for selection.
4. Add to Formula: Click this to add the selection definition to the formula box.
5. Save Formula: Click to save the selection definition formula. If you wish to create additional selection definitions, repeat steps 1 – 5 for each definition you wish to add to the formula.
6. Finished: When all desired selection definitions have been added to the formula, click the Finished button. This will apply the selection definition formula and return you to the mass data change screen. The students displayed will be the students meeting the selection definitions you created.
The  button allows
you to clear all selection definitions from the formula box to start
over.
button allows
you to clear all selection definitions from the formula box to start
over.
The  allows you to
close the Selection Definition\Query Builder without saving.
allows you to
close the Selection Definition\Query Builder without saving.