 button to save the entry.
 Revised 12/12/2018
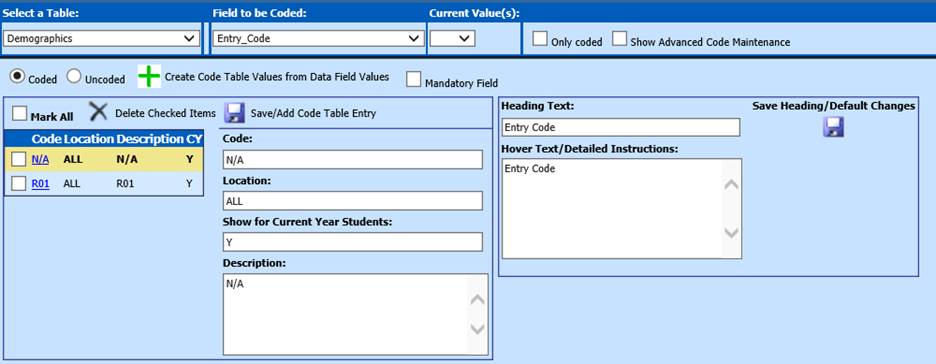
This area allows you to code, view, edit and un-code a
field. You can also define mandatory fields for data entry, change heading text,
and enter hover text in this area.
To access Master Code Field Definition and Changes, from the
Web School Office menu, select |Administrative Utilities |Master Code Field
Definition and Maintenance.
Code a
Field
1. Select a Table (1): Select the table with the field you want to code (i.e. Demographics)
2. Field to be Coded(2): Select the field you would like to code (i.e. Grade_Year)
o Note: If you check Only Coded, the dropdown will only show coded fields.
3. Click the radio button “Coded.”
o If a coded field is chosen, a list of codes and descriptions will display. If the field is not currently coded, a blank code, school location and Description screen will display.
4. To add a code,
o Enter the code in the Code box.
o Enter the school location this code applies to in the Location box (use "ALL" if all schools can use this code).
o Enter the description in the Description box.
o Press the Save/Add Code
Table Entry button to save the entry.
o Repeat for each code you wish to add.
o You can add the same code for separate school locations. i.e., you can have a grade year code of 02 for school location 1 and a grade year code of 02 for school location 2 if needed.
5.
Current Value(s): The dropdown lists all data values that
have been entered in the selected field. To add all of these values to
the code list, click  .
.
6. Edit codes/descriptions by clicking on the blue code in the list.
o Edit the values in the Code, School Location and Description boxes on the right.
o Click Save/Add Code Table Entry.
7. To
remove codes, check the box in front of the code(s) to be deleted and click
the button. If all codes are to be deleted,
check the box "Mark All" and then click thebutton.
button. If all codes are to be deleted,
check the box "Mark All" and then click thebutton.
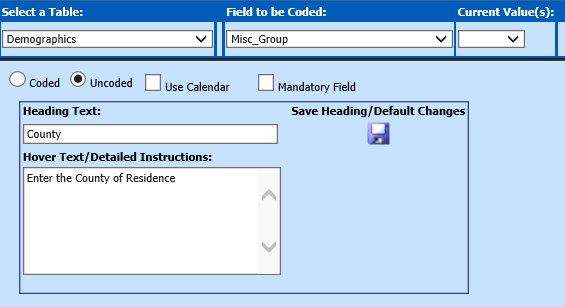
Un-code a
Field
1. Select the table with the field you want to uncode (i.e. Demographics)
2. Select the field you would like to uncode (i.e. School_Location)
3. Click the radio button “Uncoded.”

Define Mandatory Data Entry Fields
1. Select the table containing the field you want to code (i.e. Demographics)
2. Select the field you would like to code (i.e. Free_Reduced)
3. Check the Mandatory Field box
4. Click
the button to save data changes.

Change Heading Text
The field headings for the vertical and horizontal
data entry screens can be changed. For example, if you have a field named Misc_1
that you use to enter the county students reside in, you could change the
heading text to County so the field would be listed with County as the heading
in the vertical and horizontal data entry screens instead of as Misc_1. NOTE:
This does not change the actual field name. The field will still display with
the original field name for sorting and report creation.
1. Select the table with the field you want to code (i.e. Demographics)
2. Select the field you would like to code (i.e. Misc_1)
3. Enter the desired Heading Text
4. Click
the  button to save data
changes.
button to save data
changes.
Change Hover Text
The text that appears in a pop up box when hovering over
a field in certain areas can be edited as follows:
1. Select the table with the field you want to code (i.e. Demographics)
2. Select the field you would like to code (i.e. Misc1)
3. Enter the desired text in the Hover Text/Detailed Instructions box
4. Click
the  button.