
Added 4/23/2018
In the Scheduling area of the program menu, Master File Changes (Horizontal) provides a screen for editing data on multiple course codes or course master sections. This screen allows you to edit information in a grid format for quick comparison and adjusting of data. The grid design allows you to edit multiple records with one save. Keep in mind that some fields such as School Location, Course Number, Section and Semester should only be edited in the vertical view to insure that the changes made to these fields flow out to any existing schedule records.
To edit Current Year Course Codes or Course Master Sections in this screen, select Scheduling (Current Year) from the application dropdown and the desired Course Codes or Course Master view from the Entry Options dropdown.
To edit Next Year Course Codes or Course Master Sections in this screen, select Scheduling (Next Year) from the application dropdown and the desired Course Codes or Course Master view from the Entry Options dropdown.

The Other Field and Other Value dropdowns can be used to select specific records to display on the screen. Check marking the Concatenate Search box allows setting up multiple field searches. With the box checked, each search will build on the previous search(es).

The tool bar provides navigating and editing options.

Each of the toolbar options are described below.
Save

The Save button saves changes made to records on the current page.
Page

The Page tools allow for navigating through the pages of records.
 Displays the first page of records and
saves changes.
Displays the first page of records and
saves changes.
 Moves to the previous page of
records and saves changes.
Moves to the previous page of
records and saves changes.
 Displays the page list and saves
changes when another page is selected.
Displays the page list and saves
changes when another page is selected.
 Moves to the next page of records and
saves changes.
Moves to the next page of records and
saves changes.
 Displays the last page of records and
saves changes.
Displays the last page of records and
saves changes.
Rows

Select to display 15, 20, 30, 40 or 50 rows per page.
Adjust Display Width

Adjusts the data entry area width of the screen.
 Decreases data entry area
width.
Decreases data entry area
width.
 Increases data entry area
width.
Increases data entry area
width.
First Field to Edit
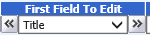
From the dropdown, select the first field to display after the splitter bar for editing.
 Moves display left 19 fields and saves
changes.
Moves display left 19 fields and saves
changes.
 Moves display right 19 fields and saves
changes.
Moves display right 19 fields and saves
changes.
Sort by

These options allow sorting the displayed records in either ascending or descending order on selected fields.
1. Choose Ascending or Descending.
2. Select a field.
3. If you wish to sort on additional fields, check mark the Concatenate check box to build on the previous sort.