
Revised: 10/15/2021
CEPI/MSDS links to 2021 General Collection information:
Manual: MSDS Collection Details Manual (michigan.gov)
Schema:SRM Collection Schema Summary (michigan.gov)
Enter WSO and select Processing Options|Data Exchange State and Federal Reporting. Select the report from the dropdown at the top of the screen. If you do not have a school location restriction on your User Security settings, select All Locations or the specific school location for the report.
Review the documentation at these links which explains the basic process of setting up a state report.
Before the report is created, SDS data needs to be in place and correctly matched to the report layout for this collection. Follow these instructions and you should be on your way to creating a successful report for submission to MSDS!
Update Database with Required Fields
If this is your first time creating the General Collection file, the first step is to update your database with the fields and code values required by MSDS. It is good practice to run this before each submission in case new fields or code values have been added.
Enter WSO. Select Administrative Utilities | Control Center. Click on the button on the left of the screen titled Student System Adjustments. Press the “Apply Now” button as shown below.

When the process is complete this message displays.
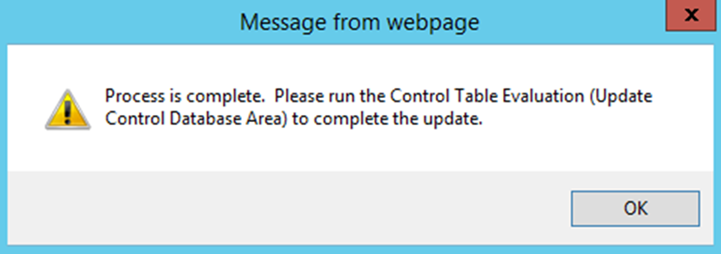
To complete the update, go to Administrative Utilities | Control Database Evaluation and click on the “Update Control Database Area” button.
Prepare Student Data
Demographics
MSDS General Collection fields have been created (if not already there) in tables Demographics_SR_1 and Demographics_SR_2. These tables are specifically set up for state reporting. In the Data Entry and Changes | Student Information/Maintenance screens, views have been created to help with data entry for these report fields.

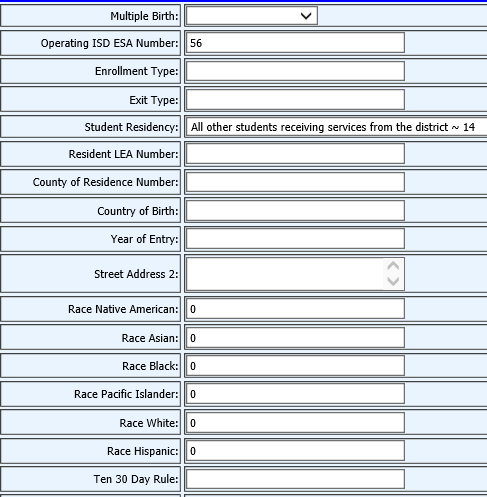

All of the fields in this view are conditionally required based on whether or not support services are received by the student. Refer to the CEPI MSDS website for further information on these requirements. Part of this view is displayed below.
Many required fields are also in the Demographics table. You can use any Demographics view for entry to these fields or create your own view for easy entry.
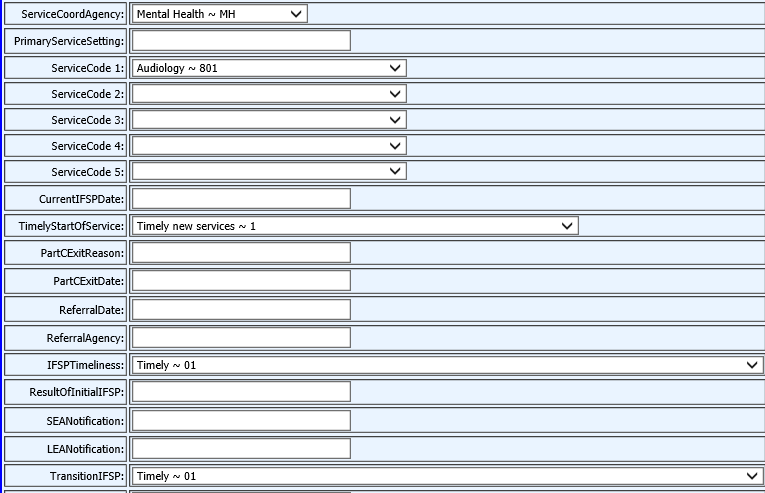
Discipline
The required fields for the Discipline component were added to the Discipline table. Entry of information can be accomplished using this preset view in Data Entry and Changes | Student Information/Maintenance.

Part of this view is shown below. Fields outlined in red must be entered for the record to be included.
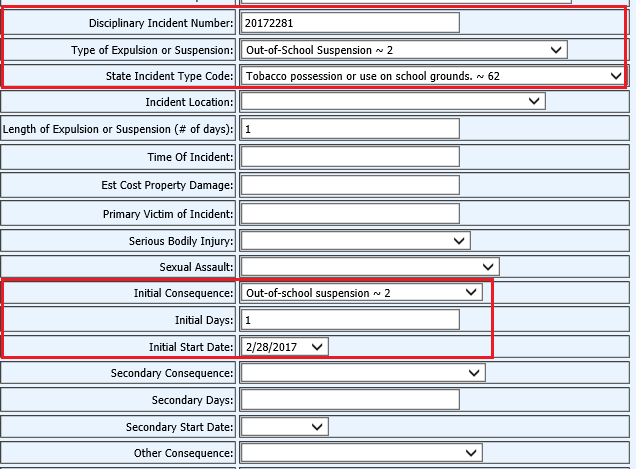
These fields are pre-matched and fixed in a separate sub report that is part of the main report layout in the General Collection Report.

The screen shot below is the discipline component (the sub report) of the General Collection report. It shows the fields that are pulled to the report.
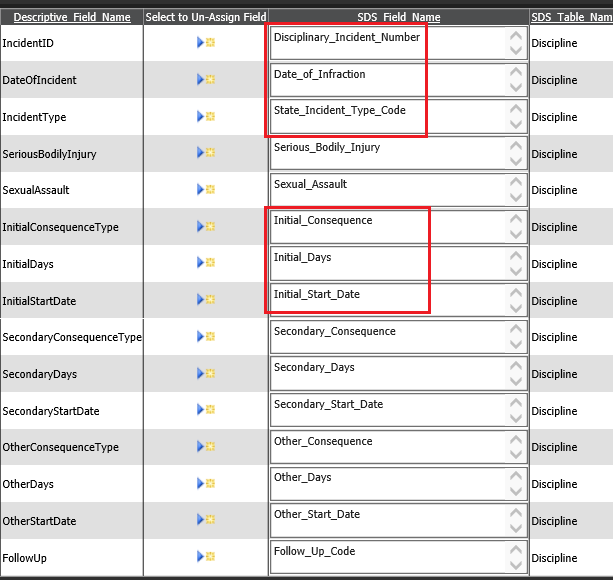
The fields outlined in red are the mandatory fields. The other fields, while not required, will be submitted if data has been entered. Otherwise they are not included in the report.
Only those Discipline records with an infraction date on or after the calendar start date of the current school year or the Last Count Date (whichever is most recent) and on or before the Current Count Date (Fall, Spring or EOY) will be included in the report. For the Fall Collection, the Last Count Date would be the first date of school. For the Spring Collection, it would be the Fall Count Date, and for the EOY Collection it would be the Spring Count Date.

NOTE: The following instructions are from MSDS. To comply, only assign a Disciplinary Incident Number to an infraction that occurred resulting in one of these removals from school.
What Incidents Are Reported?
Incidents resulting in a suspension or an expulsion are required to be submitted for all students (general education and special education). Report all incidents resulting in the student's removal from his/her usual education setting for one half of the school day or longer.
For students with an active IEP at the time of the incident, you must also report Removals by Hearing Officer and Unilateral Removals to an Interim Alternative Educational Setting for Weapons, Drugs or Serious Bodily Injuries (Disciplinary Action types “3” and “4”, respectively).
For students with an active IEP who are reported with Primary Educational Setting “07” (Parentally Placed in Private School or Home School at Private/Parent Expense) at the time of the incident, discipline incidents only need to be reported if the incident took place in a public school setting. Do not report incidents that occurred outside of a public school setting.
Attendance
To correctly report days enrolled and in attendance, refresh Attendance Analysis in SDS before running the report. Refresh from the first day of school to the current count date. Run the process for all locations that will be reported in the collection. For further information on this process
The information from the Attendance Analysis table is essential to the report. It compiles not only attendance figures but exit and entry dates as well. These report fields should be matched to fields in this table.


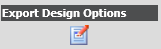
If they are not, click on Export Design Options to
select the fields shown above and match them to the report fields in the layout.
Click the  to the right of
the report layout field name to assign the SDS field.
to the right of
the report layout field name to assign the SDS field.

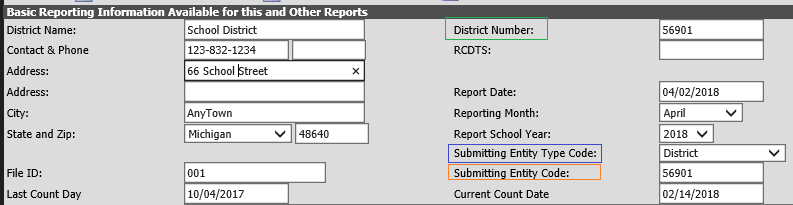
Report Settings
Default Values
Make sure that the Basic Information for the report is in place. Fields circled must be matched to the report layout fields as shown below.


If they are not, click on Export Design Options to
select the fields shown above and match them to the report fields in the layout.
Click the to the right of
the report layout field name to assign the SDS field.

The default value column of the report allows for entry of a value to assign to each student who does not have data in the SDS field. These are common default values shown in the far right column.


Output and Record Selection
This is the top of the report screen. The File Export Format dropdown must be set to XML Format. Select a School Location if all locations are not being reported.

Data selection should include all active
students. DO NOT EXCLUDE STUDENTS WITH EXIT DATES DURING THE SCHOOL YEAR.
To set this selection, click on  and click the blue link to include
Active Students. REMOVE the Exit_Date portion of the selection and then
press
and click the blue link to include
Active Students. REMOVE the Exit_Date portion of the selection and then
press  and press again. Your selection
will now look at all students with Current Year Active set to 0 and in the
school location you have selected previously.
and press again. Your selection
will now look at all students with Current Year Active set to 0 and in the
school location you have selected previously.

There is no need to worry about selecting students by entry date. The program will not include students who entered after the count date. If a student withdrew and reenrolled during the count period, the most recent entry date will be reported.
Set the count date fields in the Basic Reporting Information area. Current Count Date is the date for this count period. For the Fall Collection, the Last Count Date would be the first active date of school. For the Spring Collection, it would be the Fall Count Date, and for the EOY Collection it would be the Spring Count Date.
All fields in the report layout must be matched to a
database field or a default value. If no value is required for the report
field it can be matched to one of the “Other Values” boxes that has no
information entered. These boxes are on the far right side in the Basic
Report Options section. Match them by selecting from the dropdowns as
shown. Then click next to
the field to be matched.


Check the Schema
Each Collection has its own output schema to comply with the MSDS reporting setups for the Fall, Spring and EOY. The report defaults to the schema currently loaded in the SDS control database. It displays in the Basic Report Information section.

If you are ready to start the next collection but the default is still set to the previous period, you can update to the new schema by selecting from this dropdown in the Basic Reporting Information area.
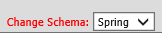
By changing the dropdown value, the schema for the selected collection will appear in the previously displayed Element 1 Info box.
Create the Report File
Click  to save any changes made to the basic
report information and/or matches to the report layout.
to save any changes made to the basic
report information and/or matches to the report layout.
Click 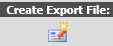
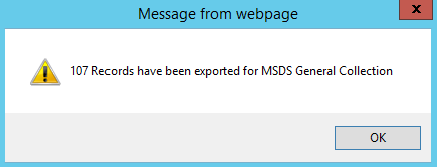
A message will show on the screen when the report is completed.
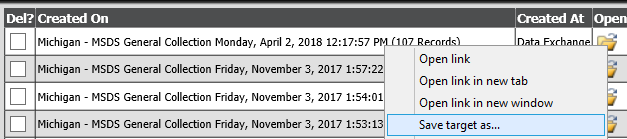
A file will be listed (at the top of previously created reports). Right click on the folder under the Open column to the right of the report name and click Save Target As. You will be prompted to select a folder on your computer/server on which to save the report.
The file can now be uploaded to the MSDS system.