Adding a Course Section


The magnet board is a tool that can be used to add and
delete sections from the course master, assign course sections to teachers and
rooms, and move course sections to different periods, teachers, or rooms. It
also includes a potential conflict matrix so the user can see how many possible
conflicts moving a course to a specific period would create.
Basic Instructions
1. Enter Scheduling |Next Year Course Master (Magnet Board).
2. Create Sections from Course Codes.
3. View Number of Students Registered for Course.
4. Create as many Courses as Required.
5. Add Sections to Teachers (on left) and Rooms (on right).
6. Potential Conflicts.
7. Remove Teacher Assignments.
8. Move assignments to different:
o Period/s.
o Teacher/s by using “Classes without assignments”.
Detailed Instructions
Adding a Course
Section

1. Choose your school location (If you have a school location restriction on your user id, the school location will default to the location on your user id).
2. Click the Need Another Section? Button.
3. Choose All Courses or those With Registration.
4. From the course list dropdown, choose the course.
o Note that the screen displays how many students are registered for this course, how many sections of this course currently exist in your next year course master.
5. Click on the Make a Section button to add a section of this course to your next year course master.
o Read the Confirmation message and click OK.
§ Note: If a link course is set up on the course code, a section of the linked course number will also be created.
6. The new class section will be listed above in the list of unassigned courses in box #2.
7. The
 button can be used to add enough
sections for ALL courses with students registered to accommodate all registered
students.
Assign a Course Section to a
Teacher


1. Choose your school location (If you have a school location restriction on your user id, the school location will default to the location on your user id).
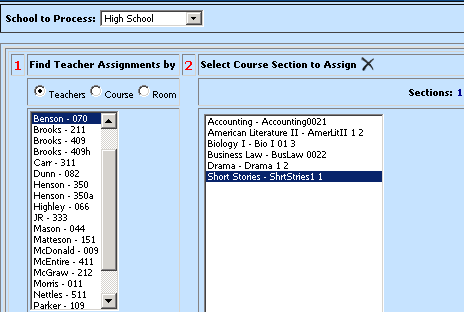
2. In box #1, choose a teacher.
o The list of teachers can be displayed in order by Teacher Name, by Course Number, or by Room Number by clicking the radio buttons
o The selected teacher’s course section assignments will display in the grid to the right.
3. In box #2, select the course section to be assigned.
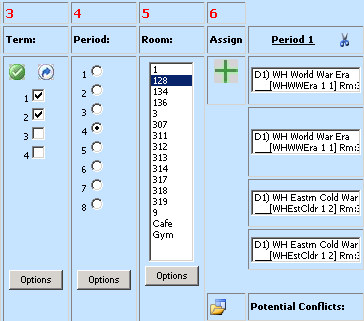
4. In box #3, select the Term(s) for the new course section.
o Click the green checkmark to checkmark all terms or individually checkmark the terms.
o Click the Options button to select different number of terms options.
5. In box #4, select the Period for the new course section.
o This can be done either by clicking one of the Periods radio buttons or
o Clicking on one of the Period headings above the grid.
o Click the Options button to select different number of Periods options.
6. In box #5, available rooms for the selected terms & periods will display. Select the room to assign the class to.
7. In box
#6, click  to assign the selected section.
o Prior to clicking the  to assign the class, the
 button can be clicked to use the Potential
Conflict Matrix to determine potential conflicts with the course placed in the
selected terms/period. More information on using the Potential Conflict Matrix
is found in the Potential Conflict Matrix section further below.
8. You will see the section added in the grid to the selected Terms & Periods for the selected teacher.
Assign a Course Section to a Room
1. Choose your school location (If you have a school location restriction on your user id, the school location will default to the location on your user id).
2. In box #1, choose the teacher assigned to the course section.
o The list of teachers can be displayed in order by Teacher Name, by Course Number, or by Room Number by clicking the radio buttons above the dropdown.
o The selected teacher’s course section assignments will display in the grid.
3. In box #3, select the Term(s) for the course section you wish to assign to a room.
4. In box #4, select the Period for the course section you wish to assign to a room.
5. The course section for the selected terms/period will highlight in the grid.
6. In box #5, available rooms for the selected terms & period will display. Select the room to assign the class to.
7. Select Room to Assign.
8. Click
the Options button in #5 and then click  .
.
9. The room number will assign to the selected course section in the grid.
Un-Assign a Course Section from a Teacher
1. Choose your school location (If you have a school location restriction on your user id, the school location will default to the location on your user id).
2. In box #1, choose a teacher.
o The list of teachers can be displayed in order by Teacher Name, by Course Number, or by Room Number by clicking the radio buttons
o The selected teacher’s course section assignments will display in the grid to the right.
3. In box #3, select the Term(s) for the course section you wish to un-assign.
4. In box #4, select the Period for the course section you wish to un-assign.
5. The course section for the selected Term(s) and Period will highlight in the grid.
6. Click the scissors button at the top of the selected Period column to un-assign the selected course section from the teacher.
7. The selected course section will be removed from the grid.
Un-Assign a Room for a Course Section
1. Choose your school location (If you have a school location restriction on your user id, the school location will default to the location on your user id).
2. In box #1, choose the teacher assigned to the course section:
o The list of teachers can be displayed in order by Teacher Name, by Course Number, or by Room Number by clicking the radio buttons above the dropdown.
o The selected teacher’s course section assignments will display in the grid.
3. In box #3, select the Term(s) for the course section you wish to un-assign.
4. In box #4, select the Period for the course section you wish to un-assign.
5. The course section for the selected Term(s) and Period will highlight in the grid.
6. In box #5, click the scissors button to un-assign the selected course section from the room.
o Click OK on the confirmation message.
o The room number will be removed from the course section on the grid.
Move a Course Section to a Different Teacher or Period
1. Follow previous instructions to Un-Assign a Course Section from a Teacher.
2. Once the course section is un-assigned, follow previous instructions to Assign a Course Section to a Teacher selecting the teacher, term and period for the selected course.
Move a Course Section to a Different Room
1. Follow previous instructions to Un-Assign a Room for a Course Section.
2. Once the course section is un-assigned, follow instructions above to Assign a Course Section to a Room to assign the course section to a different room.
Delete a Course Section from the Course Master
1. Follow instructions above to Un-Assign a Course Section from a Teacher.
2. Once the course section is un-assigned, click the Un-Assigned Course dropdown and select the course section to be deleted.
3. Click
the  button to the right of the Un-Assigned
Course dropdown to delete the selected course section.
4. Click OK on the confirmation message.
o Note: If students have already been scheduled into a course section, the section should be removed from the students’ schedules prior to deleting the course section from the course master.
Potential Conflict Matrix
The Potential Conflict Matrix will display potential
conflicts by term/period/day for a selected un-assigned
class.

1. Click the Potential Conflicts file folder button in box #6
2. Choose to display potential conflicts By Day or by Course and Day.
o By Day displays the number of potential conflicts for each day in each term/period.
o Course and Day will display each course in conflict and the number of potential conflicts for that course for each day/term/period.
3. Choose the # of sections from the dropdown on the right.
4. Choose the course section in box #2.
5. Click on the Refresh Display for Courses button to display the potential conflicts for the selected Un-Assigned class.
o Note: The Refresh button must be clicked each time a new course section is selected from the Un-Assigned Courses dropdown.