Revised 8/15/2018
Once Policy Definitions have been set up, letters can be created in School Policy Processing| Policy Processing/Letter Creation. If you haven’t yet created policy definitions for the letters you wish to create, click here and follow the instructions for policy definition.
Policy Processing/Letter Creation Screen Display
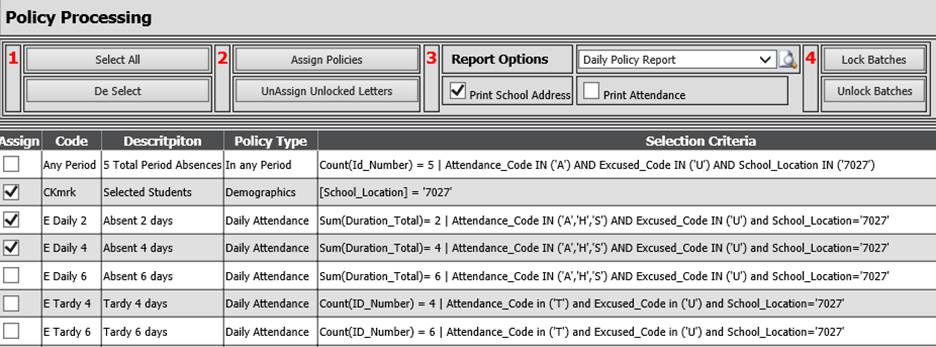
1. In School Policy Processing| Policy Processing/Letter Creation put a check by the letters you want to process. Policies can be selected by clicking on the Assign check box. The Select All button can be used to check mark all policies. The DeSelect button can be used to uncheck all check marked policies.
2. Click the  button. A new screen will display.
3. If you are running a Demographics or Health
Records policy, check mark  .
.
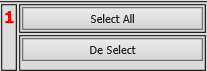
4. If you are running an attendance or discipline policy, select dates.
o The top date boxes (activity date range) are used to find students with absences/discipline records during “this period”. The Select From and Select Thru dates can be completed by either typing the dates in the boxes in the format shown in the screen shot above or by using the “date picker” calendar below each box. The Select Thru date will also be the date printed on the letter.
§ Often times this is a 1 week range, but it could be longer or shorter. Some schools may run Policy Letters daily.
§ It is recommended to be a shorter date range so you communicate the student's absences more often to the parents.
o The bottom date boxes (evaluation date range) are used to assign the range for the system to count the number of occurrences or total the duration to find students with absences/discipline records meeting the number defined on the policies.
§ These date boxes are used to determine the "start counting from" and "count up until" dates.
§ The beginning date box is usually the first day of school OR the first day of the second semester.
§ The ending date MUST match the ending date of the top date box.
o In short, the top set of date boxes tells the system to look at all students who have absence/discipline records in this date range and then for those students, look at their absence/discipline records within the bottom date range and find the records meeting the selection criteria on the policy definition.
o Note: the “create a letter for ONLY first class meeting period policy” can be checked when you only want to send 1 letter that will cover all of the classes that met period policy criteria. If you uncheck this box, 1 letter is created for EACH class and can result in multiple letters for the same student.

5. If you would like to select to create letters for only certain students who meet the selection criteria, click on the "By Student" button. A list of students meeting the policy criteria will display on the right. Checkmark the students for whom you wish to create letters. Click the Create Letters for Selected Students button. When finished, a message displays noting how many letters of each policy were created. Click OK.

6. If you are not using the “By Student” option in #5, click the “Create Letters” button. Student records will be analyzed and a letter created if the policy criteria are met. When finished, a message displays noting how many letters of each selected policy were created. Click OK.
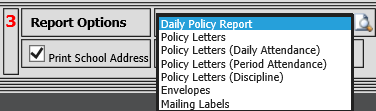
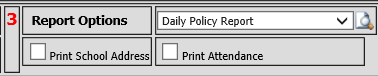
7. In box 3, there are several reports you can run.
1. Daily Policy Report.
o This report will list the students who were “hit” by a letter and list the letter received by the student.
o This report is convenient to check over the students briefly so as to “head off a letter at the pass” – For example: a student has been very ill and you decide to NOT send a letter due to the extreme circumstances.
o At this point you will want to run the letters, envelopes or labels.
2. To run the letters, select one of the following:
o Policy letters - use for demographic or health records policy letters.
o Policy Letters (Daily attendance) – will optionally include a daily attendance report WITH the letter.
o Policy Letters (Period attendance) – will optionally include a period attendance report WITH the letter.
o Policy Letters (Discipline) – will print information regarding the discipline incident involved.
3. For the Daily and Period Attendance letters, you have an option to print the school name and address at the top of the letter if you’re not printing on letterhead. You also have an option to print an attendance report.
If you select to print attendance additional date range boxes will open. Enter the values you used in the 2nd set of date boxes when you created the letters.
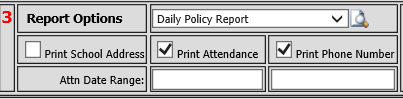
4. After making your
Report Options selection, click  .
.
5. Answer the parameter questions. Note: not all parameters appear for all letters.
8. To run the envelopes or labels, complete the following:
o While still on the letter creation page in area 3, select Policy Envelopes (or labels)
o Click the .
o Answer the following parameter questions:
§ Print the school’s return address (not applicable for the labels)
§ Print the student’s name
§ When selecting the date range, use the ENDING DATE you selected when you created the letters (the date in the right hand box)
o Print the envelopes or labels
o Be sure to match the envelope or label to the proper letter!
9. The last step, once everything has been successfully printed, is to return to the school policy processing option.
•Click on policy processing/letter creation. You should either
o Un-assign the letters (basically this erases what you’ve done) or
o Lock the batch (this creates a history of letters sent to the student’s home during the school year). To lock a batch, you MUST highlight the batch(es) listed BEFORE hitting the lock batches button.
§ It is recommended that you lock the batch in order to keep a record of correspondence with the family.
•If you choose to un-assign the letters, click on UnAssign Unlocked Letters.
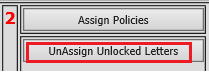
o Select the batch(es) you wish to un-assign.
o Click  .
.
•If you choose to lock the letters, as recommended, click on Lock Batches.
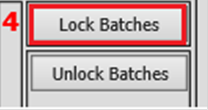
o Select the batch(es) you wish to lock.
o 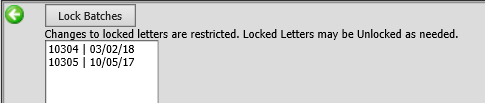
o Click  .
.
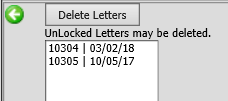
•Once the letters have been locked, they are no longer available for printing. If you find you need to reprint letters, envelopes, or labels, in School Policy Processing|Policy Processing\Letter Creation, you can click on the Unlock Batches button.
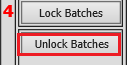
o Select the batch(es) you wish to unlock.
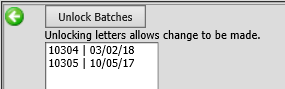
o Click  .
.
o You may now print letters, etc. for the unlocked batch(es).
o Important – Remember to lock the batches again when printing is completed.