1. Open the Reports folder.
2. Click on Student Reports.
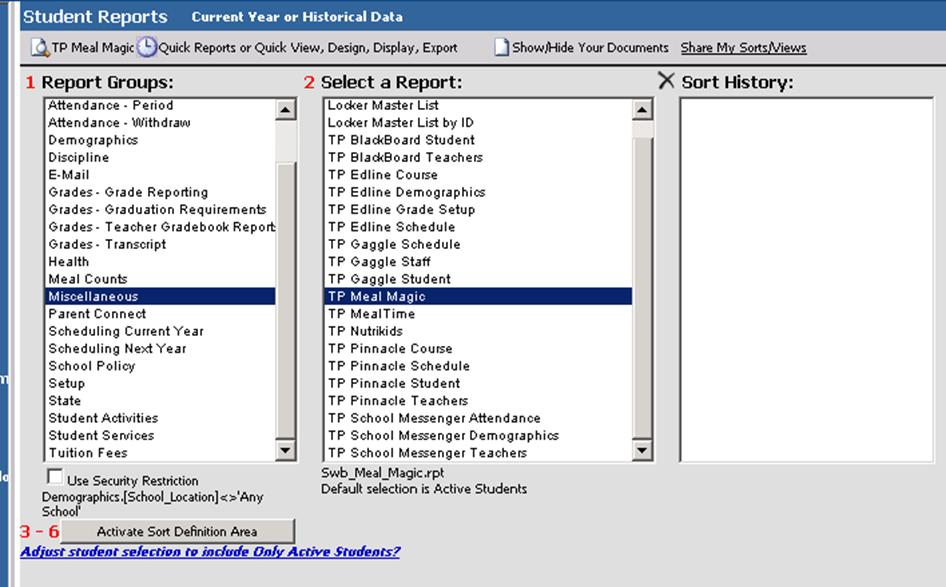
3. In the 1 “Report Groups” box, choose an area on which you want to run a report (i.e. Demographics if you need student data, Curr_Yr_Schedules if you need schedules, etc.). Here we are selecting “Miscellaneous” to run a report for third party use.

4. Box 2: choose a report that would contain some/most of the data you want to choose for your report.
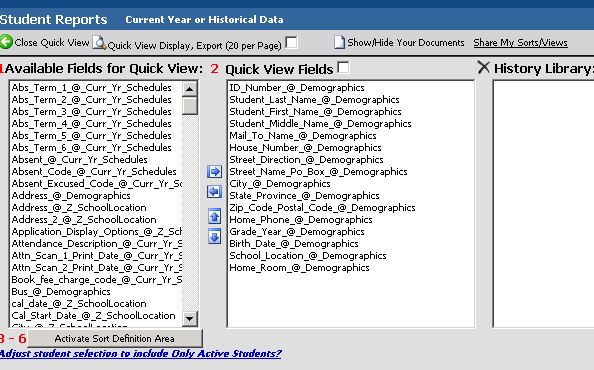
5. Click the “clock” icon at the top of the screen (Quick View Reports). This screen displays:

6. Box 2: remove any data fields you DO NOT want for your report.
o Click on the field in the center box to highlight it.
o Click the left arrow between box 1 & 2 to move a field back to “Available Fields”.
o To highlight multiple fields, hold the ctrl key while selecting the fields.
7. In box 1: select any new field(s) you want included on your report.
o Click on the field in the left box to highlight it.
o Click the right arrow between box 1 & 2 to move the field into the list of fields you want.
o To highlight multiple fields, hold the ctrl key while selecting the fields.
o To change the order of the fields in the middle box,
click on a field and click the  or
or  to move the selected field up or down in
the list.
o Put a check mark in the box next to the words “Quick View Fields”.
§ This check mark saves your field selections for the next time you might want to run this same flash report.
§ The next time the report is run it will include any new students or remove any old students who no longer meet the criteria you set.
8. Most often you want your report to include only active students. Click the “blue link” below the activate sort definition area “Adjust student selection to include Only Active Students?” For other sort/selection search this document for the “Activate Sort Definition” document.
9. When finished defining your sort criteria, click the “Close Sort/Select” button.
10. Before running your report, put a check in the box next to the words “(20 per page)”. When this box is checked, all records that meet your criteria will show. If left unchecked, only the first 20 that meet your criteria will show on the next screen.
11. Click the magnifying glass to the left of the words “Quick View Display, Export (All Records)”.
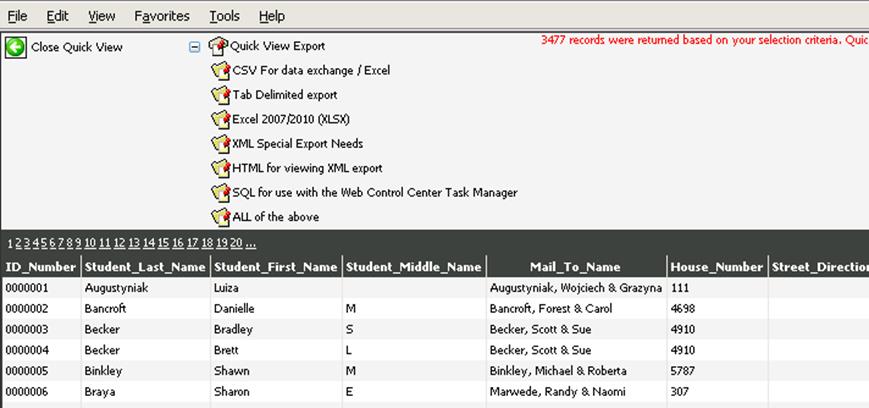
o Report results will appear on a new screen. Click
the + next to Quick View Export to see the options for exporting the
data. 
o CSV for data exchange/Excel. This creates a CSV file you can open in Excel and use in third party software.
o XML Special Export Needs. This creates an XML output file
o HTML for viewing XML export. This creates a file that can be viewed in HTML or on a web page format
o SQL for use with the web control center task manager. This creates a “saved flash report” format to be used in a nightly batch file export data from SDS to third party software.
o ALL of the above. This creates all the formats above. This option also creates the nightly batch file to export data for third party software. The following information on the batch file requires an understanding of the function of a .bat file and how to edit its properties.
§ The batch file is created in your student folder (where your SDS database and programs reside). For example: C:\Sdsadmin\Student.
§ The batch file is named according to the name of your report and your user ID. For example, if you ran the report on the Miscellaneous Menu “TP_Meal_Magic” and your user ID is “99”, the batch file is called TP_Meal_Magic_by_99.bat.
§ The batch file is set to send each resulting file format to the FTP site under your student folder. This file can be edited in Notepad if you wish to send it to another location. The batch file for the example used here would look like this.
==================================================
swc_xml.exe "1|TP_Meal_Magic_by_99"
copy C:\SDSADMIN\STUDENT\Usr_Disp\_Master\Flash\TP_Meal_Magic_by_99.csv C:\SDSADMIN\STUDENT\ftp /y
copy C:\SDSADMIN\STUDENT\Usr_Disp\_Master\Flash\TP_Meal_Magic_by_99.xml C:\SDSADMIN\STUDENT\ftp /y
copy C:\SDSADMIN\STUDENT\Usr_Disp\_Master\Flash\TP_Meal_Magic_by_99.htm C:\SDSADMIN\STUDENT\ftp /y
copy C:\SDSADMIN\STUDENT\Usr_Disp\_Master\Flash\TP_Meal_Magic_by_99.txt C:\SDSADMIN\STUDENT\ftp /y
==================================================
•You can change the destination of the file copy by removing the default “C:\sdsadmin\student\ftp” and replacing it with another folder. If you don’t need all 4 formats, delete the other lines.
•Save your changes, then make this batch file one of your server’s nightly tasks it runs (it should already be doing a backup each night anyway, so add this to the server’s “to do” list).
13. Once your choice is made, you are returned to the “normal” student reports window. Click the “show/hide your documents” icon piece of paper at the top right of your screen.
•The most recent report you have run will be listed at the top of the list. Click the yellow file folder under “Open”.
14. Click the “Save” button, then save your output file to your own desktop or data file on your local server - even a thumb drive – wherever you need it to be to continue using the data as it is intended.
•In the “Show/Hide Your Documents” area, all output files you create will be stored here until you delete them.
•If you need the report as you ran it back in December, just open the file dated in December.
•To delete an older file, put a check in the box at the beginning of the line, then click the “X” icon on the right side of the screen. (It is the same “X” icon you see throughout web office to delete records.)
To save the report just created for future use, follow these steps:
1. Choose the same report group from box 1 as you did in step 3 above.
2. Choose the same report from box 2 as you did in step 4 above.
3. Click the clock icon.
4. On the right is a History Library box. The report you JUST ran will be dated and time stamped “today” and within a few minutes ago. Click on this line.
5. At the top of the box, the same date and time appear in a small box. Click in this box and give the report a name (i.e. Meal Magic report).
6. Click the diskette button to the left of this box.
7. The next time you need to run this report, you’ll choose the same report group, same report, and click the clock. You will see your report name on the far right in the sort history box. Click it and everything will set up as you just did it in the steps above.
8. When you preview the report the data will be current, just the criteria for the saved report is unchanged.