 to add new records for each subject
area/department and grade level. Complete fields as follows:
to add new records for each subject
area/department and grade level. Complete fields as follows:Revised: 4/23/2018
Parent Connect can be set up to allow parents to register their student(s) online. Follow the instructions below to complete the setup for Parent Connect registration.
Subject Area Definition
Access WSO | Scheduling | Master File Changes and Code
File Entry and Changes | Application: All Entry Options | Entry Options:
Subject Area Definitions
Add subject areas to be registered for (i.e. English, Math, Science, Electives, Foreign Language
Complete these fields for online registration:
•Course Type Code – Must be only 1 character (i.e. E-Englsh, M-Math, L-Electives, etc. or 1-English, 2-Math, 3-Electives, etc.)
•Subject Area – Enter the subject area description (i.e. English, Math, Electives, Foreign Language, Fine Arts, etc.)
•School Location – Select your school location
NOTE: If you are using the Graduation Requirement report, you will already have subject areas defined. If they are 1 character Course Type Codes, you can use these for online registration. If they are more than 1 character Course Type Codes, add new Subject Areas with 1 character Course Type Codes to be used for online registration.
Course Codes Next Year
Access WSO | Scheduling | Master File Changes and Code
File Entry and Changes | Application: Scheduling (Next Year) | Entry Options = Course Codes – Next Year (All
Fields).
•Course codes must have a Dept/Curr Code assigned (i.e. M = Math). If these codes are not set up, the Student/Parents will see an empty space when they click on the drop down for course selection.
•Course codes must have a Scan Code specified (i.e. 1=Fresh 2=Soph., 12=Fresh/Soph)
•Do not enter a grade year such as 12 for seniors. The scan code should be created to identify the available grade level(s) for each course. Examples would be: 12=Freshmen and Sophomores, 34=Juniors and Seniors.
•If you have courses that students need to discuss with the counselor and gain approval before taking, do not enter a scan code or dept/curr code on these courses.
•Note: If courses are linked in the course master, the students do NOT need to select the second semester course in the drop box. To prevent the linked course(s) from showing in the selection options, do NOT enter a Scan Code on the linked course(s). For example, if the second semester of English 9 is linked to the first semester course number, do not enter the scan codes on the second semester English 9 course code.
Registration via Web Setup
Note: In this step, each registration area is set up by department and grade level. This defines the options for course selection made by the student(s).
Access WSO | Scheduling | Master File Changes and Code File Entry and Changes | Application: Scheduling (Next Year) | Entry Options = Registration via Web Setup.
Use the to add new records for each subject
area/department and grade level. Complete fields as follows:
•Grade Year - Select the appropriate current year Grade Year from the drop down.
o If your grade year contains a leading zero (i.e. 08 or 09), this MUST be included.
•School Location - Select the School Location from the drop down
•Registration Area - The Registration Area field is used to specify the order for each course to be displayed on the web registration page.
•Enter the placement number for Registration Area. If the number “1” is entered, the selected subject area will be displayed as the first option in the Parent Connect view.
•For example, view the screen display below and notice for grade_year 08, the school would like English to show as the first option for selection. The “1” was placed in the Registration Area column. Math is to be displayed as the second option for selection and a “2” is placed in the Registration Area column etc.
•Description – Enter the desired description (ie. English, Mathematics, etc.)
•Scan Code - This is a 1 character field to denote grade levels. Use 1 for freshmen, 2 for sophomore, 3 for juniors and 4 for seniors. Junior high and middle schools can use 6 for 6th grade, 7 for 7th grade, and 8 for 8th grade
•Subject Code – Use the same codes that you set up in Subject Area Definition and entered in the Dept Curr Codes field on Course Codes Next Year
•Note: Users can enter in more than one subject code per description (i.e., E - Electives and L - Language Arts i.e. E, L, M).
•If these codes are not set up, then the Student/Parents will see an empty space when they click on the drop down for course selection.
•Credits – This field is optional. Enter the number of credits for this subject, if desired.
•Max # of Registration - Enter the Maximum Numbers of Requests (course selections) a student may select for registration. For example: Grade/Year 08 students can only register for one English course. Enter "1" in the maximum number of requests column. Grade/Year 08 students may only register for two Electives. Enter "2" in the maximum number of requests column. If the entry value is not numeric then it will not be accepted.
•Registration Area Instructions - Any instructions that need to be supplied to the Student/Parents about selecting the courses should be entered in the Registration Area Instructions.
•Example: "Students must have teacher/counselor approval to request AP classes."

User Security
To “turn on” the next year registration option for
Parent Connect user, go to Administrative Utilities |Security – Application and
Data Access. If you don’t have this option, you can ask your tech to do this for
you.
In the Security – Application and Data Access screen:
Click on All Users|Security Groups
In the list of user groups on the left, click on _Parent
Scroll over to the Views section of the screen on the right
In the No Access column, in the Demographics Look & Browse Views section find the Registration (L&B) view highlighted in blue in this screen shot and click on it to select it.
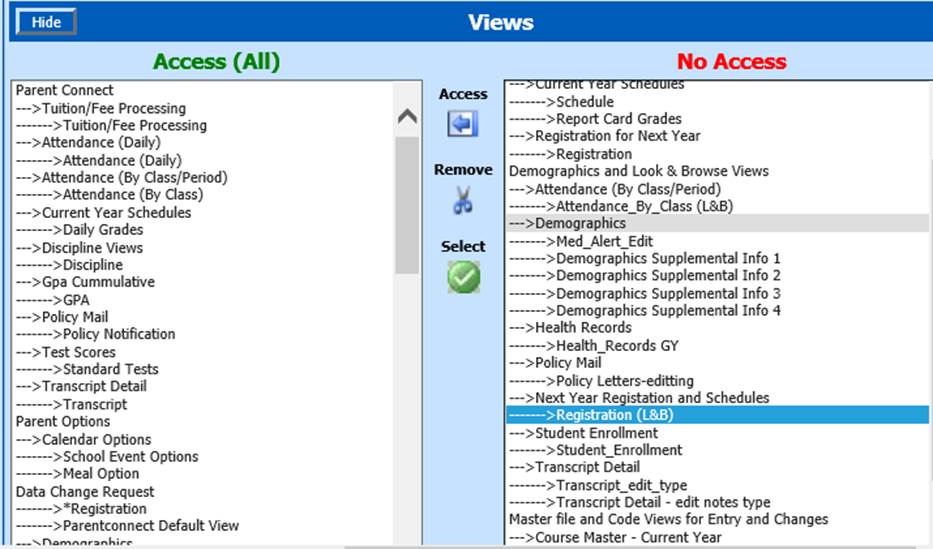
Click the Access arrow button  to move the selected view to the Access
(All) column to the left.
to move the selected view to the Access
(All) column to the left.
If you have
assigned Parent Connect passwords to your students and the students will be
entering their own registration, you will need to repeat the user
security settings listed above for the _ParentConnect Student group.
When your school is finished with registration and no
longer wants student/parents to enter registration, move the Registration
(L&B) view from the Access (All) column back to the No Access column by
clicking on Registration (L&B) in the Access (All) column in the Views area
and clicking on the scissor button .
If you want the Registration tab to display in Parent Connect, go to Administrative Utilities |Security – Application and Data Access. If you don’t have this option, you can ask your tech to do this for you.
In the Security – Application and Data Access screen:
Click on All Users|Security Groups
In the list of user groups on the left, click on _Parent
Scroll over to the Views section of the screen on the right
In the No Access column, in the Registration for Next Year Views section find the Registration view highlighted in blue in this screen shot and click on it to select it.
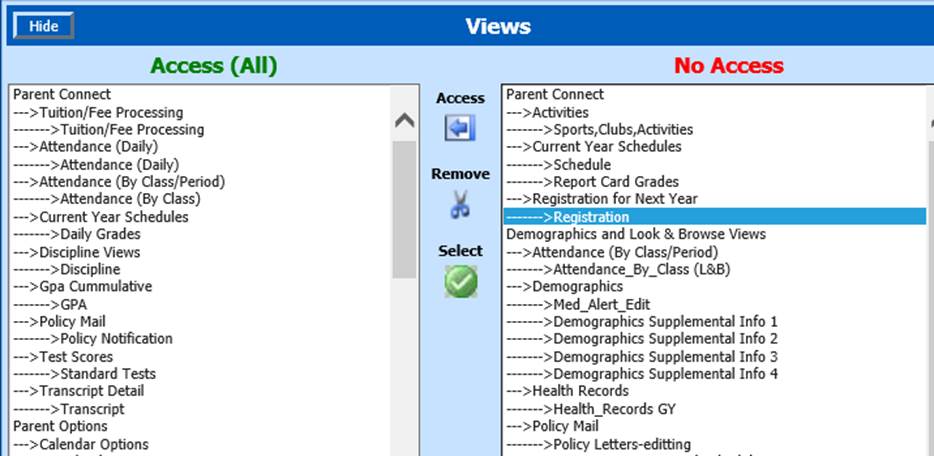
Click the Access arrow button to move the selected view to the Access
(All) column to the left.
If you have
assigned Parent Connect passwords to your students and the students will be
entering their own registration, you will need to repeat the user
security settings listed above for the _ParentConnect Student group.
When your school no longer wants the Registration tab
to display in Parent Connect, move the Registration view from the Access (All)
column back to the No Access column by clicking on Registration in the Access
(All) column in the Views area and clicking on the scissor button .
SDS Web Office Setting
Access Administrative Utilities |SDS Web Office Settings
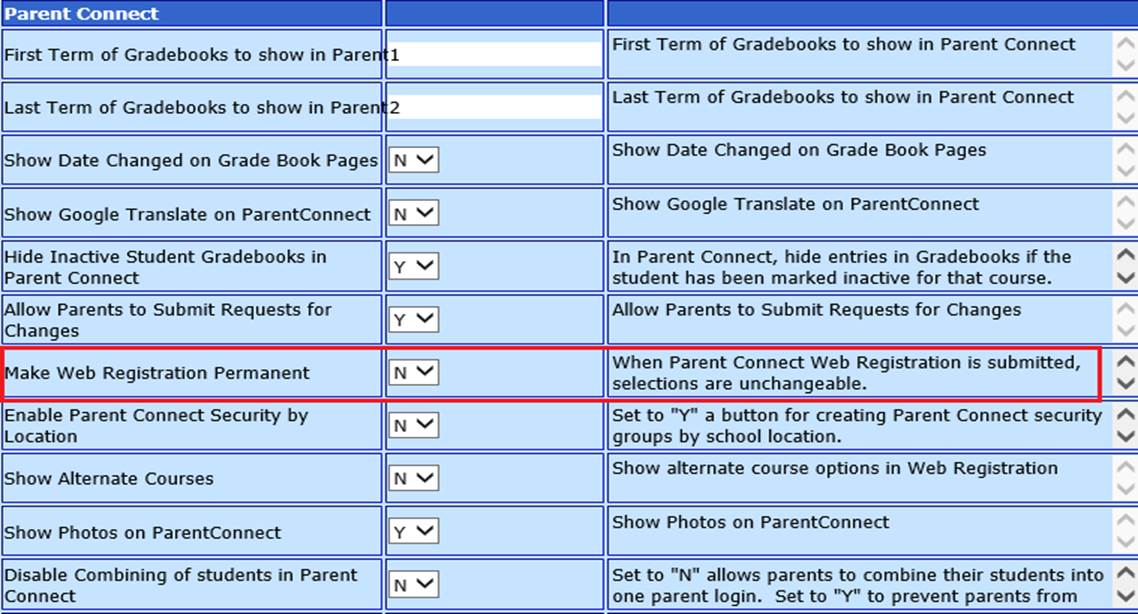
In the Parent Connect area, set the “Make Web Registration Permanent” setting as desired.
If this is set to N, parents/students will be able to make changes to registration once they have selected and submitted.
If this is set to Y, parents/students will not be able to make changes to registration once they have selected and submitted
NOTE: If the parents/students leave some areas unselected and submit, they will still be able to go back and make selections in those areas, but they won’t be able to make changes to the areas that were already selected and submitted.
Parent Connect Screen
Below is the screen that will be displayed for parents when registering their student/s for Next Year.
Notice, English shows up first, then Math, Science
etc. The screen display reflects the setup that was entered in the Registration
Area column. 
NOTE: Courses pre-registered in the office in the Next Year Registration and Schedule Changes screen will be displayed in grayed out text with an * beside the title in the Parent Connect Online screen. These registrations will not be available for changes. (See the World Literature registration in the screen shot below)
Course pre-registered in the office in the Mass Registration screen will display in the dropdown in normal text in the Parent Connect Online screen. These registrations will be available for changes. (See the Geometry registration in the screen shot below)

Guided Course
Selection
The setup of online registration also provides the option for Guided Course Selection in Scheduling |Next Year Registration and Schedule Changes. (See screen shot below) Clicking this will open the same screen as shown above. This is particularly useful to a counselor if they have a student in their office they are helping with registration.
