Revised 10/2/2018
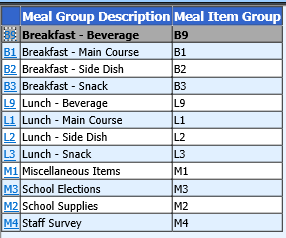
The first step in setting up to use the Meal and Miscellaneous Count Planner is to set up Meal and Miscellaneous Groups. Examples of groups are displayed in this screen shot.
The above are just suggested groups. You may set up whatever groups fit your needs. Count items will be set up for each of these groups in
Follow the instructions below to set up Meal and Miscellaneous Groups.
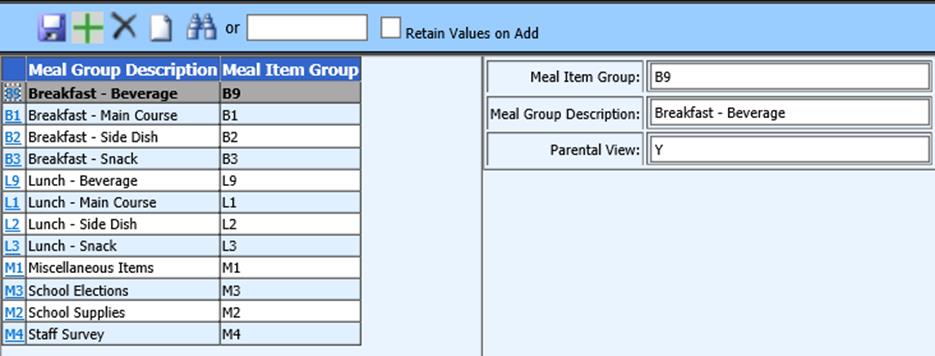
1. Select Data Entry and Changes |Master File and Code Entry and Changes
2. Select Meal Codes from the Application dropdown at the top of the page; select Meal and Miscellaneous from the Entry Options dropdown box.
3. Click
 to add a group.
4. In the boxes on the right enter:
o Meal Group Number: The limit is two characters.
o Meal Group Description: For example: “breakfast”, “lunch”, “elections”, “supplies” (In step 2, you will identify specific items).
o Parental View: If using Parent Connect, schools can show the calendar and menu. If you do not want a particular group to be viewable on parent connect then enter “N” in that field. If it is to be viewed on parent connect enter “Y”.
o Click to  save.
save.
§ Continue adding groups until you have the groups you will need. Additional groups can be added at any time as the need arises.
The rest of the Meal and Miscellaneous Count Planner steps for setup and use can be accessed via the buttons below.