Revised 10/2/2018
Below are the steps on how to create a menu for each calendar date. Teachers will be able to view the current day’s items when clicking on the Meal Counts button in Teacher Web.
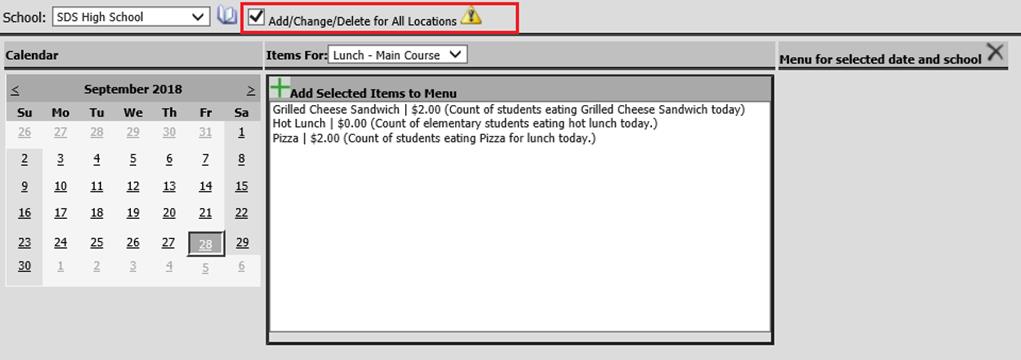
1. Click on Processing Center |Meal and Miscellaneous Count Planner
2. Select a School Location
o Note: If all locations will have the same menu setup you can manage the menu planner for all locations. Put a check in the box titled “Add/Change/Delete for All Locations”
3. Choose the date on the calendar by navigating to the correct month and clicking on a date. The selected date will highlight.
4. In the box "Items for", choose an item from your Meal and Miscellaneous Count Groups. The Menu Items for that group will appear on the list below.

5. Click on the menu items you wish to add to the selected date. Multiple items may be selected by holding down the Ctrl key on your keyboard as you click items.
6. Click
 to add these items to the menu for the
selected date.
to add these items to the menu for the
selected date.
7. To add
additional count items from another Meal and Miscellaneous group, choose the
group in the “Items for” dropdown and then highlight the items you wish to add
and click the to add the items to the selected date.
8. Continue adding menu items until your menu/count items for the date listed to the right is complete.
9. If you
selected an item and wish to remove it from the list, check the box to the left
of the item and click  to remove all checked items.
10.  = Clicking on this icon will clear all
selected items for the month.
= Clicking on this icon will clear all
selected items for the month.
The rest of the Meal and Miscellaneous Count Planner steps for setup and use can be accessed via the buttons below.