SAM is a program in Web School Office that will track,
analyze and chart the progress of your students' test results from year to year.
This is a POWERFUL tool!
With the unique analysis capabilities for
S.A.M., you will be able to sort and sequence your analysis by discipline codes,
attendance records, grades or any other data within SDS. This program is the
simple analytical connection between your standardized test scores, curriculum,
and school improvement. When new scores arrive, you simply put in the memory
card/CD or access the file over the Internet and select import. The SDS system
then automatically imports the new data and analysis away! You can even simply
create QUICK analysis CHARTS or GRAPHS with your data!
Create a New Test Definition
Step #1
•Click Import Test Data
•Click the icon next to Testing Instruments
(Hover over icon it reads “Activate the create new testing instrument”). Click
OK after reading the message. 
•Enter the name of the new test under New Testing Instrument Name.
•Click the green + to save the new test.

•A new format will appear on the bottom left grid.
Step #2
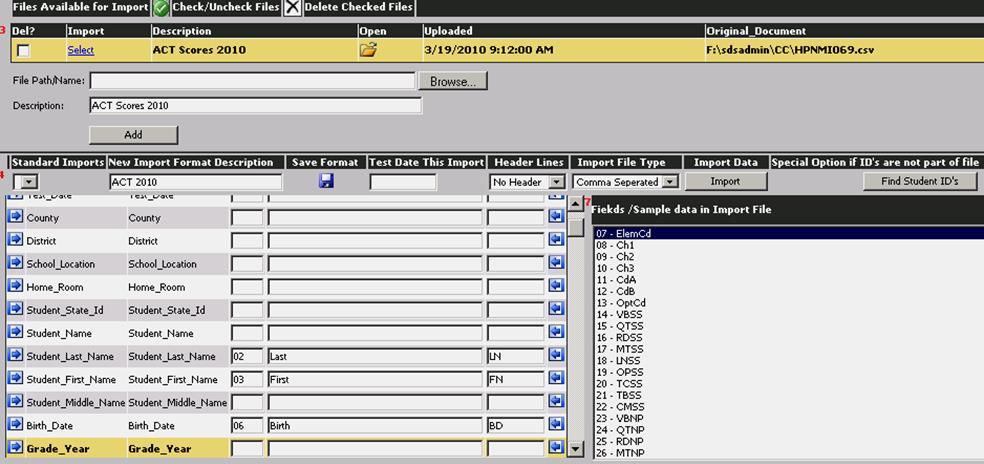
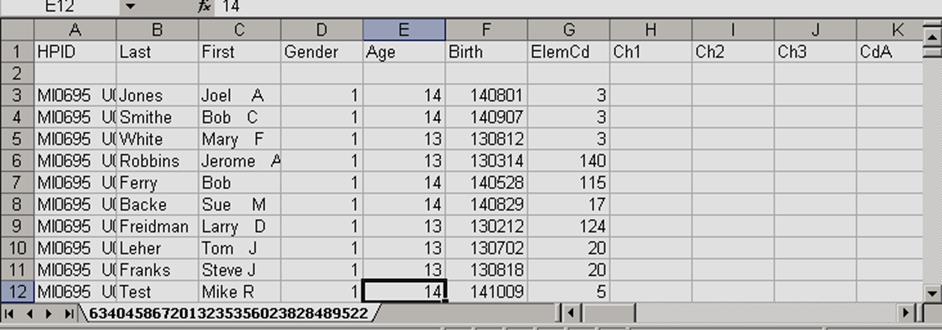
•Click the Browse button. Navigate to the csv file that contains the new test information to be imported, highlight the file and click the folder icon under “Open”.
•Type a description of the file found in the previous step into the Description box.
•Click the ADD button.
A new line will appear above
next to the #3 creating a link to your file. To view the csv file, click the
file folder to open the file in Excel. If you want to make changes to the file
before importing to SAM, exit SAM and open the csv file in Excel. Make any
necessary changes and then save the file in Excel. 
•When you are ready to set up the import template from this file, click the blue select link to load the file to the screen on the right hand side.
Note: You must match the Id_Number field in order to import data. If you match the ID Number proceed to Step #3. If the Id Number field is not available in the file being imported, a special process is available to look up the ID Number using the student name and birth date. This process follows in bold type.
•On the right hand side, locate the fields containing the student’s last name, first name and birth date. Match each of these fields to the corresponding field on the left side by highlighting a field and then clicking the arrow (on either side) of the field from the SDS test score table on the left.
•For the fields you have matched, type the following codes into the box in column “Import If”: LN (last name), FN (first name) and BD (birth date).
•Click “Find Student IDs” on the right. You will see a Green message in the lower left of the screen “Please Wait”. A message will appear indicating the number of students that were matched.

•This process creates a new data file
that is now listed below the file on the screen next to #3. If you click the
file folder under “Open” you will see this new file in Excel with the student id
numbers and a combined student name in new fields at the end of the
file. 
•You will probably have to edit this file if not all student names and birth dates found a match in SDS demographics. You can key in any missing id numbers and remove any students that are no longer in your SDS database.
•If you have made changes and wish to import the updated file then follow these steps:
o Save your edited file with a new name to your local workstation.
o Return to step #2 and import this new file.
•If you did not make changes then you may simply import from the new file. Select the blue link to load the new file to the screen on the right hand side and continue with Step #3.
Step #3
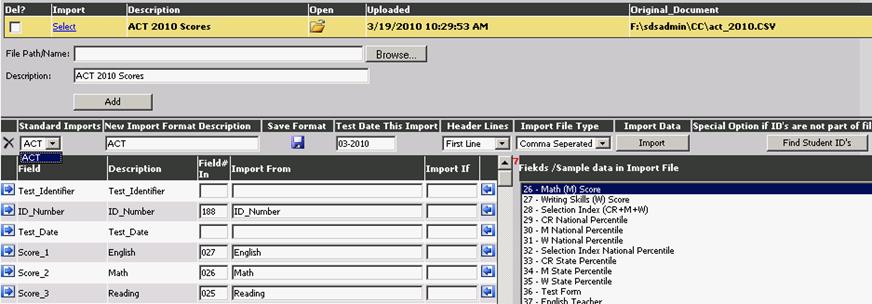
•Type in the test date for the data to be imported in the test date box.
•Click the dropdown to indicate if there is a header record and its’ position in the data file by selecting one of the options provided. There are 3 options: No header, First Line, Second Line, Third Line. A header record has the name of each field stored in the file.
•Click the dropdown to indicate the file format of the data file. There are 2 options, comma separated and tab separated. Files with the extension of .csv are comma separated. Other files should be loaded in Notepad to check if the data is separated by commas or spaces. Spaces would indicate a tab separated file.
•Match each field from the right hand side that contains the numbered fields by highlighting a field and then clicking the arrow (on either side) of the field from the SDS test score table on the left.
•Match the scores that you want to import to the score_ fields (there are 100 score fields) on the left. A description of each score will be added to the template as you match the scores themselves.

•Once the matching is done, click on Save Format. You will see a Green message in the lower left of the screen “Please Wait”. A message will appear that says “Your import layout has been saved”.
Importing the Data
Now you have a layout to use to import your test
data.
•Go back to #3 on the screen and click the blue select to reload the data file to import.
•Under #4 on the screen select your newly created Standard Import layout from the dropdown.
•Make sure that all of the dropdowns
described above are set correctly for this file before importing: Test Date,
Header Lines, Import File Type. 
•Click Import. You will see a Green message in the lower left of the screen “Please Wait”. When the import is complete, a message will appear indicating the number of students imported.