Revised: 05/2022
Student Course Assignment Report Data Elements: student_course_asmt.pdf (isbe.net)
This file format pertains to
the data submitted to ISBE SIS when submitting information for Student Course
Assignments. The Home School District is the only entity allowed to submit
Student Course Assignment data in the ISBE SIS.
You should have already imported the state course codes into SDS. If you have not done so, please refer to Student Help Console for instructions on matching your SDS course codes to state course codes.
COURSE CODES:
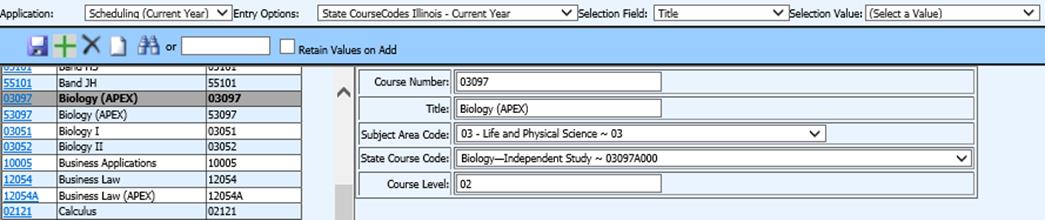
•Each course code should also have a course level (Rigor Level) assigned. This can be entered from menu Data Entry & Changes |Master File and Code File Entry and Changes, Application “Scheduling (Current Year)”, Entry Option “State Course Codes Illinois-Current Year”.
Course Level Codes to be used are:
01 Remedial
02 General
03 Enriched
04 Honors
COURSEMASTER:
•A course setting must be included on the course master. This can be entered from menu Data Entry & Changes |Master File and Code File Entry, Application “Scheduling (Current Year)”, Entry Option “Course master – Current Year (All Fields)”.
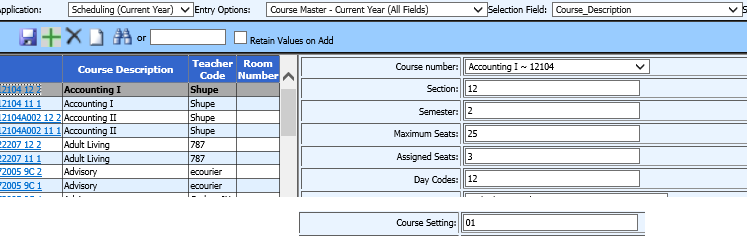
Course
Setting Codes to be used are:
01 Traditional School Day Program
02 Night or After School
03 Online Learning (Internet based)
04
Distance Learning (Not Internet based)
05 Alternative Placement
Settings
06 Other Education Setting
•Also in this screen, the state codes for Term must be entered in the Term_SR field. Codes to be used are:
o Y1 Year Long classes
o Y2 Year Long Summer classes
o S1 Semester 1 classes
o S2 Semester 2 classes
o S3 Semester Summer classes
o T1 Trimester 1 classes
o T2 Trimester 2 classes
o T3 Trimester 3 classes
o T4 Trimester Summer Classes
o Q1 Quarter 1
o Q2 Quarter 2
o Q3 Quarter 3
o Q4 Quarter 4
o Q5 Quarter Summer
MARKING PERIOD GRADE CODES:
•Enter the course completion status for each letter grade. Use menu Data Entry & Changes |Master File and Code File Entry, Application “Grade Reporting”, Entry Option “Marking Period Grade Codes”. Enter the status code in field “State Pass Fail Code”.

Codes
to be used are:
Course Completion Code / Letter Grade
01 A+
02 A
03 A-
04 B+
05 B
06 B-
07 C+
08 C
09 C-
10 D+
11 D
12 D-
13 F
14 S
15 U
16 I
17 W
18
WP
19 AUDIT
20 Student waived from course requirement. Student did
not receive course term credit. Student did not receive final grade.
21 Above Average - Student’s performance exceeds standards. (Grades K-8
only)
22 Average - Student’s performance meets expectations. (Grades K-8
only)
23 Below Average - Student’s performance was below expectations.
(Grades K-8 only)
24 P - Student was promoted at end of term. (Grades
K-8 only)
25 R - Student was retained at end of term. (Grades K-8 only)
26 N - Student did not complete the term. (Grades K-8 only)
27
Exceptional
28 Meets Standard
29 Approaching Standard
30 Below
Standard
31 Student has completed course (Pre-K only)
99 Erroneous
•Enter the final grades for the semester and calculate GPA. This will post all of the mandatory report information that was entered to SDS course codes and course master to the students’ transcript records.
•Note: A check box was added to the GPA Calculation to accommodate Elementary school classes to allow for posting of classes that do not have a final grade but need to be reported. The exit_date and credit fields will be blank on the transcript record for courses with no grade per state requirement.

In order for the class to post to transcript the following must be in place:
•Grade Area Setup must include a Final Grade area for the school location
•The class must have a Final Grade Marking Period assigned in the Course Master (to match the grade area above)
•Graded field in the Course Master set to “”Y”
It is likely that you will not want to retain these records
in Transcript_Detail after the report is run. To remove them simply uncheck the
box “Post classes to Transcript with NO Final Grade Entered” and check the box
“Clear Current Year Transcript records before Compute”. Then click “Calc GPA
& Honor Roll” button to post only those classes with
grades.
To run the report
Go to menu:
Processing Center | Data Exchange State and Federal Reporting. Select the
“Student Course Assignment” report from the dropdown. Many fields will already
be matched for you. Match those that are not and ignore the fields that are
indicated as “Placeholders”. The latter are not required for the submission but
hold a blank space in the file.
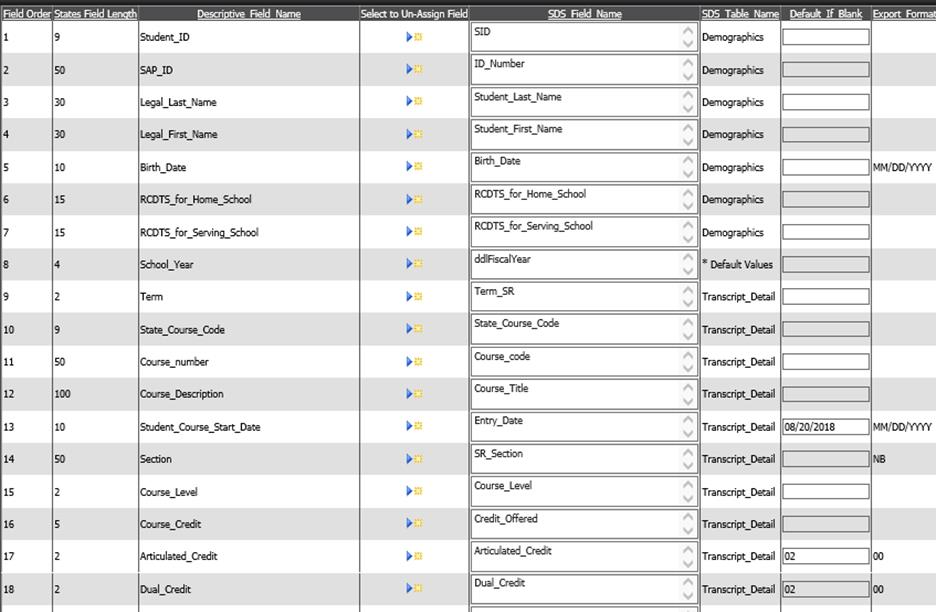
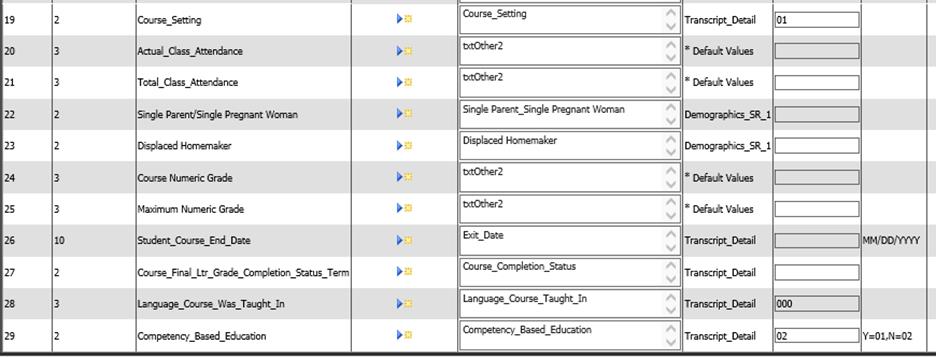
o The Course_Credit field (see field 16 in the screen print below) should be matched to Credit_Offered in Transcript_Detail. The term credit available to be earned in the course is posted from the Course Master to this field during GPA calculation.
o The Articulated_Credit field is no longer required but the field remains in the file layout and any data entered to that field will simply be ignored on upload to the state.
•Listed below are other fields that are posted to transcript during GPA calculation with the table of origin in parentheses.
o State_Course_Code (Course Codes)
o Entry_Date (first date of the first term the class meets as transcript Entry Date unless the student has a later Entry Date in Schedules)
o Course_Setting (Course Master)
o Course_Level (Course Codes)
o Exit_Date (the last date of the last term the class meets as transcript Exit Date unless the student has an earlier Exit Date in Schedules) This date will fill in automatically from the transcript table once a final grade is awarded, so there is no need to put a date in “Default if blank”. Note: There should NOT be an exit date in the “Default if blank” when submitting courses at the start of the term, before final grades/course completion status is determined. Submitting courses at start of semester with an exit date will cause an error because any course with an exit date is expected to have a final grade, course completion status.
o Course_Completion_Status (Grade Codes)
o RCDTS_for_Serving_School (Course Master) Be sure to put your home school RCDTS in the “Default if Blank” column.
Complete the Basic Report
Information
o Complete all the boxes with the appropriate information that is not already showing.
o If you will be limiting the records to include in the report to a specific school location, select that location from the dropdown box in the upper right corner. If your Security setup restricts you to one school location, that will be the only one in the dropdown.
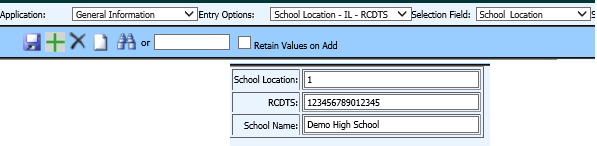
o Note: A new feature has been added to pull the RCDTS code to the screen to a single RCDTS box. A school location must be selected for this to happen. Also, the RCDTS must be entered in the Master File and Code File Entry and Changes under General Information. The RCDTS can also be keyed in to the box on the screen and saved with the report if preferred.
•Click the Save Report Changes button to save changes made to the report setup. NOTE: This button will also save the "Other Values 1-6" and the matches you have made of SDS fields to the report fields. These changes are saved for the report and school location if one is selected.

•The current school year will be set as shown in the dropdown next to "Transcript Sch Year" in the lower right of the screen above. Key the "Transcript Semester" in the box below the school year. This will be saved the next time the report is run.
•If further record selection is needed (i.e. selecting one grade level), follow this process. NOTE: There is no need to include the school location, school year or semester in your selection. The selections made above will do this automatically.
o Click the Data Selections Option (A to Z) button at the top of the screen.
o Setup and save record selections as desired.
o To include only current students, click the blue link “Adjust Selection to Include Only Active Students”.

•Create your export file
o Follow these links for instructions:
o http://help.schooloffice.com/StudentHelp/#!Documents/createthereport.htm
o http://help.schooloffice.com/StudentHelp/#!Documents/savethereport.htm