 to add the test entry records
needed for the date selected to enter student test scores.
to add the test entry records
needed for the date selected to enter student test scores. Revised 6/12/2018
In Data Entry & Changes|Student
Information Changes (Horizontal), the Testscore Entry Options data entry view
allows you to add, change and delete test scores.
Prior to adding test scores in this area, test score definitions should be set up in the Data Entry & Changes Master File and Code File Entry area. For instructions on setting up test score definitions,
1. Enter WSO and select from the menu |Data Entry and Changes |Student Information Changes (Horizontal Entry) |Entry |Test Scores Entry.
2. Select your test sort options = School, Grade, Test, Display all Dates or Select/Enter a test date.
3. Click to add the test entry records
needed for the date selected to enter student test scores.
o Important Notes:
§ To enter a test for only 5 students for
example; create tests for all students in the school and grade. Enter the scores
for the 5 students, and then click  to save. Follow the instructions in step 4
below to delete the tests for students with no scores.
to save. Follow the instructions in step 4
below to delete the tests for students with no scores.
§ You can have more than one of the same tests for a student as long as each test is set for a different test date.
§ Notice you can change the “First Field to Edit” for ease of entry.
§ Also be aware that you can click on the dropdown arrow under “Sort by” to sort on different fields. Along those same lines you can select the ascending or descending radio button for further sorting features.
4. You must click once you have
entered test scores. If you don’t, your work will not be saved.
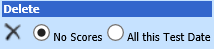
o Important Notes:
§ If you create tests that you do not
want, choose to delete only those with No Scores or All this Test Date and click
the  button.
5. The
button in the
below screen shot can also be used to delete individual test scores.

•Checkmark the records you wish to delete as shown and click the

•To undo individual deletions made in this method, click the  button.
•The Undo Option allows the restoration of deleted records for up to 30 days.
•Make selections in the Undo Options screen. 
•Click the 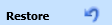 to restore.
•Important notes
o If only one record is chosen
to restore, only that record will be displayed after clicking the button. The ID box at the top of the
screen will be focused to that student’s id number. 
o Remove the id number and click
the  to refresh the screen to
display all students for the selected test.
to refresh the screen to
display all students for the selected test.