
The Tuition and Fee Processing Module requires the setup of 3 different types of codes.
•Charge Type Codes
•Department Codes
•Payment Codes
Each of these code types and how to set them up are explained below.
Tuition/Student Fees Charge Type Code
This code defines the types or categories of the individual charges. It is used on the actual charges you’ll create in a later section. To access this screen, go to Data Entry and Changes| Master File and Code File Entry and Changes. In the Application dropdown, select Tuition/Student Fees. In the Entry Options dropdown, select Tuition/Student Fees Charge Type Code.
1. To add a new code, click  .
.
2. Fill in the following fields:
a. Type code: Enter a 1-character code to represent a type of charge. This is a broad representation, not specific.
b. Description: Words used here print on various reports to specify what the 1-character code represents.
c. School location: Enter “ALL” if the code will be shared by all buildings in your district. Otherwise enter the school’s specific code.
d. Payment Priority: if a charge of this type should be paid “first” (with priority), enter a 1. Enter a lesser number if you do not expect this type of item to be paid with priority. This field may be left blank. Note: This feature was added specifically for Indiana schools to prioritize which types of charges received payment first without having to specifically select those items in the payment screen.
3. Click  to save.
4. To change a code, click on the blue number at the beginning of the line.
5. Edit the information on the right side of the screen.
6. Click to save.
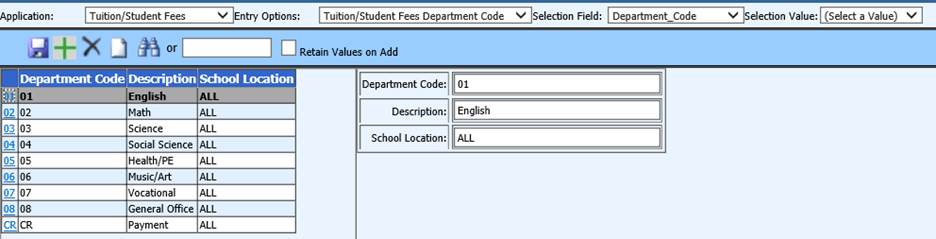
Tuition/Student Fees Department Code
This code defines the department who will receive the money
from the charges and payments. This code is used on the actual charges you’ll
create in a later section. To access this screen, go to Data Entry and
Changes| Master File and Code File Entry and Changes. In the Application
dropdown, select Tuition/Student Fees. In the Entry Options dropdown,
select Tuition/Student Fees Department Code.
1. To add a new code, click the .
2. Fill in the following fields:
a. Department code: Enter a 2-character code to represent a department.
b. Description: Words used here print on various reports to specify what the 2-character code represents.
c. School location: Enter “ALL” if the code will be shared by all buildings in your district. Otherwise enter the school’s specific code.
3. Click to save.
4. To change a code, click on the blue number at the beginning of the line.
5. Edit the information on the right side of the screen.
6. Click to save.
Tuition/Student Fees Payment Code
This code defines the types of payments (or
credits) received from students and parents. This code is used while
entering payment information. To access this screen, go to Data Entry
and Changes| Master File and Code File Entry and Changes. In the
Application dropdown, select Tuition/Student Fees. In the Entry Options
dropdown, select Tuition/Student Fees Payment Code.
1. To add a new code, click the .
2. Fill in the fields.
a. Payment code: Enter a 2-character code to represent a type of payment.
b. Description: Words used here print on various reports to specify what the 2-character code represents.
c. School location: Enter “ALL” if the code will be shared by all buildings in your district. Otherwise enter the school’s specific code.
3. Click to save.
4. To change a code, click on the blue number at the beginning of the line.
5. Edit the information on the right side of the screen.
6. Click to save.