Select this recipient type. The screen will then display a list of other staff members and their email addresses to allow you send messages to them through SDS.

Revised 4/13/2020
In the Web School Office menu tree, open Look and Browse and click on E-mail Center.
1. Choose either
PARENT OR
STUDENT
Select this recipient type. The screen will then access
the E-Mail field in your demographics table to select recipients.
OR
STAFF
MEMBER
Select this recipient type. The screen will then display
a list of other staff members and their email addresses to allow you send
messages to them through SDS.
We will first look at the Parent or Student options.

Choose a saved selection from the Load Saved Selection dropdown or proceed to 2.
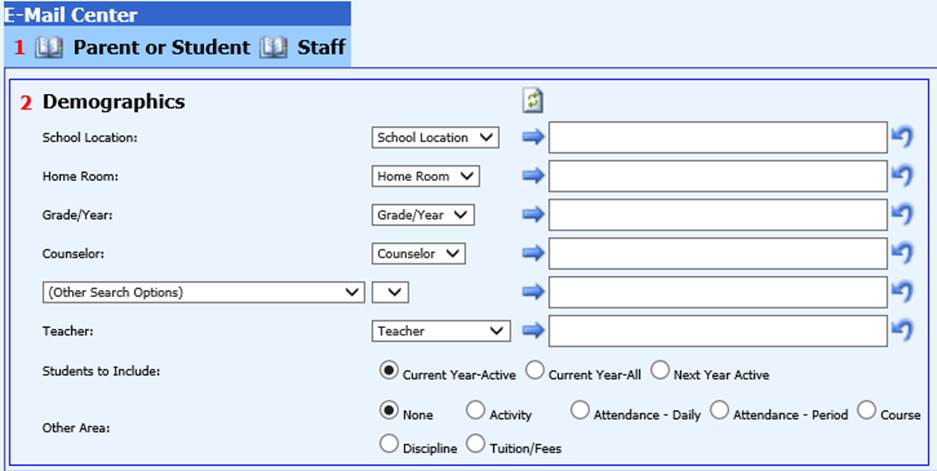
2. The Demographics section may be used to select students by demographic field values.
§ Select a value from a dropdown and click
the blue arrow button  to move the value to the right hand
box.
to move the value to the right hand
box.
§ Multiple values may be chosen from the
dropdown, if desired. Simply choose a value from the dropdown and click
the arrow . The value will appear in the right hand
box. Then choose another value from the dropdown and push the
arrow . You will then see both values in the
right hand box.
§ The  button can be used to clear all values
from the right hand box.
button can be used to clear all values
from the right hand box.
§ The (Other Search Options) dropdown allows you to set up a selection on any of your demographic fields.
§ The Teacher field allows you to select a teacher to e-mail students/parents in that teacher’s classes.
§ Students to Include: Indicate if you want current year students who do not have exit dates, All Current year students with or without exit dates, or Next Year active students.
§ Click the refresh button  to apply your demographic selections. The
students meeting your selections will display in number 3. below.
to apply your demographic selections. The
students meeting your selections will display in number 3. below.
§ The Other Areas allows you to set up selections in the other areas listed.

2b. When selecting one of the Other Areas options, a new selection screen will open in 2b. We will review each of these different selection screens.
Activity
This area may be used to select students involved in specific activities during a specified date range.

§ Setup the desired activity date range by selecting beginning and ending dates from the Activity Date dropdowns.
§ Select an activity from the Activity
dropdown and click the blue arrow button  to move the value to the right hand
box.
to move the value to the right hand
box.
§ Multiple values may be chosen from the
dropdown, if desired. Simply choose a value from the dropdown and click
the arrow . The value will appear in the
right hand box. Then choose another value from the dropdown and push the
arrow . You will then see both values in the
right hand box.
§ The  button can be used to clear all values
from the right hand box.
button can be used to clear all values
from the right hand box.
§ Click the refresh button  to apply your selections. The
students meeting your selections will display in number 3.
to apply your selections. The
students meeting your selections will display in number 3.
Attendance – Daily
Use this area to setup a selection for students’ daily absence records during a specified date range.

§ Setup the desired date range by selecting beginning and ending dates from the Absence Date dropdowns.
§ If desired,
make selections from the Attendance Code, Excused Code, Other Code, & Misc.
Group dropdowns and click the blue arrow button to move the value to the right hand box
for each.
§ Multiple values may be chosen from each
dropdown, if desired. Simply choose a value from the dropdown and click
the arrow . The value will appear in the right hand
box. Then choose another value from the dropdown and push the
arrow . You will then see both values in the
right hand box.
§ Click the refresh button to apply your selections. The
students meeting your selections will display in number 3.
Attendance – Period
Use this area to setup a selection on students’ period absence records during a specified date range.

§ Setup the desired date range by selecting beginning and ending dates from the Absence Date dropdowns.
§ If desired,
make selections from the other dropdowns and click the blue arrow
button to move the value to the right hand box
for each.
§ Multiple values may be chosen from each
dropdown, if desired. Simply choose a value from the dropdown and click
the arrow . The value will appear in the right hand
box. Then choose another value from the dropdown and push the
arrow . You will then see both values in the
right hand box.
§ Click the refresh button to apply your selections. The
students meeting your selections will display in number 3.
Course
This area may be used to select students scheduled into specific courses.

§ Make selections as desired in the
Course, Period, & Semester dropdowns and click the blue arrow
button to move the value to the right hand box
for each.
§ Multiple values may be chosen from each
dropdown, if desired. Simply choose a value from the dropdown and click
the arrow . The value will appear in the right hand
box. Then choose another value from the dropdown and push the
arrow . You will then see both values in the
right hand box.
§ Click the refresh button to apply your selections. The
students meeting your selections will display in number 3.
Discipline
This area may be used to set up selections from students’ discipline records.

§ Setup the desired date range by selecting beginning and ending dates from the Infraction Date dropdowns.
§ Make selections as desired in the
Infraction Code and Penalty Action dropdowns and click the blue arrow
button to move the value to the right hand box
for each.
§ Multiple values may be
chosen from each dropdown, if desired. Simply choose a value from the
dropdown and click the arrow. The value will appear in the right hand
box. Then choose another value from the dropdown and push the
arrow . You will then see both values in the
right hand box.
§ Click the refresh button to apply your selections. The
students meeting your selections will display in number 3.
Tuition/Fees
Use this area to set up selections from students’ tuition/fee processing records.

§ Setup the desired date range by selecting beginning and ending dates from the Fee Date dropdowns.
§ Make selections as desired in the Fee
Code, Fee Type, and Department dropdowns and click the blue arrow
button to move the value to the right hand box
for each.
§ Multiple values may be
chosen from each dropdown, if desired. Simply choose a value from the
dropdown and click the arrow . The value will appear in the
right hand box. Then choose another value from the dropdown and push the
arrow . You will then see both values in the
right hand box.
§ Make desire selection in the Balance dropdown
§ Click the refresh button to apply your selections. The
students meeting your selections will display in number 3.
After creating a selection, you can save it for future use. At the top of the screen, type a name for the selection in the Save Selection As: box and click the floppy disk button to save. When you wish to use this selection in the future, you can simply choose it from the Load Saved Selection dropdown.
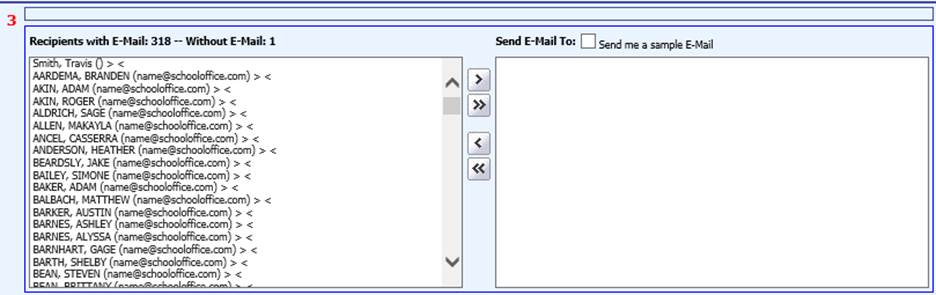
3. E-mail Recipients
Checkmark the e-mail addresses you want your e-mail to go to.

The big box on the left displays the students who met the criteria from selections set up in 2a and 2b.
§ If you wish to send your e-mail to all students listed in
the box, click the  button to move all the names to the
Send E-mail to: box on the right.
button to move all the names to the
Send E-mail to: box on the right.
§ If you wish to select specific students in the list on the
left to send the e-mail to, highlight those students by clicking on them and
click the  button to move the selected names to the
Send E-mail to: box on the right. NOTE: You can select
multiple students by holding down on the Ctrl key on your keyboard as you click
names.
button to move the selected names to the
Send E-mail to: box on the right. NOTE: You can select
multiple students by holding down on the Ctrl key on your keyboard as you click
names.
§ The  button can be used to remove all names
from the Send E-mail to: box, if necessary.
button can be used to remove all names
from the Send E-mail to: box, if necessary.
§ If you desire to remove selected names from the Send
E-mail to: box, highlight those students by clicking on them and click the
 to remove the highlighted names.
Checkmark the Send me a Sample E-mail box to send yourself a sample e-mail prior to sending the e-mail to the recipients. After creating the e-mail and clicking the Send E-mail button, the e-mail will be sent only to you to preview before sending to students/parents.
4. Create the E-mail

From
Your name and e-mail address displays in this area. This is pulled from your user code set up in the Master Code File Entry area. If you wish to receive a carbon copy of the e-mail, checkmark the CC box.
Subject
Select a preset selection from the dropdown or type your own subject in the box below the dropdown
Message
Select a preset message from the dropdown or type your own message in the box below the dropdown.
Attachment
If desired, you can add an attachment to your e-mail. Click the Browse button to find and select the desired file to attach.
To remove an attachment, click the X button below the Browse button
5. Send the E-mail
Click the Send E-mail button to send your e-mail.

§ If you had check marked the Send Me a Sample E-mail box, the e-mail will be sent only to you. You can check it and then make changes, if desired. When ready to send it to the selected e-mail recipients, go back and uncheck the Send Me a Sample E-mail box. Then send the e-mail again.
Now we will look at the Staff options.
1. Choose Staff at the top of the E-mail Center.

2. Select a staff group from the Staff Groups dropdown.

3. E-mail Recipients
The big box on the left displays the teachers in the staff group selected in 2.

§ If you wish to send your e-mail to all teachers listed in
the box, click the button to move all the names to the
Send E-mail to: box on the right.
§ If you wish to select specific teachers in the list on the
left to send the e-mail to, highlight those teachers by clicking on them and
click the  button to move the selected names
to the Send E-mail to: box on the right. NOTE: You can select
multiple teachers by holding down on the Ctrl key on your keyboard as you click
names.
button to move the selected names
to the Send E-mail to: box on the right. NOTE: You can select
multiple teachers by holding down on the Ctrl key on your keyboard as you click
names.
§ The button can be used to remove all names
from the Send E-mail to: box, if necessary.
§ If you desire to remove selected names from the Send
E-mail to: box, highlight those teachers by clicking on them and click
the  to remove the highlighted names.
Checkmark the Send me a Sample E-mail box to send yourself a sample e-mail prior to sending the e-mail to the recipients. After creating the e-mail and clicking the Send E-mail button, the e-mail will be sent only to you to preview before sending to students/parents.
4. Create the E-mail

From
Your name and e-mail address displays in this area. This is pulled from your user code set up in the Master Code File Entry area. If you wish to receive a carbon copy of the e-mail, checkmark the CC box.
Subject
Select a preset selection from the dropdown or type your own subject in the box below the dropdown
Message
Select a preset message from the dropdown or type your own message in the box below the dropdown.
Attachment
If desired, you can add an attachment to your e-mail. Click the Browse button to find and select the desired file to attach.
To remove an attachment, click the X button below the Browse button
5. Send the E-mail
Click the Send E-mail button to send your e-mail.

§ If you had check marked the Send Me a Sample E-mail box, the e-mail will be sent only to you. You can check it and then make changes, if desired. When ready to send it to the selected e-mail recipients, go back and uncheck the Send Me a Sample E-mail box. Then send the e-mail again.
E-mail and Message Maintenance
Users can use this area at the bottom of the E-mail Center to view and manage their sent e-mails as well as messages from other staff sent via the Message Center.
§ Click the Refresh button to update the displayed list.
§ Click Sent E-mails to view the list of e-mails you have sent
§ Click Messages to view the list of Message Center messages sent to you from other staff members
§ Click Read to read a sent e-mail or message
§ Click the checkbox to select a sent e-mail or message
§ Click the Delete button to delete selected sent e-mails or messages
§ Click the Mark as Read button to mark selected sent e-mails or messages as read.