Revised: 4/2021
Finance Look and Browse,
allows you to search for account numbers and the detail activity associated with
the account. The detail activity for the account may also be viewed for prior
year(s). This area is a way to quickly access all areas associated with the
account; Accounts Payable, Cash Receipts, Journal Entries, Purchase Orders,
Employee Contracts, PR Detail, AR Invoices, and any Documents added for that
account. Sorting and filtering on different accounts and dimensions allows to
you see what you need quickly. Users can also print various reports regarding
the account for reference.
To view account information:
1. Open Look and Browse
2. Select Finance Look and Browse
3. Select the Accounts button
4. To search for an account(s) with the Option Menu:
•Find by Account: enter partial or full account number. When entering a partial account number, a list will display of all available options with the criteria you entered.
•By Description: enter a partial or full account description. When entering a partial account description, a list will display of all available options with the criteria you entered.
•Find by PO or Invoice: Select PO or Invoice; enter a partial or full PO or Invoice number. When entering a partial PO or invoice number a list will display of all available options with the criteria you entered. Select the Only Open Purchase Orders box if applicable.
5. Select the Search box or Enter.
•A total of 50 items per page will display, if you have more than 50 accounts matching your criteria, you will have navigation arrows and a Page number drop down.


6. Once you’re done searching, select the account to view.

•An information grid will display.

7. Select Expanded List to Display your information in a horizontal grid view. This is especially useful when searching partial account numbers for a list of all multiple accounts with detail information on each account, EI; Salary Accounts. Sorting is accomplished by select a title in the grid; Example: select Account Description to view accounts alphabetically.


8. Searching may also be done alphabetically by using the alpha search.
9. Select the first letter of the Account Description all accounts beginning with that letter will display.
10. Select All to Display All accounts.
11. Select the Account Number to display.


12. Select Options may be used to narrow your search.
13. To activate, select the + sign next to Selection Options

14. Show Balance Sheet Accounts, select to show only Balance Sheet Accounts.
15. Show Revenue Accounts, select to show only Revenue Accounts.
16. Show Expense Accounts, select to show only Expense Accounts.
17. Show Account Dimension Filter. Select to filter your search for accounts by dimension or limit your view by dimension. The Account Dimension Filter is a series of Dimension boxes which can be used singly or as a group.
•Examples, to find or limit your view to all 400 Objects, enter a 4 in the Object box. Hit enter to apply the search. All 400-499 are available for viewing. To further limit the search, enter 41 in the Object box. All 410-419 are available for viewing. To limit the view to a fund, enter a Fund Dimension with an Object dimension to see all selected dimensions within a fund.
•To clear and close the Account Dimension Filter select Show Account Dimension Filter again.

18. Clear Filters, select Clear Filters to Clear ALL filters.
19. Active Accounts, select to display only active accounts.
20. Inactive Accounts, select to display only inactive accounts, All Accounts, select to display all accounts
21. Show Reporting Dates, Displays Report Date Range boxes (defaults to Current Fiscal Year)
22. You have the option to check Ignore if zero and no budget to exclude those accounts from the display.
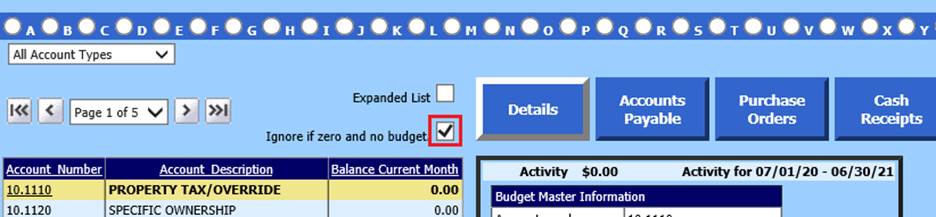
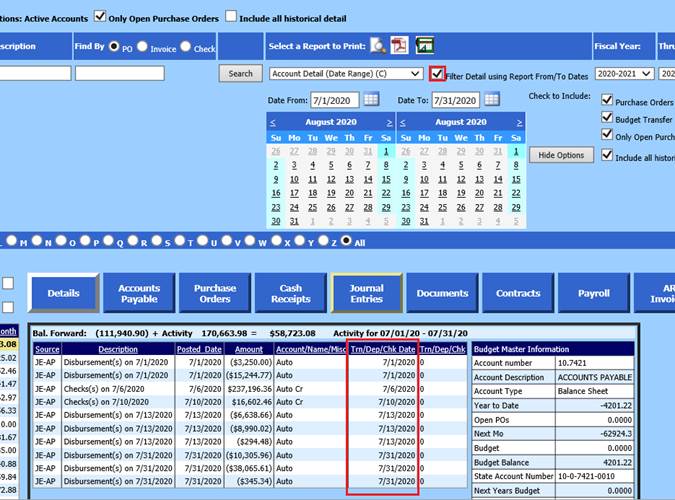
23. After your account is selected, any associated areas will be bold to select detail information. Here the account has Journal Entries. Select the Journal Entries button to display Details.

24. The Journal Entries will display and may be sorted
by selecting a title in the grid. Select Detail to display the Journal
Entry, etc.
Reporting
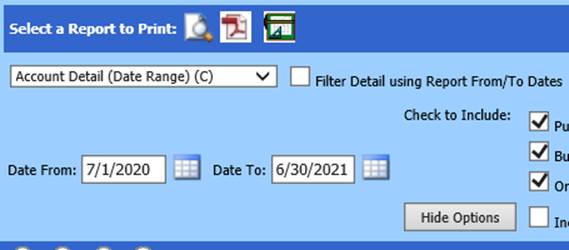
To print a report, after selecting an account, select a report from the “Select a Report to Print” dropdown.
Account Detail (Date
Range) will display account details for your selected date
range.

Date Aware Historical Report Format will display the old format Look and Browse report with account details for you selected date range.

Account Detail (Historical
Format) will display the old format and
is only used for historical reporting. It is recommended that you use the Date
Aware Historical Report with the date range you would like reported.

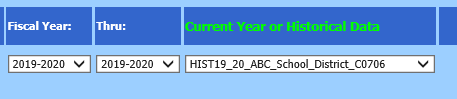
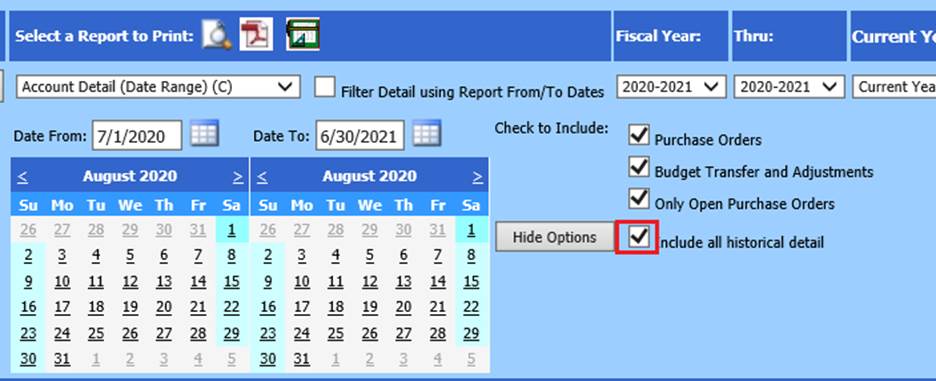
1. Select Fiscal Year: and Thru: Select a range of Years to display using Current Year data.
2. Select Current Year or Historical Data. Select Current Year for active data reporting. This will include adjustments made to accounts after your Fiscal Close. Select a Historical Database from the list to reflect your select Fiscal Close, no adjustments made at a later date will display.
3. Select your date range using the Calendars or
entering in m/d/yyyy format. 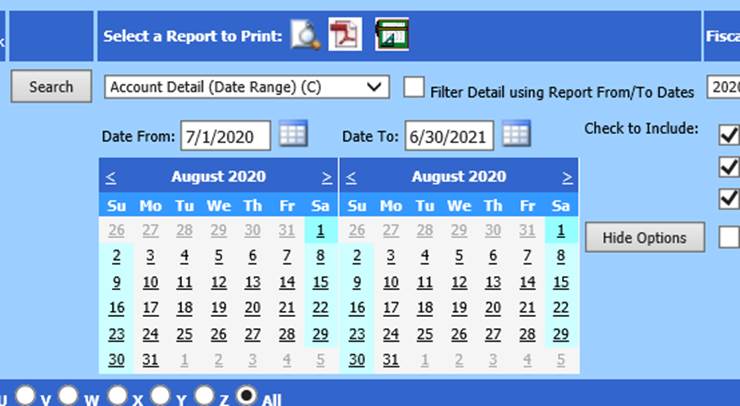
4. Check to include the areas for reporting. Purchase Orders; Only Open Purchase Orders and Budget Transfer and Adjustments.

5. Note: When running the Account Detail report, you have the option to Include all historical detail when viewing Current Year data, select this option to run your report with all data related to this account for the selected date range.
6. Read the information box and select Ok.

7. Select the preview icon  to
display your report in Crystal Report format or to print PDF, select
to
display your report in Crystal Report format or to print PDF, select

8. Select Hide Options to remove from display.
9. Load Activity into an Excel Spreadsheet
10. Select the Excel button  and a report will be created for you to
export into Excel. When the report is created an Open Worksheet
and a report will be created for you to
export into Excel. When the report is created an Open Worksheet  button
replace the Excel button. Select the Open Worksheet button and select from the
following options to Open, Save or Save As.
button
replace the Excel button. Select the Open Worksheet button and select from the
following options to Open, Save or Save As.

11. Select Open to display. The report will display in Excel. You may view, adjust, and save the report.
12. Select Save, the report will save in a download area, the box below will display. From here you may open the document, open the download folder or view your download and save.

13. Save as, navigate to the location of your choice, name and save your document.
To Filter Detail using Report From/To Dates
Using the option “Filter Detail using Report From/To Dates will narrow down date search selection for reporting and viewing in the details listed